# Developer Platform

Welcome to your team’s developer platform

<h2 align="center">Spaces - Developer platform template</h2>

<p align="center">Welcome to your team’s new developer platform</p>

<p align="center"><a href="http://app.gitbook.com/join" class="button primary">Sign up</a> <a href="http://app.gitbook.com/join" class="button secondary">Log in</a></p>

<table data-view="cards"><thead><tr><th></th><th></th><th></th><th data-hidden data-card-target data-type="content-ref"></th><th data-hidden data-card-cover data-type="files"></th></tr></thead><tbody><tr><td><h4><i class="fa-leaf">:leaf:</i></h4></td><td><strong>No code</strong></td><td>Get started with the developer platform in 5 minutes.</td><td><a href="/spaces/TDW1ZRM19YbdZGIPdh3j">/spaces/TDW1ZRM19YbdZGIPdh3j</a></td><td><a href="/files/LHIOZGoI6dPF36TuRaxH">/files/LHIOZGoI6dPF36TuRaxH</a></td></tr><tr><td><h4><i class="fa-server">:server:</i></h4></td><td><strong>Hosted</strong></td><td>Learn more about hosting the developer platform.</td><td><a href="/spaces/TDW1ZRM19YbdZGIPdh3j">/spaces/TDW1ZRM19YbdZGIPdh3j</a></td><td><a href="/files/IaUMODRBBSBL8eUaPX09">/files/IaUMODRBBSBL8eUaPX09</a></td></tr><tr><td><h4><i class="fa-terminal">:terminal:</i></h4></td><td><strong>API reference</strong></td><td>Browse, test, and implement APIs.</td><td><a href="/spaces/Lmzpees5tc2J1R4yFEZa">/spaces/Lmzpees5tc2J1R4yFEZa</a></td><td><a href="/files/ebMoLMpZFyLqpzByuzrk">/files/ebMoLMpZFyLqpzByuzrk</a></td></tr></tbody></table>

{% columns %}
{% column %}

### Get started in 5 minutes

Setting up your first API call should be the easiest part of getting started. With clear endpoints, copy-paste-ready examples, and quick authentication, you’ll be up and running in minutes—not hours.

No guesswork, no complexity—just your first successful call, fast.

<a href="/spaces/TDW1ZRM19YbdZGIPdh3j" class="button primary" data-icon="rocket-launch">Get started</a> <a href="/spaces/Lmzpees5tc2J1R4yFEZa" class="button secondary" data-icon="terminal">API reference</a>
{% endcolumn %}

{% column %}
{% code title="index.js" overflow="wrap" %}

```javascript
// Import the SDK
import ExampleAPI from "example-api";

// Initialize the client
const client = new ExampleAPI({ apiKey: "YOUR_API_KEY" });

// Send your first message
const response = await client.messages.send({
  message: "Hello, world!"
});

```

{% endcode %}
{% endcolumn %}
{% endcolumns %}

{% columns %}
{% column %}

<figure><img src="https://gitbookio.github.io/onboarding-template-images/placeholder.png" alt=""><figcaption></figcaption></figure>
{% endcolumn %}

{% column %}

### Learn more about the developer platform

Read guides, watch tutorials, and learn more about working with the developer platform and integrating it with your own stack.

<a href="/spaces/UaVe0UW73HTSTN5P02Ry" class="button primary" data-icon="book-open">Guides</a> <a href="/spaces/TDW1ZRM19YbdZGIPdh3j" class="button secondary" data-icon="book">Documentation</a>
{% endcolumn %}
{% endcolumns %}

<h2 align="center">Join a community of over 3,000 developers</h2>

<p align="center">Join our Discord community or create your first PR in just a few steps.</p>

<table data-card-size="large" data-view="cards"><thead><tr><th></th><th></th><th></th><th></th><th data-hidden data-card-cover data-type="files"></th></tr></thead><tbody><tr><td><h4><i class="fa-discord">:discord:</i></h4></td><td><strong>Discord community</strong></td><td>Join our Discord community to post questions, get help, and share resources with over 3,000 like-minded developers.</td><td><a href="https://www.gitbook.com/" class="button secondary">Join Discord</a></td><td></td></tr><tr><td><h4><i class="fa-github">:github:</i></h4></td><td><strong>GitHub</strong></td><td>Our product is 100% open source and built by developers just like you. Head to our GitHub repository to learn how to submit your first PR.</td><td><a href="https://www.gitbook.com/" class="button secondary">Submit a PR</a></td><td></td></tr></tbody></table>


# 跳板机 NextCLi JumpServer


# NextCLi跳板机介绍

有问题请联系客服 https\://t.me/NextCLiBOT

### 几句话看懂跳板机的优势：

* 您通过跳板机连远程服务器，远程服务器上只有跳板机的IP；
* 远程服务器上可以限制仅限跳板机的IP链接，这样即使知道服务器密码，也无法登录；
* 跳板机系统可以设置计划任务，清理服务器日志，清理您的连接记录；
* 开启VPN、机场再连接跳板机系统，跳板机系统上就只有代理IP的记录；
* 跳板机也可以绑定域名、可以再套上一层CDN，可以通过CDN/宝塔来限制仅限哪些地区/白名单IP访问跳板机；

### 跳板机用法示例图：

![跳板机的定位和用法](/files/hRNh9RXMh9vbHkQezJ6w)

* 【运维/研发人员】可以通过跳板机更安全的连接服务器；
* 【业务/客服人员】可以通过跳板机连接另外的Windows桌面进行远程操作；
* 可以创建多账号，为每个账号单独分配资源；

<mark style="background-color:red;">【同时购买跳板机服务器+Windows服务器，请告知客服为您组建内网，让跳板机连内网更快速、稳定】</mark>

## NextCLi跳板机介绍

&#x20;   NextCLi 跳板机系统支持 Windows RDP (网页版远程桌面)、Linux SSH、VNC、Telnet、Kubernetes 等协议，可以自定义账户密码，也可以先创建授权凭证，添加资产时再选择该授权凭证，动态指令可以批量操作多台SSH资产，也可以在操作单台资产时单独使用已添加的指令，方便输入一些复杂指令，接入网关是使用SSH设备作为跳板机访问隐藏在该台设备后面的资产。

* 简单来说：

&#x20;       **更稳定**：<mark style="color:red;">本机连接Windows桌面，会有大量RDP协议长时间大流量通信，会被各种防火墙监测、劫持。而通过NextCLi跳板机的Web端访问远程Windows桌面，走的是浏览器http通信、网页渲染，更加安全、便捷</mark>。

&#x20;         **更安全**：<mark style="color:red;">本地不直接链接服务器，通过跳板机的IP连接服务器；还可以在服务器上限制只允许跳板机的IP才可以访问服务器。服务器上只有跳板机IP的连接记录；跳板机可以设置计划任务定时删除服务器上的日志、连接记录。</mark>

* 管理后台支持随时重装跳板机系统，重装前请先备份数据；
  1. NextCLi跳板机文档见本页左侧导航；
  2. [如何为NextCLi跳板机绑定域名并使用https进行加密访问>>](/jumpserver/nextcli-domain)&#x20;

### 更多详细介绍见下列链接：

{% content-ref url="/pages/uUNoGltAGdZYSYF50scn" %}
[资产列表](/jumpserver/list)
{% endcontent-ref %}

{% content-ref url="/pages/q3F9KGU4EsBqjJjqYXen" %}
[授权凭证](/jumpserver/credential)
{% endcontent-ref %}

* [远程链接Windows桌面](https://docs.nextcli.com/jumpserver/list#windows-rdp)
* [远程连接Linux SSH](https://docs.nextcli.com/jumpserver/list#linux-ssh)

{% content-ref url="/pages/ZF8g8kAsLbNMGSXyVkFl" %}
[动态指令](/jumpserver/dynamic-command)
{% endcontent-ref %}

{% content-ref url="/pages/bfygk4iXWQOTGLqtspyu" %}
[接入网关](/jumpserver/access-gateway)
{% endcontent-ref %}

{% content-ref url="/pages/W5GuiyTaS7JB8Pjvc9V0" %}
[如何为NextCLi跳板机绑定域名](/jumpserver/nextcli-domain)
{% endcontent-ref %}

## 控制面板

### 登录系统 <a href="#deng-lu-xi-tong" id="deng-lu-xi-tong"></a>

跳板机系统已内置到 NextCLi 系统内，安装好该系统即可使用；

地址：<http://ip:8088>

默认账户：admin

默认密码：admin

<mark style="color:red;">如果安装宝塔，请在</mark> [<mark style="color:blue;">宝塔面板</mark>](https://www.hostcli.com)<mark style="color:red;">-安全 中放行8088端口</mark>；

如果需要绑定域名，请参考 [如何为NextCLi跳板机绑定域名>>](/jumpserver/nextcli-domain)&#x20;

![](/files/M93DMIQlAxhmnV7mlJ9g)

普通登录有效时间为2小时，在此期间使用系统会自动续期，在无操作2小时之后再使用需重新登录系统。

记录登录有效时间为14天，其他逻辑与普通登录一致。

在连续登录失败5次后，系统会对账号进行锁定5分钟，在此期间该账户无法进行登录。

### 控制面板

控制面板页面展示了在线会话、资产数量、授权凭证、在线会话等数据信息。

![](/files/0aARn67xI5oYtvUzU6Ki)


# 资产列表

有问题请联系客服 https\://t.me/NextCLiBOT

## 资源管理 <a href="#zi-yuan-guan-li" id="zi-yuan-guan-li"></a>

资源管理主要分为资产、授权凭证、指令、接入网关四个部分。其中资产支持RDP、SSH、VNC、Telnet、Kubernetes协议，可以自定义账户密码，也可以先创建授权凭证，添加资产时再选择该授权凭证，动态指令可以批量操作多台SSH资产，也可以在操作单台资产时单独使用已添加的指令，方便输入一些复杂指令，接入网关是使用SSH设备作为跳板机访问隐藏在该台设备后面的资产。

<mark style="background-color:red;">【同时购买跳板机服务器+Windows服务器，请告知客服为您组建内网，让跳板机连内网更快速、稳定】</mark>

## 资产管理 <a href="#zi-chan-guan-li" id="zi-chan-guan-li"></a>

支持使用名称、IP、标签、协议作为筛选条件进行查询。

![](/files/oUV46c15Z3hlUMJ5zwBn)

## **Windows** RDP 资产——远程桌面 <a href="#windows-rdp" id="windows-rdp"></a>

在新增RDP资产时，除了常见的账户密码外，还支持使用域作为身份认证的参数。

<mark style="color:red;">无特殊需求/不懂怎么操作的情况下，只需要填写带 \* 的信息即可，不需要使用 RemoteApp高级功能；</mark>&#x20;

### **RemoteApp(一般情况下，无需使用该高级功能)**

**RemoteApp 功能可以限制只允许访问目标资产上的某一个程序**，但并不是任意 Windows 操作系统都支持的，另外开启 RemoteApp 方法较为复杂，推荐使用 用 [RemoteApp Tool](https://github.com/kimmknight/remoteapptool) 配置。

配置好RemoteApp之后，在添加资产时输入对应的参数：

* **程序** : 填写英文 `||` 加上可执行文件去掉后缀的名称。
* **工作目录** : 填写全路径加上可执行文件的全称。
* **参数** : 填写Remote App的命令行参数。

![在添加RDP资产时，右侧Remote APP添加该资产Windows中 Remote App 的安装路径。](/files/6EO7FD3c0IejvcaXoiaJ)

![设置之后即可实现只允许访问上图示例 Remote Ap 中的两个程序。](/files/tQbdnpUYCVMLHiPwPkau)

### **网络驱动**

由于无法做到像微软官方的远程桌面那样使用复制粘贴来传输文件，所以使用了网络挂载盘的方式来上传下载文件，开启此功能需要新增或修改资产时启用设备映射。

![](/files/MCunfJS53N90MoU73jsi)

![](/files/RbPwYXuepLVuKibeKri4)

该功能入口在连接上Windows服务器后右上角浮动；

![](/files/hHBAHtsPcSh1CQsO0ImA)

## Linux SSH 资产 <a href="#linux-ssh" id="linux-ssh"></a>

在新增RDP资产时，可以手动选择使用Guacd或者原生模式访问目标资产，原生模式是通过NextCLi直接访问目标资产，优点是占有资源小。

![](/files/9ssoBckiAi7ps9yGyOq6)

如果使用连接模式guacd无法连接，请尝试选择远程、保存后再次连接；

![连接成功示例；相关功能在右侧。](/files/PqavcQRZm8FOE0ypY28x)

## 服务器实时状态信息 <a href="#monitor" id="monitor"></a>

![](/files/0QTOiUkTaStTDfobIAwl)

<br>


# 子账号分配服务器资源

有问题请联系客服 https\://t.me/NextCLiBOT

<mark style="background-color:red;">【同时购买跳板机服务器+Windows服务器，请告知客服为您组建内网，让跳板机连内网更快速、稳定】</mark>

### 一、资源管理-资产列表-添加所有Linux、Windows机器：

{% content-ref url="/pages/uUNoGltAGdZYSYF50scn" %}
[资产列表](/jumpserver/list)
{% endcontent-ref %}

参考该链接添加Windows、Linux机器到资产列表

### 二、用户管理中添加用户：

![](/files/AXWBy0IgxTfAhtrzp88Y)

添加用户-资产授权，即可为该用户分配这些资源，即该用户智能看到授权的资产，其他的看不到；

### 三、为用户分配资源：

![](/files/PiLf3oJW2RGqEL8iMUrs)

添加完成后，请尝试换游客模式的浏览器登录该账号进行验证；


# 授权凭证

有问题请联系客服 https\://t.me/NextCLiBOT

## 授权凭证 <a href="#credential" id="credential"></a>

授权凭证是统一管理账号密码的功能，在添加授权凭证之后，新增资产时选择账户类型为：授权凭证，即可在下方的授权凭证处选择已添加好的账号密码，便于复用。

![](/files/f1K4q5S0RkJp3TGCE0cA)

![](/files/qwPh7T22VQzPIOoZlGQM)


# 动态指令

有问题请联系客服 https\://t.me/NextCLiBOT

## 动态指令 <a href="#dynamic-command" id="dynamic-command"></a>

动态指令可以批量执行并实时查看结果，不仅支持预先定义好的指令，并支持实时下发输入的指令。

![](/files/BuaZPLJUrY3EJptDa0WW)

![](/files/u6lXaQ16YNy4BtIbmODj)

![](/files/HmGTrX49psmlRHle9Fib)

动态指令的另一种表现形式为在打开一个ssh终端后可以选择已录入指令进行执行：

![](/files/0B5hKVVyqdyPcj2qELa3)


# 接入网关

有问题请联系客服 https\://t.me/NextCLiBOT

## 接入网关 <a href="#access-gateway" id="access-gateway"></a>

接入网关是用于访问隐藏在某一个SSH主机后面的设备，NextCLi 所在服务器无法直接访问目标资产，只有这台SSH主机可以访问。

其原理是SSH隧道功能，在访问目标资产时需要将目标资产先映射到 NextCLi 所在服务器上的某一个端口上，因此本地映射地址最好不要设置为公网IP，以防被不法分子入侵。

本地映射地址为空时会自动设置为 localhost 这个本地环回主机名称，当guacd服务和 NextCLi 服务不在同一台主机上时需要设置为IP地址或主机名称（前提是guacd所在服务器可以访问到此主机名称）。

使用 docker-compose 安装的服务需要把本地映射地址设置为 `nextcli`，docker容器在内部已经做过了dns映射，因此设置为容器名称即可。

![](/files/fUXS86uQNaESVjxpYPvR)

![](/files/z3AbPjbzbLtEygJdBonq)


# 跳板机安全设置

有问题请联系客服 https\://t.me/NextCLiBOT

### 个人电脑本机开启v2ray/trojan代理再访问跳板机系统 <a href="#v2ray" id="v2ray"></a>

* 自己的电脑开启VPN、Clash等软件的全局代理，推荐使用香港IP，这样跳板机记录的登录日志就只是代理IP，而非本人真实IP地址；

### 为工作机/Windows开启v2ray/trojan代理再访问外网 <a href="#v2ray" id="v2ray"></a>

* 接入跳板机系统的Windows里，运行VPN或机场Clash代理，这样Windows访问的网站也只能记录Win里登录的VPN的IP；

### 为[跳板机系统绑定域名](/jumpserver/nextcli-domain)，甚至为该域名开启CloudFlare、或其他CDN <a href="#domain" id="domain"></a>

{% content-ref url="/pages/W5GuiyTaS7JB8Pjvc9V0" %}
[如何为NextCLi跳板机绑定域名](/jumpserver/nextcli-domain)
{% endcontent-ref %}

### 经常手动删除跳板机的登录日志列表 <a href="#delete-jumpserver-log" id="delete-jumpserver-log"></a>

![](/files/N516p7to5QpchxLgqmsq)

也可以通过计划任务+命令，自动删除本机和远程机器的日志，见下文：

### 计划任务+删除登录日志 <a href="#delete-log" id="delete-log"></a>

![注意，资产选择默认是全部，请根据自己实际情况做自定义选择。](/files/jGW0YtzUL63wMUlPYH4Q)

* 截图为CentOS删除登录日志方法，其他版本请自行Google搜索；
* corn表达式，附常用公式，辅助工具：[在线工具A](https://www.matools.com/cron) [在线工具B](https://tool.lu/crontab/)&#x20;
  * 5分钟执行一次：0 \*/5 \* \* \* ?

[CentOS7 系统清空删除系统日志的方法>>](https://cloud.tencent.com/developer/article/1969592) 将代码放到跳板机、宝塔计划任务内即可。

其他系统日志请网上查询，或咨询ChatGPT、Google Gemini等AI.

{% tabs %}
{% tab title="通用命令" %}
通用清理命令（CentOS 9、Ubuntu 22、Debian 12均适用）

```bash
# 清理登录日志
echo "" > /var/log/wtmp
echo "" > /var/log/btmp
echo "" > /var/log/lastlog

# 清理用户历史命令日志
history -c
echo "" > ~/.bash_history
echo "" > /root/.bash_history

# 清理系统日志（syslog 或 rsyslog）
find /var/log -type f -name "*.log" -exec truncate -s 0 {} \;
```

{% endtab %}

{% tab title="CentOS 9" %}

```bash
#!/bin/bash
# 清理 CentOS 9 登录日志和命令历史

# 清空登录日志文件
: > /var/log/wtmp 2>/dev/null
: > /var/log/btmp 2>/dev/null
: > /var/log/lastlog 2>/dev/null

# 清空当前用户和 root 用户的命令历史文件
: > ~/.bash_history 2>/dev/null
: > /root/.bash_history 2>/dev/null
```

{% endtab %}

{% tab title="Ubuntu22" %}

```bash
#!/bin/bash
# 清理 Ubuntu 22 登录日志和命令历史

# 清空登录日志文件
: > /var/log/wtmp 2>/dev/null
: > /var/log/btmp 2>/dev/null
: > /var/log/lastlog 2>/dev/null

# 清空当前用户和 root 用户的命令历史文件
: > ~/.bash_history 2>/dev/null
: > /root/.bash_history 2>/dev/null
```

{% endtab %}

{% tab title="Debian12" %}

```bash
#!/bin/bash
# 清理 Debian 12 登录日志和命令历史

# 清空登录日志文件
: > /var/log/wtmp 2>/dev/null
: > /var/log/btmp 2>/dev/null
: > /var/log/lastlog 2>/dev/null

# 清空当前用户和 root 用户的命令历史文件
: > ~/.bash_history 2>/dev/null
: > /root/.bash_history 2>/dev/null
```

{% endtab %}
{% endtabs %}

```
cat /dev/null > /var/log/boot.log
cat /dev/null > /var/log/btmp
cat /dev/null > /var/log/cron
cat /dev/null > /var/log/dmesg
cat /dev/null > /var/log/firewalld
cat /dev/null > /var/log/grubby
cat /dev/null > /var/log/lastlog
cat /dev/null > /var/log/mail.info
cat /dev/null > /var/log/maillog
cat /dev/null > /var/log/messages
cat /dev/null > /var/log/secure
cat /dev/null > /var/log/spooler
cat /dev/null > /var/log/syslog
cat /dev/null > /var/log/tallylog
cat /dev/null > /var/log/wpa_supplicant.log
cat /dev/null > /var/log/wtmp
cat /dev/null > /var/log/yum.log
```

### 修改默认密码、开启双重认证 <a href="#change" id="change"></a>

![](/files/95U6SdgfS8uLmYgF9AZE)

二步验证通常使用谷歌身份验证器Google Authenticator，但是不能备份导出；

建议使用微软Authenticator iPhone支持备份数据到iCloud；

Chrome插件 [身份验证器](https://chrome.google.com/webstore/detail/authenticator/bhghoamapcdpbohphigoooaddinpkbai)，支持备份导出数据；

### Windows机器仅限跳板机的IP访问远程桌面 <a href="#only-jumpserver-ip" id="only-jumpserver-ip"></a>

[Windows中限制IP远程桌面登录的方法>>](https://blog.csdn.net/baidu_38844729/article/details/103135246)

[windows2012通过本地安全策略限制远程登录的IP地址>>](https://blog.csdn.net/weixin_51928617/article/details/122496754)

[windows10专业版指定IP地址远程桌面访问（IP安全策略）>>](https://blog.csdn.net/qq_42177204/article/details/87800701)


# 如何为NextCLi跳板机绑定域名

有问题请联系客服 https\://t.me/NextCLiBOT

## 一、NextCLi跳板机系统绑定域名 <a href="#nextcli-domain" id="nextcli-domain"></a>

* 默认安装完NextCLi系统后， 使用 <http://IP:8088> 即可访问跳板机，通过遗下4步即可使用https+域名，如：<https://demo.nextcli.com> 加密访问跳板机；

1、安装宝塔纯净版 <https://www.hostcli.com/>&#x20;

Centos 7.6 全新安装命令：

```
yum install -y wget && wget -O install.sh http://v7.hostcli.com/install/install_6.0.sh && sh install.sh
```

2、网站 --> 新加站点 --> 添加域名，并将域名指向本服务器IP

&#x20;     如未安装Nginx，请先安装后再创建站点，如图：

![](/files/CXb7PK7wKsjn5548GkK7)

<mark style="color:red;">**如果需要原来的 <http://ip:8088> 可以继续访问，需要在宝塔->安全中放行8088端口；**</mark>

&#x20;<mark style="color:red;">**因为宝塔默认没有放行这个端口**</mark>。

3、如果需要开启HTTPS，请在上述站点 SSL证书处，申请免费证书即可；[申请宝塔免费证书教程>>](https://docs.gfwvip.com/#step5)

<mark style="color:green;">如果该域名使用的解析（如：CloudFlare）包含SSL，则此处无需再申请证书即可直接使用https访问反代的域名，如：</mark> <mark style="color:green;"></mark><mark style="color:green;">**https**</mark><mark style="color:green;">://demo.nextcli.com</mark>

* <mark style="color:green;">**不建议开启CloudFlare等CDN**</mark><mark style="color:green;">，因为NextCLi跳板机使用最优质的香港线路，访问速度非常快，再套上CDN只会降低访问速度。</mark>
* 文件验证、DNS验证两种方式均可申请，文件验证最方便，只需要把域名解析到当前服务器IP即可，需要先把域名解析到本台服务器IP

![两种方式均可申请，需要先把域名解析道本台服务器IP](https://files.gitbook.com/v0/b/gitbook-x-prod.appspot.com/o/spaces%2FjiR3t04ay90Ea9V3I6ju%2Fuploads%2FpnP6cPx3WPWMGbUw5Vmn%2Fimage.png?alt=media\&token=79972af4-e1ea-40fe-8497-15cad8facc80)

* 跳板机本身就是相对干净、安全的机器IP，也不用来建站，一般没必要再套一层CDN代理。
* 特别不建议给该域名(如图示例中的 “demo.nextcli.com” ) 开启CloudFlare的免费代理CDN，因为CF的CDN是美国IP，会绕道美国，严重拖慢速度。
* 如果想要更安全，可以在Windows里再开一个VPN或者Clash、机场等，这样出口IP就是VPN的IP；

4、站点设置 --> 反向代理 --> 添加反向代理：

&#x20;   <mark style="color:red;">**开启代理**</mark>

&#x20;   目标URL：<mark style="color:red;">**<http://127.0.0.1:8088>**</mark>

![](/files/iBXbFk6gHmixemDaK8y4)

5、保存反向代理后，编辑 **该反向代理的【配置文件】**，在18行处添加以下三行，然后保存。

&#x20;    宝塔7.9以上的新版本nginx1.2以后的版本可能已经有这3行在11～13行，无需再添加。

> <mark style="color:red;">proxy\_http\_version 1.1;</mark>
>
> <mark style="color:red;">proxy\_set\_header Upgrade $http\_upgrade;</mark>
>
> <mark style="color:red;">proxy\_set\_header Connection "upgrade";</mark>

![](/files/EHF06N5swu0uvYR2OUlE)

到此位置，已经可以打开 <https://demo.nextcli.com> ，不需要使用 <http://IP:8088> 进行访问跳板机

### 二、为域名开启CDN

域名开不开CDN无所谓，虽然多套一层代理更安全，<mark style="color:orange;">**在国内的用户不推荐给网站开CDN，会很慢**</mark>；

因为跳板机系统主要是香港IP线路，可以给您电脑本地[使用香港VPN、机场代理访问](/jumpserver/security#v2ray)跳板机即可；

{% tabs %}
{% tab title="CloudFlare" %}

#### 开启代理 <a href="#open-cf" id="open-cf"></a>

即为使用CloudFlare的免费CDN，免费版一般是美国IP，国内打开速度较慢，请根据自己情况是否开启或关闭；

![ 开启勾选、保存即可](/files/PWmufvgOLgZ8k174t4Rb)

#### 关闭代理 <a href="#off-cf" id="off-cf"></a>

关闭即不使用CF的网址，域名直接指向真实IP。

![取消代理状态后，点击保存即可](/files/Xqu5eRDbWN76I1yHemvO)
{% endtab %}

{% tab title="其他云服务器CDN" %}
参考其他CDN厂商、客服的教程自行开启；
{% endtab %}
{% endtabs %}


# 跳板机读取剪贴板/复制/粘贴

有问题请联系客服 https\://t.me/NextCLiBOT

为方便本地和跳板机之间复制粘贴内容，跳板机本身是具备复制、剪贴功能的。

* 跳板机连接Linux服务器应该无需此设置；
* 跳板机连接Windows可能需要跳板机有https权限，参考以下文档安装宝塔：

{% hint style="info" %}

* [如何为NextCLi跳板机绑定域名？](https://docs.nextcli.com/jumpserver/clipboard)
* [如何获取证书？](https://docs.gfwvip.com/#step5)
  {% endhint %}

***

#### 一、系统提示：

1.1、首次打开跳板机链接Windows等服务器时，浏览器会弹出提示获取剪贴板权限，请【允许】。

{% hint style="info" %}
需要使用 https\:// 访问跳板机，才能获取剪贴板权限，http\:// 无法获取；

建议为[跳板机绑定域名并申请证书](/jumpserver/nextcli-domain)，即可实现<https://域名> 访问跳板机。
{% endhint %}

<figure><img src="/files/QoYWvcmKWqAADjxeAx68" alt=""><figcaption><p>点击【允许】获取剪贴板权限</p></figcaption></figure>

1.2、如果首次不小心点击了【禁止】，或忘记设置，可以在连接远程桌面时，在本地浏览器输入框的右侧有一个 剪贴板图标📋 ，点击即可设置为【始终允许】；

<figure><img src="/files/l3eetBygpO126Gg8FZxd" alt=""><figcaption></figcaption></figure>

***

#### 二、人工允许剪贴板权限

如果没有上述提示，请按照下文步骤开启剪贴板权限：

<figure><img src="/files/TKCBAXfWe9xatM5KFSsB" alt=""><figcaption><p>找到浏览器设置 --> 隐私和安全 --> 网站设置 --> 剪贴板</p></figcaption></figure>

1、chrome浏览器可以复制该地址，直接在输入框输入，并按下键盘回车键即可打开：

```
chrome://settings/content/clipboard
```

2、然后找到跳板机网址，点击进入后，找到【剪贴板】如图所示，设置为【允许】即可。

<figure><img src="/files/0q41ErcqAtmBsoUoDZ8W" alt=""><figcaption></figcaption></figure>


# NextCLi跳板机找回密码

有问题请联系客服 https\://t.me/NextCLiBOT

适用于2023年10月之后新开/重装跳板机系统；

通过root登录后输入一下命令

```bash
cd /usr/local/nextcli && ./nextcli --reset-password admin
```

或

```
cd /usr/local/nextcli
./nextcli --reset-password admin
```

2023年10月之前的版本，无法找回，请及时在跳板机内导出备份；


# TRX/TRC20靓号地址


# Trx-Trc20靓号地址USDT/USDC

联系客服 https\://t.me/NextCLiBOT

请到 <https://my.nextcli.com/index.php?rp=/store/trx-address> 支付完成后，联系客服 <https://t.me/NextCLiBOT> 索取您自选的靓号地址及密钥；

### [7位Trx-Trc20靓号地址USDT/USDC](https://my.nextcli.com/index.php?rp=/knowledgebase/28/)

### [8位Trx-Trc20靓号地址USDT/USDC](https://my.nextcli.com/index.php?rp=/knowledgebase/29/)

### [9位Trx-Trc20靓号地址USDT/USDC](https://my.nextcli.com/index.php?rp=/knowledgebase/30/)

### [6位Trx-Trc20靓号地址USDT/USDC](https://my.nextcli.com/index.php?rp=/knowledgebase/31/)


# 云平台 Cloud.NextCLi.com

Cloud云平台，旨在为开发者提供一站式开发/运营管理服务！


# 平台介绍

### Cloud.NextCLi.com 云平台介绍 <a href="#intro" id="intro"></a>

* <https://Cloud.NextCLi.com> 是在云计算、AI浪潮下的新形态云服务厂商、开发者一站式服务平台！
* 旨在为企业/开发者提供灵活、高效的解决方案，通过不断的支持更多的新兴业务、尽可能的满足不同的业务需求！
* 迎合时代趋势，支持多种加密货币支付，自助充值、自动到账、即买即用！

### 功能特点 <a href="#features" id="features"></a>

* **前沿服务**：集成AI巨头的API、免费证书、跳板机、APP打包等超多的新兴服务能力！
* **弹性扩展**：根据业务需要随时调整资源配置/升级服务/购买流量套餐等..
* **加密货币支付**：USDT、USDC等数字货币支持！
* **多语言支持**：兼容多种开发语言，方便全球开发者使用。

### 适用场景 <a href="#use-cases" id="use-cases"></a>

适用于需要快速部署、高效管理、灵活扩展云资源的各类企业，无论是初创公司还是大型企业。

### 如何开始 <a href="#get-started" id="get-started"></a>

{% stepper %}
{% step %}

#### 注册账号

&#x20;打开 <https://cloud.nextcli.com/register> 注册账号；
{% endstep %}

{% step %}

#### 选购需要的服务

多种产品、服务供您选择！
{% endstep %}

{% step %}

#### 开通/购买，即刻开启使用！

免费服务直接使用，付费服务在线支付实时启用！
{% endstep %}
{% endstepper %}


# 账户

### 账户注册 <a href="#register" id="register"></a>

支持邮箱+密码注册账号；

### 登录 <a href="#login" id="login"></a>

本站账号为邮箱，您可以用邮箱账号+密码登录，也可以使用邮箱收验证码、Telegram收验证码登录。

{% tabs %}
{% tab title="邮箱+密码登录" %}

* 邮箱+密码登录，如忘记密码，可以使用邮箱收验证/Telegram收验证码的方式登录。
* 亦可使用重置密码修改账号密码。
  {% endtab %}

{% tab title="邮箱收验证码登录" %}

* 邮箱验证码登录作为辅助登录方式，在您忘记密码时可以使用本方式登录。
* 您亦可使用邮箱重置密码；或使用Telegram收验证码登录。
  {% endtab %}

{% tab title="Telegram收验证码登录" %}

* Telegram收验证码登录目前作为辅助登录方式，需要先在个人中心绑定Telegram，并关注机器人 [@NextCLiCLoudBOT](https://t.me/NextCLiCLoudBOT)&#x20;
* 如果Telegram被注销，您可以通过账号邮箱登录网页端个人中心解绑Telegram、换绑新的Telegram。
  {% endtab %}
  {% endtabs %}

### 找回密码 <a href="#reset-password" id="reset-password"></a>

* 修改账号密码，支持邮箱收验证码、Telegram收验证码两种方式；
* Telegram收验证码需要已绑定账号，并且关注机器人 [@NextCLiCLoudBOT](https://t.me/NextCLiCLoudBOT)&#x20;

### 修改密码

登录个人中心->[修改密码](https://cloud.nextcli.com/account/change-password)；

### 两步验证

登录个人中心->[开启两步验证](https://cloud.nextcli.com/account/mfa)；

### 绑定登录Telegram <a href="#link" id="link"></a>

{% tabs %}
{% tab title="Telegram绑定登录" %}

#### 机器人 <a href="#telegram-bot" id="telegram-bot"></a>

[https://t.me/NextCLiCloudBOT](#support-commands)&#x20;

#### 账号绑定Telegram <a href="#link-telegram" id="link-telegram"></a>

平台账号绑定Telegram，请按照网站个人中心的示意操作将绑定码发给机器人，即可完成绑定；

#### 账号解绑Telegram <a href="#unlink-telegram" id="unlink-telegram"></a>

1. 通过网站个人中心解绑Telegram；
2. 您也可以通过Telegram命令解绑，见下文 /unlink 命令。

#### [@NextCLiCloudBOT](https://t.me/NextCLiCloudBOT) 现已支持的命令： <a href="#support-commands" id="support-commands"></a>

<table><thead><tr><th width="162">命令</th><th>命令说明</th></tr></thead><tbody><tr><td><a href="https://t.me/NextCLiCloudBOT?start&#x26;text=/start">/start</a></td><td>查看机器人使用说明</td></tr><tr><td><a href="https://t.me/NextCLiCloudBOT?start&#x26;text=/account">/account</a></td><td>查看账户详情、获取绑定的账号邮箱</td></tr><tr><td><a href="https://t.me/NextCLiCloudBOT?start&#x26;text=/get_id">/get_id</a></td><td>获取Telegram ID、Chat ID、群组ID等信息</td></tr><tr><td><a href="https://t.me/NextCLiCloudBOT?start&#x26;text=/link">/link</a> 6位绑定码</td><td>Telegram侧绑定账号，命令有空格间隔，如：<mark style="background-color:purple;">/link 123456</mark></td></tr><tr><td><a href="https://t.me/NextCLiCloudBOT?start&#x26;text=/unlink">/unlink</a> 邮箱</td><td>Telegram侧解绑账号，命令有空格间隔，如：<mark style="background-color:red;">/unlink name@mail.com</mark></td></tr><tr><td><a href="https://t.me/NextCLiCloudBOT?start&#x26;text=/help">/help</a></td><td>查看平台帮助文档</td></tr><tr><td><a href="https://t.me/NextCLiCloudBOT?start&#x26;text=/kefu">/kefu</a></td><td>获取客服联系方式</td></tr><tr><td>-</td><td>正在支持更多命令，详见机器人内 /start</td></tr></tbody></table>
{% endtab %}
{% endtabs %}

### 两步验证 <a href="#mfa" id="mfa"></a>

* 两步验证码为`6位纯数字`；
* 密钥/恢复码仅能绑定一次，每次解绑两步验证后，系统会为用户分配新的两步验证密钥；
* `请备份系统分配的恢复码`，以便在两步验证软件损坏/手机遗失等极端情况下，可以快速将密钥/恢复码导入新的两步验证软件中继续使用。

#### 如何重置两步验证? <a href="#how-to-reset-mfa" id="how-to-reset-mfa"></a>

如遇两步验证的密钥/恢复码无法找回、手机故障无法查看两步验证码等极端情况，请提供以下至少两种不同的证明给管理员，协助清理两步验证：

1. 充值转账记录截图（钱包/交易所转账记录截图）；
2. 登录邮箱，以`NextCLi`为关键词搜索邮件，将搜索结果页面截图，图片不得小于1080px，即需要浏览器全屏截图；
3. 绑定的Telegram，与 [@NextCLiCloudBOT](https://t.me/NextCLiCloudBOT) 的聊天记录；
4. 该账号下正在使用NextCLi业务、资产的使用截图、视频。

发送邮件给管理员邮箱 <img src="/files/cXjEag0UbEU10nw3Zn5S" alt="" data-size="line">

### 操作日志 <a href="#log" id="log"></a>

这里包括了您从注册、每次登录（包括具体登录方式）、退出账号、重置、消费等行为记录。


# 充值/支付

https\://cloud.nextcli.com/  人工客服 https\://t.me/NextCLiCloudBOT

## 👩‍💻NextCLi.com 支持的币种 <a href="#nextcli" id="nextcli"></a>

* NextCLi.com **现已支持加密货币支付** <img src="/files/WH36N5VnopXGC3e35uR4" alt="" data-size="line"><mark style="color:green;">**USDT**</mark>、<img src="/files/nAkPC39EYlByn3TvppTQ" alt="" data-size="line"><mark style="color:purple;">**USDC**</mark>；
  * 支持 <img src="/files/34af5Ndw89ZTgCFShTOG" alt="" data-size="line">波场<mark style="color:red;">**TRC20**</mark> 和 <img src="/files/TnilhkbMFBQeqqruSFxq" alt="" data-size="line">以太坊<mark style="color:blue;">**ERC20**</mark> 网络的<mark style="color:green;">**USDT**</mark>和<mark style="color:purple;">**USDC**</mark>；
* **暂不支持**：BUSD币安链USD、BNB币安币、BTC比特币、TRX波场、ETH以太坊；

{% tabs %}
{% tab title="🏧自助在线充值" %}

* 您可以在线充值、转币、实时到账、系统会自动将充值金额添加到您的账户余额；
  * 自助充值通常在几分钟内即可完成；
  * **如果是交易所提币，可能会被交易所审核 或 链上拥堵导致超过一两个小时才能到账**，强烈推荐走[人工充值>>](#ren-gong-chong-zhi)
  * 如遇转币后未到账：
    * 请耐心等待到账，直到账单超时；
    * 账单已超时过期，且仍未到账的情况下，再联系[人工客服](#ren-gong-chong-zhi)获取帮助。
* 如果在充值账单有效时间结束后，仍未到账，请提供：
  * **1、充值账单页面截图(包含充值单号)**
  * **2、钱包转账截图(转帐交易哈希hash)** 等证明给人工客服 <img src="/files/XJyGmkpEBHdFTxl0tYqj" alt="" data-size="line">[@NextCliCloudBOT](https://t.me/NextCLiCloudBOT)

    {% endtab %}

{% tab title="👤人工充值" %}

* 人工充值通常客服较忙，响应较慢，请优先使用[自助在线充值>>](#zi-zhu-zai-xian-chong-zhi)
* 人工客服充值步骤：
  * 1、联系人工客服 <img src="/files/XJyGmkpEBHdFTxl0tYqj" alt="" data-size="line"> [@NextCLiCloudBOT](https://t.me/NextCLiCloudBOT) 获取最新的人工充值地址(地址不定期会变，请先联系客服确认)；
  * 2、转帐给人工充值地址；
  * 3、您需要提供**钱包转账截图(转帐交易哈希hash)**、**本次要充值到的账号邮箱**；
  * 4、人工客服为您生成充值账单并入账到您的余额。
    {% endtab %}
    {% endtabs %}

### 🔎充值情况说明 <a href="#list" id="list"></a>

* **自助充值时，如果到账金额正确**，系统一般会在几秒内自动入账、充值金额到您的余额；
* **自助充值时，如果到账金额不对**， 需要提供转账证明、充值账单等联系客服，参见  [#ren-gong-chong-zhi](#ren-gong-chong-zhi "mention")&#x20;
* **交易所提币**，请走   [#ren-gong-chong-zhi](#ren-gong-chong-zhi "mention")&#x20;

## 💡如何充值 USDT USDC <a href="#deposit" id="deposit"></a>

### 💰通过钱包转账支付 <a href="#wallet" id="wallet"></a>

* 主流<mark style="color:green;">**USDT**</mark>、<mark style="color:purple;">**USDC**</mark>有ERC20、TRC20等网络协议；
* 亚洲/中国人用的比较多的是<mark style="color:green;">**USDT**</mark>；
* 北美(美国)比较认<mark style="color:purple;">**USDC**</mark>，甚至很多公司不支持<mark style="color:green;">**USDT**</mark>；
* <mark style="color:red;">**NextCLi支持接收ERC20、TRC20网络的**</mark><mark style="color:green;">**USDT**</mark><mark style="color:red;">**和**</mark><mark style="color:purple;">**USDC**</mark>。

#### 转账教程（所有钱包基本都一样）： <a href="#transaction" id="transaction"></a>

* 打开钱包，选择钱包中的<mark style="color:green;">**USDT**</mark>或<mark style="color:purple;">**USDC**</mark>
* 点击「转账」
* 输入收款地址、转账金额
* 完成转账/查看转账详情记录

{% hint style="danger" %}
请在各钱包官网下载钱包，以免下载到盗版引发虚拟币丢失等情况；

✈️ 所有第三方Telegram免翻墙版本等均存在篡改钱包/盗币等情况，请使用官方正版的[Telegram](https://desktop.telegram.org/)&#x20;

&#x20;    点击[将Telegram设置为中文版](https://t.me/setlanguage/zh-hans-beta)；
{% endhint %}

**Chrome浏览器拓展版钱包推荐：可以放到**[<mark style="color:purple;">**跳板机**</mark>](https://my.nextcli.com/index.php?rp=/store/jumpserver)**的Chrome里使用，更加安全、便捷！**

<table><thead><tr><th width="254">钱包名称</th><th width="214">支持的网络协议</th><th>支持的币种和网络</th></tr></thead><tbody><tr><td><a href="https://chrome.google.com/webstore/detail/ibnejdfjmmkpcnlpebklmnkoeoihofec">TronLink</a> 波场钱包 👍</td><td>TRC20的<mark style="color:green;"><strong>USDT</strong></mark>和<mark style="color:purple;"><strong>USDC</strong></mark></td><td><p><mark style="color:green;"><strong>USDT</strong></mark>-TRC20，支持多签</p><p><mark style="color:purple;"><strong>USDC</strong></mark>- TRC20，支持多签</p></td></tr><tr><td><a href="https://chrome.google.com/webstore/detail/metamask/nkbihfbeogaeaoehlefnkodbefgpgknn">MetaMask</a> 小狐狸 👍</td><td>ERC20的<mark style="color:green;"><strong>USDT</strong></mark>和<mark style="color:purple;"><strong>USDC</strong></mark></td><td><p><mark style="color:green;"><strong>USDT</strong></mark>-ERC20</p><p><mark style="color:purple;"><strong>USDC</strong></mark>- ERC20</p></td></tr><tr><td><a href="https://chromewebstore.google.com/detail/trust-wallet/egjidjbpglichdcondbcbdnbeeppgdph">Trust Wallet</a> 币安收购的钱包</td><td>TRC20的<mark style="color:green;"><strong>USDT</strong></mark>和<mark style="color:purple;"><strong>USDC</strong></mark><br>ERC20的<mark style="color:green;"><strong>USDT</strong></mark>和<mark style="color:purple;"><strong>USDC</strong></mark></td><td><p><mark style="color:green;"><strong>USDT</strong></mark>-TRC20</p><p><mark style="color:purple;"><strong>USDC</strong></mark>- TRC20<br><mark style="color:green;"><strong>USDT</strong></mark>-ERC20</p><p><mark style="color:purple;"><strong>USDC</strong></mark>- ERC20</p></td></tr></tbody></table>

{% hint style="warning" %}
截至2025年初，波场的地址多签，只有Tronlink和NextCLi自研钱包支持，其他钱包均未支持；

**NextCLi自己研发的钱包**，后续可能会作为商业付费项目对外销售；
{% endhint %}

### 💱 交易所提币到NextCLi <a href="#ex" id="ex"></a>

#### OKEX、币安等交易所如何购买USDT/USDC，并提币/充值到NextCLi账户？ <a href="#ex-1" id="ex-1"></a>

* 通过交易所买币后提币**可能会被风控**，即买币后24小时内禁止提币，建议至少提前2天买币
* 交易所提币，可能遇到网络拥堵/延时等情况，可能导致到账延时数个小时；

#### 示例：各大交易所的操作流程基本一致，此处以某交易所APP为例： <a href="#example" id="example"></a>

1、没有USDT/USDC，登陆交易所网站 或 APP --> 交易 --> 法币 --> USDT/USDC

&#x20;     选择信誉较好、交易数量较多、价格较低的进行购买USDT/USDC！

2、有USDT/USDC，登陆交易所网站 或 APP --> 账户 --> 选择提币 --> 选择 USDT/USDC

<figure><img src="https://docs.gfwvip.com/~gitbook/image?url=https%3A%2F%2F996571950-files.gitbook.io%2F%7E%2Ffiles%2Fv0%2Fb%2Fgitbook-legacy-files%2Fo%2Fassets%252F-MOWbOMVPRvMDZ8XgO09%252F-MZNnVc2yUG4OPx_WFEz%252F-MZNoU4tVRqkLBR0GxBE%252Fhuobi-tibi.png%3Falt%3Dmedia%26token%3D504daaf0-db54-4b7b-aff4-4984b84f4f19&#x26;width=768&#x26;dpr=4&#x26;quality=100&#x26;sign=9ec6e92d&#x26;sv=2" alt="" width="375"><figcaption><p>在交易所选择提币</p></figcaption></figure>

转账时会从转账数量中扣除手续费；

<mark style="color:red;">请以转账页面底部的【到账数量】为准；否则可能NextCLi收到的金额不对无法入账</mark>。

<figure><img src="https://docs.gfwvip.com/~gitbook/image?url=https%3A%2F%2F996571950-files.gitbook.io%2F%7E%2Ffiles%2Fv0%2Fb%2Fgitbook-legacy-files%2Fo%2Fassets%252F-MOWbOMVPRvMDZ8XgO09%252F-MZNnVc2yUG4OPx_WFEz%252F-MZNojUBc9Jn__Zza6Tk%252Fphoto_2021-04-28%252022.09.29.jpeg%3Falt%3Dmedia%26token%3D9ff4ed81-600e-4bb1-a86a-0886831ab15b&#x26;width=768&#x26;dpr=4&#x26;quality=100&#x26;sign=e9f5140a&#x26;sv=2" alt="" width="188"><figcaption><p>示例：如需转60U，需要转61U 含手续费。</p></figcaption></figure>

End.


# 通知/Telegram通知/邮件通知

### NextCLi Cloud现在已支持多种通知渠道： <a href="#intro" id="intro"></a>

* NextCLi Cloud平台消息通知渠道现已支持Email和Telegram；
* Telegram通知需要先在网站个人中心[绑定Telegram](/cloud/account#telegram-bang-ding-deng-lu)；

### 主要通知行为包括不限于： <a href="#actions" id="actions"></a>

* 账号相关操作通知，收验证码登录、找回密码、登录账号通知等..
* 支付相关：充值通知/服务购买/支付成功等通知
* 服务到期提醒
* 可以直接对话机器人，即可联系人工客服
* 其他重要行为操作通知陆续添加中..


# Telegram BOT机器人

https\://cloud.nextcli.com/bot/

{% hint style="success" %}
[https://Cloud.NextCLi.com](https://cloud.nextcli.com/) 现已支持多种Telegram BOT机器人能力，免费开放给群主、群管理员使用！
{% endhint %}

<table data-view="cards"><thead><tr><th data-type="content-ref"></th><th data-hidden data-card-cover data-type="image">Cover image</th><th data-hidden data-card-target data-type="content-ref"></th></tr></thead><tbody><tr><td><a href="/pages/ucj1xPGnGzBL9uNSnGhI">/pages/ucj1xPGnGzBL9uNSnGhI</a></td><td><a href="/files/hxLESDlWk4Vj5smusuUD">/files/hxLESDlWk4Vj5smusuUD</a></td><td><a href="/pages/ucj1xPGnGzBL9uNSnGhI">/pages/ucj1xPGnGzBL9uNSnGhI</a></td></tr><tr><td><a href="/pages/59he7Dsm8MfGqBa3iuFC">/pages/59he7Dsm8MfGqBa3iuFC</a></td><td><a href="/files/ZY8R7c28sPNLhDixw1YC">/files/ZY8R7c28sPNLhDixw1YC</a></td><td><a href="/pages/59he7Dsm8MfGqBa3iuFC">/pages/59he7Dsm8MfGqBa3iuFC</a></td></tr><tr><td><a href="/pages/QbOjB6mB4txSOyieaFhf">/pages/QbOjB6mB4txSOyieaFhf</a></td><td><a href="/files/xUIt56qobemf1kygxydg">/files/xUIt56qobemf1kygxydg</a></td><td><a href="/pages/QbOjB6mB4txSOyieaFhf">/pages/QbOjB6mB4txSOyieaFhf</a></td></tr><tr><td><a href="/pages/oA55jusbWwYlKlsfXRaW">/pages/oA55jusbWwYlKlsfXRaW</a></td><td><a href="/files/6tmKdSylHUd6bLEdZ4Ac">/files/6tmKdSylHUd6bLEdZ4Ac</a></td><td></td></tr></tbody></table>

{% hint style="success" %}

#### 添加机器人到群组 <a href="#add-to-group" id="add-to-group"></a>

1、打开 群组信息 -> 管理群组 -> 管理员 -> 添加 [@TGHelp](https://t.me/tghelp) 为管理员；

2、编辑权限，给予 **删除消息**/**封禁用户**/**通过链接邀请用户/取消置顶** 等权限，保存。
{% endhint %}

End.


# Telegram群组/频道管理机器人

Telegram Group/Channel Management BOT  https\://t.me/tghelp

{% hint style="danger" %}

### 群管理机器人介绍

* 群管理机器人 [@TGHelp](https://t.me/tghelp) 免费无限开放！
* [Telegram群组/频道管理机器人](/cloud/telegram-bot/telegram-group-channel-management-bot)功能参考、借鉴了业内所有机器人的功能列表，与 [Telegram双向转发客服机器人](/cloud/telegram-bot/telegram-customer-service-bot) [加密货币收/支监控通知机器人](/cloud/telegram-bot/cryptocurrency-notification-bot) 不同，群管理机器人 主要功能是辅助群管理员对群组进行管理、违规信息的识别/删除、封禁恶意群发用户、自定义新成员进群通知、群聊关键词自动回复等功能全部免费开放！
  {% endhint %}

{% hint style="success" %}

#### 使用方法 <a href="#add-to-group" id="add-to-group"></a>

将群管理机器人 [@TGHelp](https://t.me/tghelp) 添加到需要被管理的群中，设置为管理员并给予全部管理员权限（至少需要**删除消息**/**封禁用户**/**取消置顶**等权限）
{% endhint %}

### 特色功能

{% hint style="info" %}

### 独家特色功能 <a href="#features" id="features"></a>

* **强制关注频道才能在群中发言**：同时支持多个群组设置该权限！需要同时给机器人设置为群组管理员和频道管理员！
* **取消置顶群组中来自关联频道的消息**：机器人将自动取消置顶频道同步到群中的消息！（当频道与群组绑定时，频道中发送的消息，Telegram会自动同步到关联群组，并给消息置顶，此为默认操作无法修改）
* **查杀内容跳过公开管理员/匿名管理员/群组关联的频道**，但不会放过成员使用其自己的频道发送违规消息
* **关键词回复**：<mark style="color:orange;">支持设置有效期，接广告，更灵活</mark>！
* **日报/周报**：功能开发中..
* 完善的官方违规词库，可结合自身内容选择开启对应的违规关键词库

**其他功能**：

* **入群验证**：验证码/加减法/简单接受
* **入群欢迎消息**：新人入群欢迎消息，支持emoji和按钮样式！
* **关键词回复**：便于展示群规、推广产品等
* **内容防护能力**：
  * 批量入群的行为/刷屏/长昵称/长内容/垃圾用户/编辑内容/转发/转发+回复/内容包含@Username/内容包含链接/禁止昵称包含违禁词..
* **广告查杀**：本群自己自定义的广告查杀关键词库；您也可以在设置主页开启官方查杀库！
* **防护能力**：针对批量入群、刷屏、长昵称、长内容
* **成员管理**：在网站中管理用户，甚至可以导出全部成员信息！
* **白名单**：白名单用户触发防护能力及关键词，不做处理
* 招人,保底月十万，可以查看机器人的操作日志

💡问题反馈/提新需求 [<mark style="color:purple;">@NextCLiCLoud</mark>](https://t.me/NextCLiCLoud)&#x20;
{% endhint %}

### 获取频道链接ID <a href="#get-channel-link" id="get-channel-link"></a>

点击频道名称，在频道ID上右键点击拷贝链接，将链接 t.me/后的ID 如：`nextcli` 填写到Cloud后台频道白名单；

<div align="left"><figure><img src="/files/sqsNATtG9Gd9pXqo2qK1" alt="" width="375"><figcaption><p>频道截图示例</p></figcaption></figure></div>

### 命令列表

[@TGHelp Telegram BOT 官方官网介绍](/cloud/telegram-bot/tghelp#command-list)

### cron计划任务表达式 <a href="#cron" id="cron"></a>

#### 表达式示例

| 表达式示例                  | 表达式说明                             |
| ---------------------- | --------------------------------- |
| `0 */30 * * * *`       | 每 `30分钟` 执行一次                     |
| `0 0 * * * *`          | 每 `小时整点` 执行一次                     |
| `0 0 4 * * *`          | 每天 `4` 点执行一次                      |
| `0 0 */12 * * *`       | 每 `12小时` 执行一次(每天 00:00 和 12:00)   |
| `0 */30 9-18 * * *`    | 每天 `9` 点到 `18` 点，每隔 `30` 分钟执行一次   |
| `0 0 9 * * MON-FRI`    | 每 `周一` 到 `周五` 在 `9` 点执行一次         |
| `0 0 9,18 * * MON-FRI` | 每 `周一` 到 `周五`， `9` 点和 `18` 点各执行一次 |

#### 基本介绍

`cron表达式` 表示一组时间，使用 `6` 个空格分隔的字段。

```
Seconds Minutes Hours Day Month Week
```

> 即 `秒 分 时  日 月 周`

每个字段的含义如下：

```
Field name    | Allowed values  | Allowed special characters
----------    | --------------  | --------------------------
Seconds       | 0-59            | * / , - #
Minutes       | 0-59            | * / , -
Hours         | 0-23            | * / , -
Day           | 1-31            | * / , - ?
Month         | 1-12 or JAN-DEC | * / , -
Week          | 0-6 or SUN-SAT  | * / , - ?
```

:::warning 月份和星期字段值英文不区分大小写。 例如传递 `SUN`、 `Sun` 和 `sun` 同样被接受。 :::

#### 特殊字符

**星号（ `*`）**

星号表示 `cron` 表达式将匹配所有的值。例如，在第五个字段( `Month`)中使用星号表示每个月。

**斜线（ `/`）**

斜杠用于描述范围的增量。例如：第二个字段使用 `3-59/15` 表示每小时的第 `3` 分钟开始到第 `59` 分钟，每隔 `15` 分钟执行。

**逗号（ `,`）**

逗号用于分隔列表的项目。例如，第五个字段使用 `MON,WED,FRI` 将指每周一，周三和周五执行。

**连字符（ `-`）**

连字符用于定义范围。例如，第三个字段使用 `9-17` 表示每天上午 `9` 点至下午 `5` 点（含）。

**忽略号（ `#`）**

忽略号表示 `cron` 表达式将忽略这个字段的使用，目前仅秒字段支持该符号，用于将 `6` 段 `cron pattern` 无缝转换为 `5` 段 `linux crontab pattern`。

**问号（ `?`）**

可以使用 `问号` 而不是 `*` 来让 `Day` 或 `Week` 字段为空。

**预定义格式**

您可以使用几个预定义的时间来代替 `cron` 表达式。

```
Entry                  | Description                                | Equivalent To
-----                  | -----------                                | -------------
@yearly (or @annually) | Run once a year, midnight, Jan. 1st        | 0 0 0 1 1 *
@monthly               | Run once a month, midnight, first of month | 0 0 0 1 * *
@weekly                | Run once a week, midnight between Sat/Sun  | 0 0 0 * * 0
@daily (or @midnight)  | Run once a day, midnight                   | 0 0 0 * * *
@hourly                | Run once an hour, beginning of hour        | 0 0 * * * *
```

**间隔**

您还可以定义任务以固定的时间间隔执行，从添加时开始运行。这可以通过格式化 `cron` 规范来支持，如下所示：

```
@every <duration>
```

其中 `duration` 是 `time.ParseDuration` 接受的字符串 （ <http://golang.org/pkg/time/#ParseDuration>）。

例如， `@every 1h30m10s` 将表示添加任务之后每隔 `1小时30分10秒` 执行。 :::warning 间隔不会考虑任务的执行开销时间。例如，如果一项工作需要 `3` 分钟才能执行完成，并且计划每隔 `5` 分钟运行一次，那么每次任务之间只有 `2` 分钟的空闲时间。 :::

#### 注意事项🔥

所有开发语言级别 `6` 段式的 `cron pattern` 设计从实践上来说，由于底层定时器的不准确性，因此都是有一定的设计缺陷。由于 `cron pattern` 精确到秒级，当延 **迟达到了秒级**，那么任务可能会存在丢失情况。而当 `golang` 引擎调度比较慢的时候，那么延迟很容易达到秒级引发程序逻辑问题。

考虑大部分的场景其实并不需要如此精准的定时任务粒度控制，因此从框架 `v2.7` 版本开始，我们对秒字段提供了忽略符号 `#`，用于将 `6` 段式的 `cron pattern` 转换为 `5` 段式的 `linux crontab pattern`，更加稳健。如果是秒级粒度的定时任务场景，请考虑使用 `gtimer` 定时器，但同时也需要注意，任何的定时器都是不准确的，不能完全依赖底层的系统时间。

如有使用问题或功能建议，请联系 [<mark style="color:purple;">**@NextCLiCloudBOT**</mark>](https://t.me/NextCLiCloudBOT)&#x20;

End.


# 加密货币收/支监控通知机器人

Cryptocurrency-Notification BOT https\://t.me/tghelp

{% hint style="info" %}

## 加密货币监控机器人介绍 <a href="#intro" id="intro"></a>

* **Telegram 加密货币收支实时监控通知机器人** [<mark style="color:$primary;">**@TGHelp**</mark>](https://t.me/tghelp) 欢迎免费使用！\
  多链、多币种、毫秒级监听，支持自定义模版与断点续发，确保每一笔链上资金变动**不漏、不慢、不误报**。
* 与 [Telegram群组/频道管理机器人](/cloud/telegram-bot/telegram-group-channel-management-bot) 、 [Telegram双向转发客服机器人](/cloud/telegram-bot/telegram-customer-service-bot)不同， [加密货币收/支监控通知机器人](/cloud/telegram-bot/cryptocurrency-notification-bot) 主要功能是监控特定钱包地址的收支，便于日常工作中的核账！
* 助您规避客户转账山寨数字货币等非官方USDT、USDC合约、恶意P图假的转账截图 等情况！只有真实的、官方的USDT、USDC才有转账成功通知！
  {% endhint %}

{% hint style="warning" %}

### **使用方法** <a href="#how-to-use" id="how-to-use"></a>

1. 将 加密货币监控机器人 [@TGHelp](https://t.me/tghelp) 拉进群中；
2. 将 加密货币监控机器人  [@TGHelp](https://t.me/tghelp) 设置为群管理员，，机器人会提示操作步骤、获取群/个人Chat ID。
3. 在[Cloud个人中心绑定您的Telegram](https://cloud.nextcli.com/account/bind)；
4. 通过Telegram小程序 <https://t.me/tghelp?startapp=crypto-monitor_template> 即可添加地址、配置该地址通知到的私聊或群组Chat ID；
   {% endhint %}

{% hint style="success" %}

### **为什么选择 @TGHelp ?** <a href="#get-id" id="get-id"></a>

#### **1️⃣ 实时性保障：事件级监听** <a href="#why-1" id="why-1"></a>

⚡ 基于区块事件 / 🔁 Transfer Log / 📜 合约事件进行监听\
⏱️ 避免传统定时轮询带来的延迟与漏单\
🚀 新区块产生后即可触发解析流程\
🧠 平台层面对监听策略进行持续优化，提高整体监控效率

***

#### **2️⃣ 高可靠机制：断点续发 & 可恢复处理** <a href="#why-2" id="why-2"></a>

🗂️ 所有监听事件均进行状态化持久存储\
🔁 支持：\
🔄 服务异常重启自动恢复\
🌐 网络抖动后的事件补偿\
🛡️ 即使 Telegram API 或网络异常，也不会丢失任何通知

***

#### **3️⃣ 高并发与速率控制** <a href="#why-3" id="why-3"></a>

🔗 多链并行处理，避免单链阻塞\
🚦 内置速率限制 & 消息推送策略，防止 Telegram API 风控\
⚡ 针对高频地址 / 高频合约进行专项性能优化

***

#### **4️⃣（开发中）智能转账识别（普通转账 / 合约行为）** <a href="#why-4" id="why-4"></a>

🔍 **支持识别：**\
🔄 合约自动分账\
💸 手续费抽成\
🏗️ 商户内部地址流转（开发中）

***

#### **5️⃣（开发中）自定义合约 Token 监听** <a href="#why-5" id="why-5"></a>

🌐 在已有的区块链网络上，可添加任意合约进行监控\
🚀 最新发行的币种，也可第一时间监控其链上动向

***

#### **6️⃣ 通知模版系统（商用级）** <a href="#why-6" id="why-6"></a>

⚙️ **模版字段可灵活配置**\
📥 **收入 / 📤 支出、💰 金额、🪙 币种、🌐 网络、🔗 TxHash、🏷️ 标签、✨ 自定义 Emoji 图标 等字段均可自由组合**

🎨 **收入 / 支出模版完全独立**\
可分别自定义 📥 **收入** 与 📤 **支出** 两种通知模版样式，自由添加任意说明文案、强调文本或表情符号

📣 **支持直接 @Telegram 用户名提醒**\
可在通知文案中直接 **@Username**，第一时间 AT 相关负责人 / 运维 / 财务人员

🏷️ **支持 Hashtag 与币种标签筛选**\
支持 **#Hashtag / #话题** 以及 **$USDT / $ETH** 等币种标签，便于在 Telegram 中一键点击筛选历史记录

🧠 **专属定制链 & 币种 Telegram 表情**\
为主流公链与币种定制 Telegram **Custom Emoji**，在通知中直接展示，让资金流向更直观、更专业、更有辨识度
{% endhint %}

## 通知示例 <a href="#template-example" id="template-example"></a>

**已支持的币种和网络：**

**币种Token:**<img src="https://docs.nextcli.com/~gitbook/image?url=https%3A%2F%2F759424590-files.gitbook.io%2F%7E%2Ffiles%2Fv0%2Fb%2Fgitbook-x-prod.appspot.com%2Fo%2Fspaces%252FjiR3t04ay90Ea9V3I6ju%252Fuploads%252F50Wt1H91AxPZVlVQ5jJ2%252FUSDT.svg%3Falt%3Dmedia%26token%3D29b620e9-bbc9-41eb-83ff-2c04236832d8&#x26;width=40&#x26;dpr=4&#x26;quality=100&#x26;sign=5348bd64&#x26;sv=2" alt="" data-size="line">USDT <img src="https://docs.nextcli.com/~gitbook/image?url=https%3A%2F%2F759424590-files.gitbook.io%2F%7E%2Ffiles%2Fv0%2Fb%2Fgitbook-x-prod.appspot.com%2Fo%2Fspaces%252FjiR3t04ay90Ea9V3I6ju%252Fuploads%252F6u4AfZYrXiF7mvC9dPAo%252FUSDT0.svg%3Falt%3Dmedia%26token%3D0b655a8a-be66-46d4-94c1-e3bc84366a67&#x26;width=40&#x26;dpr=4&#x26;quality=100&#x26;sign=e47f9b4f&#x26;sv=2" alt="" data-size="line">USDT0 <img src="https://docs.nextcli.com/~gitbook/image?url=https%3A%2F%2F759424590-files.gitbook.io%2F%7E%2Ffiles%2Fv0%2Fb%2Fgitbook-x-prod.appspot.com%2Fo%2Fspaces%252FjiR3t04ay90Ea9V3I6ju%252Fuploads%252F9M7RQnLbgnhdLuUgbMlE%252FUSDC.svg%3Falt%3Dmedia%26token%3D62793dd1-c887-4f8d-8567-7a55e9226279&#x26;width=40&#x26;dpr=4&#x26;quality=100&#x26;sign=c171a222&#x26;sv=2" alt="" data-size="line">USDC / <img src="https://docs.nextcli.com/~gitbook/image?url=https%3A%2F%2F759424590-files.gitbook.io%2F%7E%2Ffiles%2Fv0%2Fb%2Fgitbook-x-prod.appspot.com%2Fo%2Fspaces%252FjiR3t04ay90Ea9V3I6ju%252Fuploads%252FEoFlFxFNy65kapvccm66%252FETH.svg%3Falt%3Dmedia%26token%3D11355e9f-2235-4ef2-9e09-729cc14b84cf&#x26;width=40&#x26;dpr=4&#x26;quality=100&#x26;sign=ef49826a&#x26;sv=2" alt="" data-size="line">ETH <img src="https://docs.nextcli.com/~gitbook/image?url=https%3A%2F%2F759424590-files.gitbook.io%2F%7E%2Ffiles%2Fv0%2Fb%2Fgitbook-x-prod.appspot.com%2Fo%2Fspaces%252FjiR3t04ay90Ea9V3I6ju%252Fuploads%252FMrN2dENX6uGHcIG8xxXW%252FTRX.svg%3Falt%3Dmedia%26token%3D0cf6b13c-76d5-4f23-ac67-a4979e9aac8d&#x26;width=40&#x26;dpr=4&#x26;quality=100&#x26;sign=5c830734&#x26;sv=2" alt="" data-size="line">TRX <img src="https://docs.nextcli.com/~gitbook/image?url=https%3A%2F%2F759424590-files.gitbook.io%2F%7E%2Ffiles%2Fv0%2Fb%2Fgitbook-x-prod.appspot.com%2Fo%2Fspaces%252FjiR3t04ay90Ea9V3I6ju%252Fuploads%252F7ubnhpqgWQrGZh5xXj9v%252FPOL.svg%3Falt%3Dmedia%26token%3D1875f603-f5d3-43b0-b3a1-2b6f964960ff&#x26;width=40&#x26;dpr=4&#x26;quality=100&#x26;sign=deb6985&#x26;sv=2" alt="" data-size="line">POL <img src="https://docs.nextcli.com/~gitbook/image?url=https%3A%2F%2F759424590-files.gitbook.io%2F%7E%2Ffiles%2Fv0%2Fb%2Fgitbook-x-prod.appspot.com%2Fo%2Fspaces%252FjiR3t04ay90Ea9V3I6ju%252Fuploads%252FqweCdQZmHpk31CCtaH6G%252FSOL.svg%3Falt%3Dmedia%26token%3Dc0a773f5-fbe9-4231-bfe9-0e04d05561a4&#x26;width=40&#x26;dpr=4&#x26;quality=100&#x26;sign=b135ceeb&#x26;sv=2" alt="" data-size="line">SOL / <img src="https://docs.nextcli.com/~gitbook/image?url=https%3A%2F%2F759424590-files.gitbook.io%2F%7E%2Ffiles%2Fv0%2Fb%2Fgitbook-x-prod.appspot.com%2Fo%2Fspaces%252FjiR3t04ay90Ea9V3I6ju%252Fuploads%252FnKziQDUlWao4Pzxmg5eb%252Fbusd.png%3Falt%3Dmedia%26token%3Daf0c1afa-a452-4097-ae4a-6bc9462eb1c7&#x26;width=40&#x26;dpr=4&#x26;quality=100&#x26;sign=54ecdac9&#x26;sv=2" alt="" data-size="line">BUSD <img src="https://docs.nextcli.com/~gitbook/image?url=https%3A%2F%2F759424590-files.gitbook.io%2F%7E%2Ffiles%2Fv0%2Fb%2Fgitbook-x-prod.appspot.com%2Fo%2Fspaces%252FjiR3t04ay90Ea9V3I6ju%252Fuploads%252FIOUXsYWIUSdxC6iSyPfg%252FBSC.svg%3Falt%3Dmedia%26token%3Db1c08b03-8ae0-4874-8449-94abe9bd224f&#x26;width=40&#x26;dpr=4&#x26;quality=100&#x26;sign=1a2c7916&#x26;sv=2" alt="" data-size="line">BNB

**网络Network**:<img src="https://docs.nextcli.com/~gitbook/image?url=https%3A%2F%2F759424590-files.gitbook.io%2F%7E%2Ffiles%2Fv0%2Fb%2Fgitbook-x-prod.appspot.com%2Fo%2Fspaces%252FjiR3t04ay90Ea9V3I6ju%252Fuploads%252FEoFlFxFNy65kapvccm66%252FETH.svg%3Falt%3Dmedia%26token%3D11355e9f-2235-4ef2-9e09-729cc14b84cf&#x26;width=40&#x26;dpr=4&#x26;quality=100&#x26;sign=ef49826a&#x26;sv=2" alt="" data-size="line"> Ethereum / <img src="https://docs.nextcli.com/~gitbook/image?url=https%3A%2F%2F759424590-files.gitbook.io%2F%7E%2Ffiles%2Fv0%2Fb%2Fgitbook-x-prod.appspot.com%2Fo%2Fspaces%252FjiR3t04ay90Ea9V3I6ju%252Fuploads%252FmmHIuSknj1wAHgrRUnwF%252FTRX.svg%3Falt%3Dmedia%26token%3De8cc6d3f-7c55-4954-bf0a-af0907ca542e&#x26;width=40&#x26;dpr=4&#x26;quality=100&#x26;sign=249a33b&#x26;sv=2" alt="" data-size="line"> Tron / <img src="https://docs.nextcli.com/~gitbook/image?url=https%3A%2F%2F759424590-files.gitbook.io%2F%7E%2Ffiles%2Fv0%2Fb%2Fgitbook-x-prod.appspot.com%2Fo%2Fspaces%252FjiR3t04ay90Ea9V3I6ju%252Fuploads%252FYOp6YW8PriXrOGRh8d7h%252FPOL.svg%3Falt%3Dmedia%26token%3D56f504ca-857e-45ec-a087-31b2460cd7bd&#x26;width=40&#x26;dpr=4&#x26;quality=100&#x26;sign=75f436fe&#x26;sv=2" alt="" data-size="line"> Polygon / <img src="https://docs.nextcli.com/~gitbook/image?url=https%3A%2F%2F759424590-files.gitbook.io%2F%7E%2Ffiles%2Fv0%2Fb%2Fgitbook-x-prod.appspot.com%2Fo%2Fspaces%252FjiR3t04ay90Ea9V3I6ju%252Fuploads%252FqweCdQZmHpk31CCtaH6G%252FSOL.svg%3Falt%3Dmedia%26token%3Dc0a773f5-fbe9-4231-bfe9-0e04d05561a4&#x26;width=40&#x26;dpr=4&#x26;quality=100&#x26;sign=b135ceeb&#x26;sv=2" alt="" data-size="line"> Solana / <img src="https://docs.nextcli.com/~gitbook/image?url=https%3A%2F%2F759424590-files.gitbook.io%2F%7E%2Ffiles%2Fv0%2Fb%2Fgitbook-x-prod.appspot.com%2Fo%2Fspaces%252FjiR3t04ay90Ea9V3I6ju%252Fuploads%252FihMzUFarYfTz6IWL9FZy%252FBSC.svg%3Falt%3Dmedia%26token%3De3d0a4e5-f812-408a-a47f-0e01391dc43e&#x26;width=40&#x26;dpr=4&#x26;quality=100&#x26;sign=41b91c25&#x26;sv=2" alt="" data-size="line"> BSC

🆓 Telegram实时通知示例 <https://t.me/cryptopush/38417>

&#x20;\- 目前已开放自定义模版，您可以自行[修改模版](/cloud/telegram-bot/telegram-bot-notification-template-sharing#cryptopush)

<table><thead><tr><th width="478.40234375">#进账 示例截图</th><th width="500.87890625">#支出 示例截图</th></tr></thead><tbody><tr><td><img src="/files/sxP4qzFylelcm7whv9ee" alt="" data-size="original"></td><td><img src="/files/NjsAluq7vmL11PID5rx2" alt="" data-size="original"></td></tr></tbody></table>

<table><thead><tr><th width="478.40234375">#进账 文本示例</th><th width="500.87890625">#支出 文本示例</th></tr></thead><tbody><tr><td>✅✅✅ <strong>#收入</strong><br><strong>支付金额</strong>：<a href="https://tronscan.org/#/transaction/315de0e863df6a3b0218abbcda9a04a319fc2508ff96ed17b03c5d6f6f852e43">3000</a> $USDT #Tron<br><strong>发送地址</strong>：<a href="https://tronscan.org/#/address/TH55Zv4ME2nqegcGSNgKyoch5fFJESrvDf/transfers">TH55Zv4ME2nqegcGSNgKyoch5fFJESrvDf</a><br><strong>接收地址</strong>：<a href="https://tronscan.org/#/address/TB7divbksr1VTKzAZ2VtGzCkApaik3yT3Q/transfers">TB7divbksr1VTKzAZ2VtGzCkApaik3yT3Q</a> (2025-人工充值)<br><strong>交易Hash</strong>：315de0e863df6..c5d6f6f852e43 <a href="https://tronscan.org/#/transaction/315de0e863df6a3b0218abbcda9a04a319fc2508ff96ed17b03c5d6f6f852e43">查看</a><br><strong>交易时间</strong>：2025-07-20 00:16:54 (UTC+8)<br><strong>链上转账备注</strong>：-</td><td>⁉️⁉️⁉️<strong>#支出</strong><br><strong>支付金额</strong>：<a href="https://tronscan.org/#/transaction/315de0e863df6a3b0218abbcda9a04a319fc2508ff96ed17b03c5d6f6f852e43">3000</a> $USDT #Tron<br><strong>发送地址</strong>：<a href="https://tronscan.org/#/address/TH55Zv4ME2nqegcGSNgKyoch5fFJESrvDf/transfers">TH55Zv4ME2nqegcGSNgKyoch5fFJESrvDf</a><br><strong>接收地址</strong>：<a href="https://tronscan.org/#/address/TB7divbksr1VTKzAZ2VtGzCkApaik3yT3Q/transfers">TB7divbksr1VTKzAZ2VtGzCkApaik3yT3Q</a> (2025-人工充值)<br><strong>交易Hash</strong>：315de0e863df6..c5d6f6f852e43 <a href="https://tronscan.org/#/transaction/315de0e863df6a3b0218abbcda9a04a319fc2508ff96ed17b03c5d6f6f852e43">查看</a><br><strong>交易时间</strong>：2025-07-20 00:16:54 (UTC+8)<br><strong>链上转账备注</strong>：-</td></tr></tbody></table>

## 模版介绍 <a href="#template-intro" id="template-intro"></a>

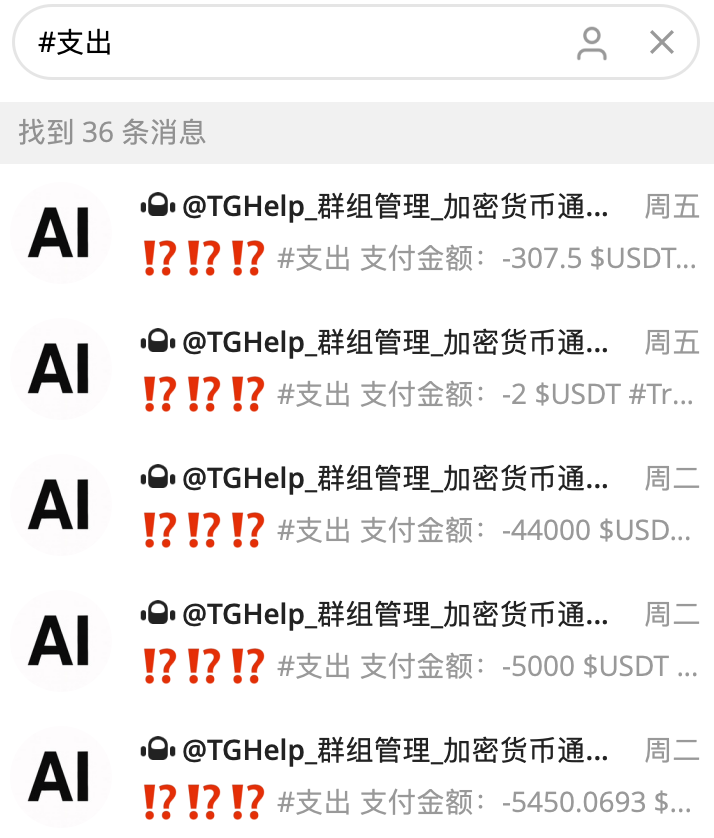
<table><thead><tr><th width="121.40234375">模版介绍</th><th width="623.04296875">详细介绍</th></tr></thead><tbody><tr><td>✅✅✅<mark style="color:purple;"><strong>#收入</strong></mark></td><td>监控的地址有进账；点击<code>#进账</code>即可在对话/群组内搜索所有 #进账 记录记录</td></tr><tr><td>⁉️⁉️⁉️<mark style="color:purple;"><strong>#支出</strong></mark></td><td>监控的地址有支出；点击 <code>#支出</code> 即可在对话记录/群组内搜索所有 #进账 记录</td></tr><tr><td><mark style="color:purple;"><strong>支付金额</strong></mark></td><td>金额、区块链网络和加密货币的币种token，图中所示为： 1000个波场网络的USDT</td></tr><tr><td><mark style="color:purple;"><strong>发送地址</strong></mark></td><td>出币地址和备注<br>点击地址可以打开区块链网络的网页上查看该账号的资产和转账记录</td></tr><tr><td><mark style="color:purple;"><strong>接收地址</strong></mark></td><td>收币地址和备注<br>点击地址可以打开区块链网络的网页上查看该账号的资产和转账记录</td></tr><tr><td>(钱包名备注)</td><td>每个监控的地址均可进行备注，会显示在 发送人/接收人 地址后面的括号内（备注）</td></tr><tr><td><strong>交易Hash</strong></td><td>交易的hash地址，点击查看即可打开网络浏览器进行核实</td></tr><tr><td><strong>交易时间</strong></td><td>该时间为区块链上记录的交易时间</td></tr><tr><td><strong>链上转账备注</strong></td><td>区块链转账时，可以添加备注到区块链上，一般需要额外支付费用，所以一般这里是为空的不填写的。</td></tr></tbody></table>

## 进账/支出筛选 <a href="#search" id="search"></a>

| #进账                                                                                         | #支出                                                                                         |
| ------------------------------------------------------------------------------------------- | ------------------------------------------------------------------------------------------- |
| <img src="/files/mCNb8mkIKZZ32yShgPgG" alt="Telegram内点击 #收入 即可筛选所有收入" data-size="original"> | <img src="/files/T5bpjp476rWid8sc9GqJ" alt="Telegram内点击 #支出 即可筛选所有开支" data-size="original"> |

{% hint style="danger" %}

### **为什么无法发送通知？**

可能是因为群组创建时候是私密群，后来开放成了公开群，会导致[Telegram群ID变化](/cloud/telegram-bot/telegram-customer-service-bot)，重新获取群ID填写到Cloud机器人通知渠道即可即可。
{% endhint %}

如有使用问题或功能建议，请联系 [<mark style="color:purple;">**@NextCLiCloudBOT**</mark>](https://t.me/NextCLiCloudBOT)&#x20;

End.


# Telegram双向转发客服机器人

Telegram Customer Service BOT  |  Demo https\://t.me/ForwardHubBOT

{% hint style="success" %}

#### 免费体验双向转发/客服机器人 <a href="#demo" id="demo"></a>

在线体验步骤：

{% stepper %}
{% step %}

### 与机器人对话并留言任意消息 [@ForwardHubBOT](https://t.me/ForwardHubBOT)

* 此时与机器人对话的<mark style="color:orange;">您的身份是客户/用户</mark>，在向客服发消息。
  {% endstep %}

{% step %}

### 加入群组 [@ForwardHubBotGroup](https://t.me/ForwardHubBotGroup)

* 鼠标右键点击 群内机器人转发您的消息 -> 回复 ，输入任意内容进行回复；
* 机器人会将您在群中引用回复的消息以私聊形式发送给客户/用户
* 此时在群中的<mark style="color:red;">您的身份是客服工作人员</mark>。
  {% endstep %}
  {% endstepper %}
  {% endhint %}

{% hint style="info" %}

### Telegram客服机器人介绍 <a href="#telegram-bot-intro" id="telegram-bot-intro"></a>

Telegram客服机器人，永久免费使用！是 livegram 等产品的绝佳替代！

与 [Telegram群组/频道管理机器人](/cloud/telegram-bot/telegram-group-channel-management-bot)、 [加密货币收/支监控通知机器人](/cloud/telegram-bot/cryptocurrency-notification-bot) 不同，Telegram客服机器人主要定位于被Telegram双向限制发消息的个人/公司/组织、团队的对外统一客服入口！

1. 主要功能是将用户与机器人的对话转发给指定个人或群组；
2. 主要应用场景：

   ✅ 公司/组织/团队对外统一的客服账号（公司多位客服可以通过群内回复机器人转发的客户消息，便于倒班调休、多客服协作处理客户问题）

   ✅ 想要隐藏个人Telegram身份的组织、团队；
   {% endhint %}

#### 🌟双向转发/客服机器人工作流程示意图 <a href="#workflow" id="workflow"></a>

<figure><img src="/files/REnqdWuZPJRg4RbA9HSO" alt=""><figcaption><p>Telegram机器人消息转发流程（可点击放大图片观看）</p></figcaption></figure>

{% hint style="success" %}

### <mark style="color:purple;">机器人亮点功能</mark> <a href="#highlight-features" id="highlight-features"></a>

我们愿称之为<mark style="color:red;">**最强客服机器人**</mark>，最完整的支持Telegram所有消息格式、以及消息的引用结构！同时支持双向删除消息！

所有这些创新能力，都是基于我们自身超过5年使用Telegram转发客服消息的实战经验：

1. **支持发送 Telegram Desktop 和 Telegram Mobile App 支持的所有消息/资源类型**
   1. **包括**：文本、图片和视频、文档、投票、位置、Wallet、Emoji、表情(含Telegram 会员表情)、Gif动态图
   2. **Include**: Text、Photo or video、Document、Creat poll、Location、Wallet、Emoji(Include Telegram Premium Emoji)、Stickers、Gifs..
   3. 还支持zip/rar/mp3/mp4/视频录像等几乎所有格式
2. **支持引用消息，双向继承消息的引用关系**
   1. 当用户A发消息 Text-1 给客服BOT，然后引用了该消息回复 Text-B ，则客服BOT侧会显示用户A引用了自己发送给客服BOT的消息 Text-1  回复了 Text-B ； 即用户侧引用的消息结构，会完整呈现在客服机器人侧；同理，机器人引用已经发送给用户的消息，用户侧也会显示客服BOT得引用关系；
3. **支持展示消息修改**
   1. 当用户A发消息 Text-1 给客服BOT，然后将该条消息修改为 Text-A1 ，机器人会自动引用原消息 Text-1 并告知已修改的消息内容为 Text-A2 ；
4. **支持客服BOT侧双向删除指定消息、双向删除所有消息**
   1. 支持客服BOT侧删除自己发送给用户的消息；
   2. 支持客服BOT侧删除用户发送给客服BOT的消息，同时在用户侧也会删除该消息；
   3. 支持客服BOT侧删除客服与用户的所有双向对话消息；
5. 无引用关系的消息（用户侧单方面删除了消息），系统将自动尝试用独立新消息的形式发送给用户！
6. 用户发送消息后对消息进行修改，会在客服侧引用展示新编辑后的消息！
7. 当客服发送消息给用户时，用户单方面删除了引用消息时，客服机器人会自动尝试使用独立消息发送给用户，并返回发送成功、失败的状态！
8. 支持使用 `/send 消息` 单独给用户发送消息，而不引用上文消息；
9. **全员消息通知**：支持群发消息给所有曾经跟机器人对话过的用户！（已屏蔽机器人的用户除外）
10. 更多功能，等您亲自来发现..
    {% endhint %}

{% tabs fullWidth="false" %}
{% tab title="使用方法" %}
{% stepper %}
{% step %}

### 创建机器人 <a href="#step1" id="step1"></a>

👍方法一(推荐)：[打开 @botfather 的小程序](https://t.me/botfather?startapp)，创建机器人 -> Create a New Bot -> ... -> Copy Token!

⚙️方法二：与 [@BotFather](https://t.me/BotFather) 对话，发送 `/newbot` 创建机器人，或 `/mybot` 在现有机器人中选择要使用的机器人，API Token获取机器人Token，示例：`506853588:AAFr81Dfz2ZpMxAQpfMXGHAXM_7Qo_h_xUX`
{% endstep %}

{% step %}

### 在Cloud云平台添加机器人 <a href="#step2" id="step2"></a>

将你的机器人Token添加到 [双向转发/客服机器人管理平台](https://t.me/tghelp?startapp=customer-service_add)

转发到对话ID，填写个人ID或群组ID，见下文及教程
{% endstep %}

{% step %}

### 配置机器人转发消息到哪个对话（转给个人 或 群组） <a href="#step3" id="step3"></a>

#### 3.1 单客服模式介绍 <a href="#step3.1" id="step3.1"></a>

客户跟机器人对话时，机器人将消息转发给管理员个人；

[<mark style="color:purple;">**单客服配置教程>>**</mark>](#dan-ke-fu-pei-zhi-jiao-cheng)

#### 3.2 多客服模式介绍 <a href="#step3.2" id="step3.2"></a>

3.2.1 客户跟机器人对话时，机器人将消息转发给群组，可以由任何群成员引用机器人转发进来的客户消息进行回复，机器人都会把消息转发给客户；

3.2.2 多客服模式需要将您创建的客服机器人bot添加到群中，**设置为管理员**并给予全部管理员权限

3.2.3 在群中使用 `/id` 即可获取当前群组ID （⚠️注意：私密群切换为公开群可能导致[群组ID变更](https://docs.nextcli.com/cloud/telegram-bot/telegram-customer-service-bot#note)，请及时将群组ID更新到Cloud云平台）

[<mark style="color:purple;">**多客服配置教程>>**</mark>](#duo-ke-fu-pei-zhi-jiao-cheng)
{% endstep %}
{% endstepper %}

### 如何获取对话ID <a href="#get-chatid" id="get-chatid"></a>

#### 如何获取单客服模式对话ID/个人ID

使用个人的Telegram账号与机器人对话，发送 `/id` 即可获取

#### 如何获取多客服模式对话ID/群组ID

将您的客服机器人拉进群组后，发送 `/id` 即可获取
{% endtab %}

{% tab title="单客服配置教程" %}
**单客服模式介绍**：

客户跟机器人对话时，机器人将消息转发给管理员个人

管理员引用消息回复，机器人将把消息转发回给目标用户！

**配制方法**：

1️⃣、[打开 @botfather 的小程序](https://t.me/botfather?startapp)，创建机器人 -> Create a New Bot -> ... -> Copy Token!

示例：`506853588:AAFr81Dfz2ZpMxAQpfMXGHAXM_7Qo_h_xUX`

2️⃣.1、跟机器人 @TGHelp 对话 发送 [/id](https://t.me/tghelp?start\&text=/id) 获取你的Telegram ID，如：`Your User ID: 942378888`

2️⃣.2、将 **机器人Token** 和 **接收消息的你的Your User ID**  [添加到机器人配置](https://cloud.nextcli.com/bot/csb/bot) 的 转发到对话ID。

2️⃣.3、添加好token，云平台即接管了机器人

至此，已配置完成

客户与与机器人的对话都将通过机器人转发给管理员个人！

**测试**：

模拟客户：单独给机器人发消息123，机器人会转发消息给自己

模拟客服：引用机器人转发的客户的消息123 并回复消息456，机器人会将消息456转发给客户(还是自己)

也可以找其他TG账号发消息来测试，更直观。

**注意事项**：

在此期间，可以删除对话历史记录，但一定不能 停用并屏蔽机器人
{% endtab %}

{% tab title="多客服配置教程" %}
**多客服模式介绍**：

客户跟机器人对话时，机器人将消息转发给群组，可以由群内任何人引用机器人转发进来的客户消息进行回复，机器人都会把消息转发给客户

可以实现客服、技术、老板 都在群内的场景

也能实现客服倒班轮岗，有历史问题未处理完的也可以让后续值班的同事继续跟进处理，技术人员/老板都可以随时看到进展！

**配制方法**：

1️⃣、[打开 @botfather 的小程序](https://t.me/botfather?startapp)，创建机器人 -> Create a New Bot -> ... -> Copy Token!

示例：`506853588:AAFr81Dfz2ZpMxAQpfMXGHAXM_7Qo_h_xUX`

2️⃣.1、创建一个私有群组，将群组设置里的->历史消息对新成员可见 开启，做了这个操作之后群组ID将会变为 `-100xxx1234567` 开头且以后也不会改变的Chat ID.

2️⃣.2、将客服机器人拉进群，并**设置成管理员**，**给予机器人所有管理员权限**；1

&#x20;   <mark style="color:red;">如果群组使用</mark>[<mark style="color:blue;">**话题模式**</mark>](#group-topics)<mark style="color:red;">，开启群组的话题设置后，必须再次设置机器人的管理员权限，给予其管理话题的权限！</mark>

2️⃣.3、在这个群内发送 **`/id`** 获取本群ID 如： `-100xxx1234567` ，然后回到[机器人配置](https://cloud.nextcli.com/bot/csb/bot)填写到该机器人的 **转发至对话ID** ；

&#x20;       <mark style="color:green;">建议设置群组的 \[新成员是否可见聊天记录] 为可见，历史消息就会具备 \[拷贝消息链接] 私聊发送给群成员，点击该链接即可定位到该消息，如</mark> [<mark style="color:green;">https://t.me/nextcli/20</mark>](https://t.me/nextcli/20)

2️⃣.4、在[添加机器人页面](https://cloud.nextcli.com/bot/csb/bot)，填写/编辑机器人Token

&#x20;       修改  **转发至对话ID** 如果没有可以先不填写对话ID

至此，已配置完成

客户与机器人的对话都将通过机器人转发到这个群组！

&#x20;

**测试**：

模拟客户：单独给机器人发消息123，机器人会转发消息给自己

模拟客服：引用机器人转发的客户的消息123 并回复消息456，机器人会将消息456转发给客户(还是自己)

也可以找其他TG账号发消息来测试，更直观。

**注意事项**：

在此期间，可以删除对话历史记录，但一定不能 停用并屏蔽机器人
{% endtab %}
{% endtabs %}

### 话题模式 Group-Topics <a href="#group-topics" id="group-topics"></a>

> #### 1️⃣ **说明**：
>
> 每位用户与机器人对话后，机器人转发消息到群组时都将以用户的Telegram唯一ID创建一个话题，该用户的所有对话都将转发到该话题下。
>
> **✅ 优点**：
>
> &#x20; \- 不需要引用转发的消息，直接在话题下发消息机器人就会转发给客户
>
> &#x20; \- 显示客户 @Username 方便您记录、私聊该用户！
>
> &#x20; \- 如果是重点客户，您可以单独点击话题进行修改
>
> &#x20; <img src="/files/hFrPOrisIJvlRRMLbij2" alt="" data-size="original">
>
> 🧰 **话题命名规范**
>
> ```
> Telegram ID | @Username | First name  Last name
> 123456 | @TGHelp | TGHelp Group/Channel / Crypto Monitor / Forward Bot🆓
> ```
>
> **Telegram ID**：Telegram 唯一数字 ID，绝对不会重复！
>
> **@Username**：用户设置的Username，唯一值，不会与其他用户重复
>
> &#x20;       用户可以随时修改该 @Username&#x20;
>
> &#x20;       同时，用户也可以不设置 @Username&#x20;
>
> **First name  Last name**：Telegram用户昵称，可以随时、任意修改。
>
> {% hint style="danger" %}
> **其他说明**：
>
> 1. 截止 2026-01-01  Telegram群组最大只能创建10000个话题
>
> 2. 如果用户修改了 @Username 或名字，机器人将不对话题名字进行更新，但请放心：Telegram数字ID是唯一且不会变的！
>    {% endhint %}
>
> ***
>
> #### 2️⃣ 设置方法
>
> 📤 **开启话题模式**：
>
> &#x20;     机器人转发消息去到的**群组 -> 管理群组 Manage -> 话题Topics -> 列表List -> 保存Save**
>
> &#x20;     开启后，机器人将自动识别群组为话题模式！
>
> <img src="/files/CqgfX0VEleyIzu09MbdX" alt="" data-size="original">
>
> 2. ⚠️您的双向转发机器人**必须是管理员**！
> 3. ⚠️并且该双向转发机器人**必须拥有管理话题Manage topics的权限**，如图：
>
> <img src="/files/jFM07Q1NsiKqofJ816oG" alt="" data-size="original">
>
> #### 3️⃣ 测试
>
> 您可以测试给您的双向机器人发消息，机器人将在群组内为您创建以您Telegram ID为唯一值的话题，说明已正常生效！&#x20;
>
> &#x20;\- 如果看不懂Telegram语言，请先[点此设置您的Telegram语言>>](https://t.me/tghelp?start\&text=/lang)
>
> &#x20;\- 如有其他设置问题或寻求帮助，请联系客服 👩‍💻 [@NextCLiCloudBOT](https://t.me/NextCLiCLoudBOT?start\&text=%23feedback%0A)&#x20;

***

### 支持的命令列表 <a href="#command-list" id="command-list"></a>

| 命令              | 使用说明                                                                                                                                                          |
| --------------- | ------------------------------------------------------------------------------------------------------------------------------------------------------------- |
| /id             | **获取对话ID**，可以在群中获取，也可以单独跟机器人对话获取                                                                                                                              |
| /ban            | <p>封禁用户</p><ol><li>引用机器人转发用户消息，回复 /ban 即可禁止该用户与机器人对话</li><li>也可以在对话框单独使用</li></ol><p><code>/ban 888444</code></p><p><code>/ban @username</code> </p>          |
| /unban          | <p>解禁用户</p><ol><li>引用机器人转发的用户消息，回复 /unban 即可允许该用户与机器人再次对话</li><li>也可以在对话框单独使用</li></ol><p><code>/unban 888444</code></p><p><code>/unban @username</code> </p> |
| /send           | 单独给用户发送消息                                                                                                                                                     |
| /delete         | <p>双向删除被引用的这一条消息：引用消息并回复 /delete 即可双向删除该消息；</p><p>可以作用于机器人转发来的消息和群组中其他人(客服)的消息从用户侧删除。</p>                                                                     |
| /deleteall      | 双向删除用户与机器人的所有消息记录：引用用户的消息并回复 /deleteall 将双向删除该用户和本机器人的所有对话                                                                                                    |
| 其他命令，等待您来提需求！😊 |                                                                                                                                                               |

### 机器人->命令->数据接口 <a href="#api" id="api"></a>

<figure><img src="/files/NjDAN8YGjXMel1BZ5Cej" alt=""><figcaption></figcaption></figure>

接口参数示例如下：

1. 开发自己的后端接口： <https://api.xxx.com/v1/getinfo?mode={0}\\&address={1}（注意只支持GET请求）>
2. 添加bot命令： /cmd param1 param2 （参数个数与接口地址占位符一致）
3. 添加 <https://api.xxx.com/v1/getinfo> 到数据接口

用户每次调用命令即可触发您自己的后端接口

#### &#x20;/id 命令代码 <a href="#id-code" id="id-code"></a>

&#x20; 用户向机器人发送 `/id` 时返回的个人/群组 Telegram唯一id 查询代码

&#x20; ⚠️本代码由Cloud开发，只适用于Cloud后台文本内容编辑器！

[查看 `/id` 代码>>](/cloud/telegram-bot/telegram-bot-notification-template-sharing#id)

{% hint style="info" %}

### ⚠️注意事项：群组ID是会变更的！ <a href="#note" id="note"></a>

改变群组类型，会引发群组ID变更，因为客服机器人转发到老的群组ID，所以无法转发消息到群内：

1. 初次创建群组，群组类型为私密群组时，群组的ID较短 如：-4731660548 (不推荐用这种)
2. 当把群组设置为【历史记录对新成员可见】，或设置为公开群组时（公开群组可能会暴露群聊信息，任何人都能通过群 @ID 看到群消息），群组ID会变得更长，如：-1002649557645 (推荐)

**预处理方案**：

* 创建群组后，先将【群组类型】设置为【公开群组】，然后再设置为【私密群组】，此时群组ID将始终为 -10开头不会再发生变化。
* 设置为【公开群组】后，群内成员新发出来的消息，将可以【复制消息链接】 便于后续分享/定位到该消息；
* 建议将 新成员是否可见聊天记录 默认的【隐藏】设置为【可见】；
  {% endhint %}

如有使用问题或功能建议，请联系 [<mark style="color:purple;">**@NextCLiCloudBOT**</mark>](https://t.me/NextCLiCloudBOT)&#x20;


# @TGHelp Telegram BOT 官方官网介绍

https\://t.me/tghelp

{% hint style="success" %}

### [@TGHelp](https://t.me/tghelp) 功能介绍 <a href="#intro" id="intro"></a>

* [x] **【**[**免费的群组/频道管理机器人**](/cloud/telegram-bot/telegram-group-channel-management-bot)**】**，拥有付费购买消息、拉新统计奖励、撒币抽奖等功能！
* [x] **【**[**加密货币收支监控通知机器人**](/cloud/telegram-bot/cryptocurrency-notification-bot)**】**，已支持USDT/USDC、TRC20/ERC20/BSC/Solana/Polygon..
* [x] **【**[**富媒体消息/带按钮**](#post)[**链接**](#post)】，创建好的消息可以在任意私聊对话、群组、频道的输入框内输入

&#x20;`@tghelp post` 即可选择/分享富媒体/带按钮的消息。[📄 教程示例>>](#inlinequery-post)

⚠️ 注意：输入框内必须是 @tghelp 开头，不能有空格！

* [x] 【[**快捷查询加密货币钱包地址余额**](#id-2-jia-mi-huo-bi-cha-xun)】，您可以在任何对话框输入 &#x20;

`@tghelp TDqSquXBgUCLYvYC4XZgrprLK589dkhSCf`  点击提示框内的选项即可查询余额 [📄 教程示例>>](#inlinequery-crypto)

⚠️ 注意：输入框内必须是 @tghelp 开头，不能有空格！

{% endhint %}

## ✨特色功能-内联查询InlineQuery <a href="#command-list" id="command-list"></a>

### 1️⃣ /post 创建富媒体消息、带按钮链接 <a href="#inlinequery-post" id="inlinequery-post"></a>

#### **创建方法**： <a href="#inlinequery-post-create" id="inlinequery-post-create"></a>

🎨 与 @TGHelp 对话发送 [/post](https://t.me/tghelp?start\&text=/post) 命令，开始创建富媒体消息！

📄 [/post 命令的用法及说明 >>](#post)

#### **使用方法**： <a href="#inlinequery-post-use" id="inlinequery-post-use"></a>

✅ 在任意私聊对话、群组、频道的输入框内输入 `@tghelp post` 即可选择/分享富媒体/带按钮的消息。

⚠️ 注意：输入框内必须是 @tghelp 开头，不能有空格！

| /post and Share post                                   | Inline Query Result 内联查询结果       | Result Message 查询结果              |
| ------------------------------------------------------ | -------------------------------- | -------------------------------- |
| [`@TGHelp post`](https://t.me/tghelp?start\&text=post) | ![](/files/dW4lBXupjWKTlD6CKFCH) | ![](/files/QijVRKLMT2KghQaG4DAi) |

### 2️⃣ 加密货币查询 <a href="#inlinequery-crypto" id="inlinequery-crypto"></a>

#### 使用方法： <a href="#inlinequery-crypto-use" id="inlinequery-crypto-use"></a>

✅ 在任意私聊对话、群组、频道的输入框内输入 `@tghelp WalletAddress`  点击提示框内的选项查询结果。

#### 已支持的币种和网络： <a href="#inlinequery-crypto-support-token-network" id="inlinequery-crypto-support-token-network"></a>

**币种Token:**<img src="/files/HzWNT1BXQU93WJEv0saM" alt="" data-size="line">USDT <img src="/files/ICLQ8fnabdrSSpFMkBMF" alt="" data-size="line">USDT0  <img src="/files/Zv3v7OwpmGDEeP4LCJD2" alt="" data-size="line">USDC / <img src="/files/nwEwKINcStSWifSd7LUd" alt="" data-size="line">ETH <img src="/files/exBgDr42GiLt5YVzidb4" alt="" data-size="line">TRX <img src="/files/1pcAZBE5k1fskN8J4mV4" alt="" data-size="line">POL  <img src="/files/fQdnoG7FkIP0iPlGIuHJ" alt="" data-size="line">SOL / <img src="/files/4iOAUa9XzvxgXA19V8Lf" alt="" data-size="line">BUSD <img src="/files/w7myB2WIIXmjiRC9nd8c" alt="" data-size="line">BNB

**网络Network**:<img src="/files/nwEwKINcStSWifSd7LUd" alt="" data-size="line"> Ethereum / <img src="/files/WSs8pLsX42sVGs8iqbcC" alt="" data-size="line">Tron / <img src="/files/fq8pW2TATEAyw5BpTiM6" alt="" data-size="line">Polygon / <img src="/files/fQdnoG7FkIP0iPlGIuHJ" alt="" data-size="line">Solana / <img src="/files/EcE1ArCRm8w6y41McKe9" alt="" data-size="line">BSC

#### 🧪 示例：在任意对话输入框内输入以下内容 <a href="#inlinequery-crypto-example" id="inlinequery-crypto-example"></a>

```
@tghelp TDqSquXBgUCLYvYC4XZgrprLK589dkhSCf
```

```
@tghelp 0xF977814e90dA44bFA03b6295A0616a897441aceC
```

```
@tghelp 5tzFkiKscXHK5ZXCGbXZxdw7gTjjD1mBwuoFbhUvuAi9
```

<table><thead><tr><th width="94.20703125">Network</th><th>Inline Query Result 内联查询结果</th><th>Result Message 查询结果</th><th>对话框内输入的内容</th></tr></thead><tbody><tr><td><img src="/files/WSs8pLsX42sVGs8iqbcC" alt="" data-size="line">Tron</td><td><img src="/files/pVO1xGQv4hrT1D4uMxJo" alt=""></td><td><img src="/files/EzQcsqCf3cX71siBaRYK" alt=""></td><td><code>@tghelp TDqSquXBgUCLYvYC4XZgrprLK589dkhSCf</code></td></tr><tr><td><p><img src="/files/MYBWq9T9bGyDRN4Fu1Jy" alt="" data-size="line">ETH</p><p><img src="/files/fq8pW2TATEAyw5BpTiM6" alt="" data-size="line">POL</p><p><img src="/files/w7myB2WIIXmjiRC9nd8c" alt="" data-size="line">BSC</p></td><td><img src="/files/NOaYRaVNdR2oVIAMkexE" alt=""></td><td><img src="/files/VPdltmDUaQDexXtlZqEi" alt=""></td><td><code>@tghelp 0xF977814e90dA44bFA03b6295A0616a897441aceC</code></td></tr><tr><td><img src="/files/fQdnoG7FkIP0iPlGIuHJ" alt="" data-size="line">SOL</td><td><img src="/files/JQPtM9Ow2SbWgO3COl8N" alt=""></td><td><img src="/files/6kEKTglYG22oU1K1QPyH" alt=""></td><td><code>@tghelp 5tzFkiKscXHK5ZXCGbXZxdw7gTjjD1mBwuoFbhUvuAi9</code></td></tr><tr><td></td><td></td><td></td><td></td></tr></tbody></table>

## 命令大全 <a href="#command-list" id="command-list"></a>

### [/start](https://t.me/tghelp?start\&text=%2Fstart) <a href="#start" id="start"></a>

开启与机器人的对话，获取机器人介绍及个人Telegram ID

### [/id](https://t.me/tghelp?start\&text=%2Fid) <a href="#id" id="id"></a>

获取Telegram 群组ID、频道ID、个人唯一数字ID

示例：

<table><thead><tr><th width="146.8359375">/id 示例</th><th>@TGHelp 返回的内容</th><th data-hidden></th></tr></thead><tbody><tr><td>在群组内使用 /id <br>前提是 @TGHelp 需要在群内。</td><td><p>👥当前为群组对话/Current is a Group Chat<br>当前对话ID/Current Chat ID：<strong>-100</strong>2960918188<br>当前群组ID/Current Group ID：<strong>-100</strong>2960918188</p><p>当前用户ID/Your User ID：1087968888<br>当前群组链接/Current Group Link：@GroupAnonymousBot<br>当前群组名称/Current Group Name：Group</p><p>‼️注：ID可能包含 - 减号，请一起复制，不要遗漏！</p></td><td></td></tr><tr><td>个人<a href="https://t.me/tghelp?start&#x26;text=%2Fid">与 @TGHelp 对话发送 /id 命令</a></td><td><p>👤当前为私聊对话/Current is a Private Chat<br>当前对话ID/Current Chat ID：2455737221<br>当前用户ID/Current Group ID：2455737221<br>当前用户名/Current Username：@NextCLi<br>当前用户昵称/Current User Name：NextCLi</p><p>‼️注：ID可能包含 - 减号，请一起复制，不要遗漏！</p></td><td></td></tr></tbody></table>

&#x20;[/id 的代码>>](/cloud/telegram-bot/telegram-bot-notification-template-sharing#id)

### [/post](https://t.me/tghelp?start\&text=%2Fpost) <a href="#post" id="post"></a>

#### 📝新建消息 <a href="#new-message" id="new-message"></a>

* 📝**文本消息**：
  * 📝**原样式(推荐)** ，Telegram软件对话框内，选中文本点击鼠标右键->格式设置 选择的样式；
  * 🎨**HTML**，支持HTML格式，[仅支持以下 HTML别名来表示消息](https://core.telegram.org/bots/api#html-style)；
  * 📋**Markdown**，支持Markdown V2格式，[仅支持以下 Markdown 别名来表示消息](https://core.telegram.org/bots/api#markdownv2-style)；
* 🎬**添加媒体**：
  * 🖼**图片** ⚠️注意 拖拽图片时，请选择 压缩图片；
  * 🎬**视频**
  * 🎵**音乐**
  * 📄**文件**
* 🔘**添加按钮**：
  * **每行一个按钮**，支持同时添加多行按钮，最大支持超过100行；
  * **每行多个按钮**，Telegram限制一行最多8个按钮！
    * <mark style="color:red;">⚠️注意：行+列 的按钮总数最大只能有100个；</mark>
  * 示例：\
    官网1 + <https://cloud.nextcli.com\\>
    官网2 + <https://cloud.nextcli.com> | 官网22 + <https://cloud.nextcli.com\\>
    官网3 + <https://cloud.nextcli.com> | 官网32 + <https://cloud.nextcli.com>
* 🎬**媒体消息**：与文本消息一样，只是流程兑换，即先选择添加的媒体类型，再添加文本。

#### 📋**消息列表** <a href="#message-list" id="message-list"></a>

查看已创建的消息列表及对应的代码

#### 如何发送/调用已创建的post消息？ <a href="#post-how-to-use" id="post-how-to-use"></a>

通过任意输入框发送已创建的富媒体/带按钮链接的消息！ [详情>>](#inlinequery-post-use)

✅ 在任意私聊对话、群组、频道的输入框内输入 `@tghelp post` 即可选择/分享富媒体/带按钮的消息。

⚠️ 注意：输入框内必须是 @tghelp 开头，不能有空格！

### [/lang](https://t.me/tghelp?start\&text=%2Flang)

获取Telegram官方语言包，一键切换Telegram客户端的语言，支持超过38种语言！

### [/coin](https://t.me/tghelp?start\&text=%2Fcoin)

#### 1️⃣ 方法一：内联查询 <a href="#coin" id="coin"></a>

✅ 在任意私聊对话、群组、频道的输入框内输入 `@tghelp WalletAddress`  点击提示框内的选项查询结果。

[详情>>](#inlinequery-crypto)

#### 2️⃣ 方法二：与机器人对话查询 <a href="#coin" id="coin"></a>

与机器人 @TGHelp 对话发送命令及参数，示例：

<table><thead><tr><th width="187.7265625">/coin 命令</th><th width="487.34765625">查询命令</th><th></th></tr></thead><tbody><tr><td>查询钱包余额命令<br>不区分区块链</td><td><a href="https://t.me/tghelp?start&#x26;text=/coin%20TWd4WrZ9wn84f5x1hZhL4DHvk738ns5jwb"><code>/coin TWd4WrZ9wn84f5x1hZhL4DHvk738ns5jwb</code></a><br><a href="https://t.me/tghelp?start&#x26;text=/coin%200xee7ae85f2fe2239e27d9c1e23fffe168d63b4055"><code>/coin 0xee7ae85f2fe2239e27d9c1e23fffe168d63b4055</code></a></td><td><a href="https://t.me/tghelp?start&#x26;text=%2Fcoin%20TWd4WrZ9wn84f5x1hZhL4DHvk738ns5jwb">示例>></a><br><a href="https://t.me/tghelp?start&#x26;text=%2Fcoin%200xee7ae85f2fe2239e27d9c1e23fffe168d63b4055">示例>></a></td></tr><tr><td><img src="/files/exBgDr42GiLt5YVzidb4" alt="" data-size="line">Tron网络余额</td><td><a href="https://t.me/tghelp?start&#x26;text=/coin%20trx%20TWd4WrZ9wn84f5x1hZhL4DHvk738ns5jwb"><code>/coin trx TWd4WrZ9wn84f5x1hZhL4DHvk738ns5jwb</code></a></td><td><a href="https://t.me/tghelp?start&#x26;text=%2Fcoin%20trx%20TWd4WrZ9wn84f5x1hZhL4DHvk738ns5jwb">示例>></a></td></tr><tr><td><img src="/files/QqwtNWXA09jJ2ADUYnmS" alt="" data-size="line">Ethereum网络余额</td><td><a href="https://t.me/tghelp?start&#x26;text=/coin%20eth%200xee7ae85f2fe2239e27d9c1e23fffe168d63b4055"><code>/coin eth 0xee7ae85f2fe2239e27d9c1e23fffe168d63b4055</code></a></td><td><a href="https://t.me/tghelp?start&#x26;text=%2Fcoin%20eth%200xee7ae85f2fe2239e27d9c1e23fffe168d63b4055">示例>></a></td></tr><tr><td><img src="/files/fq8pW2TATEAyw5BpTiM6" alt="" data-size="line">Polygon网络余额</td><td><a href="https://t.me/tghelp?start&#x26;text=/coin%20pol%200xee7ae85f2fe2239e27d9c1e23fffe168d63b4055"><code>/coin pol 0xee7ae85f2fe2239e27d9c1e23fffe168d63b4055</code></a></td><td><a href="https://t.me/tghelp?start&#x26;text=%2Fcoin%20pol%200xee7ae85f2fe2239e27d9c1e23fffe168d63b4055">示例>></a></td></tr><tr><td><img src="/files/fQdnoG7FkIP0iPlGIuHJ" alt="" data-size="line">Solana网络余额</td><td><a href="https://t.me/tghelp?start&#x26;text=/coin%20sol%20tiii7ritjiiiiiiwcV7B1fj1Cv2sLrfrxt9rjpvJtUx"><code>/coin sol tiii7ritjiiiiiiwcV7B1fj1Cv2sLrfrxt9rjpvJtUx</code></a></td><td><a href="https://t.me/tghelp?start&#x26;text=%2Fcoin%20sol%20tiii7ritjiiiiiiwcV7B1fj1Cv2sLrfrxt9rjpvJtUx">示例>></a></td></tr></tbody></table>

#### 3️⃣ 方法三：监控加密货币钱包地址的收/支，Telegram推送通知🆓 <a href="#myaddress" id="myaddress"></a>

打开[Telegram小程序](https://t.me/tghelp?startapp=crypto-monitor)添加监控即可收到推送！

更多详情教程参见：[加密货币收/支监控通知机器人](/cloud/telegram-bot/cryptocurrency-notification-bot)

### [/myaddress](https://t.me/tghelp?start\&text=%2Fmyaddress) <a href="#myaddress" id="myaddress"></a>

查询我在Cloud上监控的区块链地址

### [/coin\_count](https://t.me/tghelp?start\&text=%2Fcoin_count) <a href="#coin_count" id="coin_count"></a>

统计我在Cloud上监控地址的余额

### [/forward](https://t.me/tghelp?start\&text=%2Fforward) <a href="#forward" id="forward"></a>

双向转发/客服机器人🆓

ℹ️ 您可以通过[Telegram小程序进行管理](https://t.me/tghelp?startapp=customer-service)，也可以到Cloud平台管理。

📄 更多详情见[双向转发/客服机器人教程>>](/cloud/telegram-bot/telegram-customer-service-bot)

### [/setlang](https://t.me/tghelp?start\&text=%2Fsetlang) <a href="#setlang" id="setlang"></a>

设置机器人的语言

💡 你与机器人的私聊对话中使用 /setlang 设置机器人与你私聊使用的语言

💡 在群组中使用 /setlang 设置机器人在该群组中使用的语言

### [/help](https://t.me/tghelp?start\&text=%2Fhelp) <a href="#help" id="help"></a>

查看帮助说明，联系客服！

### [/admin](https://t.me/tghelp?start\&text=%2Fadmin) <a href="#admin" id="admin"></a>

联系管理员、问题反馈

### [/html](https://t.me/tghelp?start\&text=/html) <a href="#html" id="html"></a>

查看Telegram支持的HTML

### [/emoji](https://t.me/tghelp?start\&text=%2Femoji) <a href="#emoji" id="emoji"></a>

查看如何在 [@tghelp](/cloud/telegram-bot/tghelp) 、[双向转发/客服机器人](/cloud/telegram-bot/telegram-customer-service-bot) 使用自定义表情

## 功能回调 <a href="#callback" id="callback"></a>

{% tabs %}
{% tab title="参数" %}
为按钮添加调用其他命令，如：点击 语言设置 按钮，直接触发 `/setlang` 命令，请在参数输入

`sendCmd=/setlang`

<figure><img src="/files/OYFn8HJpBqeWT7SAfwj3" alt=""><figcaption></figcaption></figure>
{% endtab %}
{% endtabs %}

👩‍💻联系客服 <https://t.me/NextCLiCloudBOT>

End.


# Telegram BOT模版代码分享

示例机器人 https\://t.me/NextCLiCloudbot

{% hint style="success" %}

#### Telegram BOT机器人相关代码

本文代码仅针对 [https://Cloud.NextCLi.com](https://cloud.nextcli.com/) 的Telegram机器人相关的设置中可用！
{% endhint %}

## `/id` [获取当前对话Chat ID](https://t.me/tghelp?start\&text=/id) <a href="#id" id="id"></a>

&#x20;   用户向机器人发送 `/id` 时返回的个人/群组ID（Telegram唯一ID）查询代码

&#x20;   ⚠️本代码由Cloud开发，只适用于Cloud后台文本内容编辑器！

> ```html
> {{if ne .tg.group_id 0}}
> 👥<b><u>当前为群组对话/Current is a Group Chat</u></b>
> <b>当前对话ID/Current Chat ID</b>：<code>{{.tg.group_id}}</code>
> <b>当前群组ID/Current Group ID</b>：<code>{{.tg.group_id}}</code>
>
> <b>当前用户ID/Your User ID</b>：<code>{{.tg.id}}</code>
> <b>当前群组链接/Current Group Link</b>：{{.tg.name}}
> <b>当前群组名称/Current Group Name</b>：<code>{{.tg.nickname}}</code>
> {{else if ne .tg.channel_id 0}}
> 📢<b><u>当前为频道对话/Current is a Channel Chat</u></b>
> <b>当前对话ID/Current Chat ID</b>：<code>{{.tg.channel_id}}</code>
> <b>当前频道ID/Current Channel ID</b>：<code>{{.tg.channel_id}}</code>
> <b>当前频道链接/Current Channel Link</b>：@{{.tg.group_link}}
> <b>当前频道名称/Current Channel Name</b>：<code>{{.tg.group_name}}</code>
> {{else}}
> 👤<b><u>当前为私聊对话/Current is a Private Chat</u></b>
> <b>当前对话ID/Current Chat ID</b>：<code>{{.tg.id}}</code>
> <b>当前用户ID/Current Group ID</b>：<code>{{.tg.id}}</code>
> <b>当前用户名/Current Username</b>：{{.tg.name}}
> <b>当前用户昵称/Current User Name</b>：<code>{{.tg.nickname}}</code>
> {{end}}
> <blockquote>‼️注：ID可能包含 <b>-</b> 减号，请一起复制，不要遗漏！</blockquote>
>
> ────────────
> <b><i>@TGHelp</i></b> 托管在 https://Cloud.<b>NextCLi</b>.com
> ```

## &#x20;<i class="fa-bitcoin">:bitcoin:</i>[加密货币监控通知机器人](/cloud/telegram-bot/cryptocurrency-notification-bot) <a href="#cryptocurrency-notification-bot" id="cryptocurrency-notification-bot"></a>

> * [x] 查看通知示例 <https://t.me/cryptopush>
> * [x] 模版代码如下： <mark style="color:blue;">更新时间/Update time</mark>: 2025-12-18
>
> <i class="fa-inbox-in">:inbox-in:</i>**收入通知内容**
>
> ```
> ✅✅✅ <b>#{{.cash_flow}}</b>
> <b>支付金额</b>：<a target="_blank" href="{{.transaction_hash_link}}"><b>{{.amount}}</b></a> {{.token_network_icon}} ${{.token}}  {{.network_icon}} #{{.network}} 
> <b>发送地址</b>：<a target="_blank" href="{{.address_from_link}}">{{.address_from}}</a> {{.address_from_name}}
> <b>接收地址</b>：<a target="_blank" href="{{.address_to_link}}">{{.address_to}}</a> {{.address_to_name}}
> <b>交易Hash</b>：{{.transaction_hash_short}} <a target="_blank" href="{{.transaction_hash_link}}"><u>查看</u></a>
> 交易时间：{{.block_time}} (UTC+8)
> 链上转账备注：{{.note}}
> ```
>
> <i class="fa-inbox-out">:inbox-out:</i>**支出通知内容**
>
> ```
> ⁉️⁉️⁉️ <b>#{{.cash_flow}}</b>
> <b>支付金额</b>：<a target="_blank" href="{{.transaction_hash_link}}"><b>{{.amount}}</b></a> {{.token_network_icon}} ${{.token}}  {{.network_icon}} #{{.network}} 
> <b>发送地址</b>：<a target="_blank" href="{{.address_from_link}}">{{.address_from}}</a> {{.address_from_name}}
> <b>接收地址</b>：<a target="_blank" href="{{.address_to_link}}">{{.address_to}}</a> {{.address_to_name}}
> <b>交易Hash</b>：{{.transaction_hash_short}} <a target="_blank" href="{{.transaction_hash_link}}"><u>查看</u></a>
> 交易时间：{{.block_time}} (UTC+8)
> 链上转账备注：{{.note}}
> ```

## <i class="fa-telegram">:telegram:</i> TG-Emoji 加密货币表情包 <a href="#tg-emoji" id="tg-emoji"></a>

➕Add Telegram Cryptocurrency icon / ➕添加到自己的表情包 👉<https://t.me/addemoji/nextcli>

<div align="left"><figure><img src="/files/no4d9mRIrqmTi8kZ0HPu" alt="Cryptocurrency icon" width="375"><figcaption></figcaption></figure></div>

## <i class="fa-telegram">:telegram:</i> Telegram CryptoCurrency emoji-id <a href="#telegram-cryptocurrency-emoji" id="telegram-cryptocurrency-emoji"></a>

{% hint style="info" %}
✅ <mark style="color:purple;">**自定义表情代码只适用于**</mark> [<mark style="color:purple;">**@TGHelp**</mark>](https://t.me/tghelp) <mark style="color:purple;">**机器人相关内容**</mark>，如：

&#x20;   [Telegram加密货币监控通知模版](https://cloud.nextcli.com/bot/cnb/notification/template)&#x20;

&#x20;   [群组/频道管理](https://cloud.nextcli.com/bot/gmb/group)的文本回复 [入群欢迎](https://cloud.nextcli.com/bot/gmb/group/manage?link=groupWelcome) 、[关键词自动回复](https://cloud.nextcli.com/bot/gmb/group/manage?link=autoReply)、[定时推送](https://cloud.nextcli.com/bot/gmb/group/manage?link=scheduledPush)、[强制关注频道](https://cloud.nextcli.com/bot/gmb/group/manage?link=followChannel)、[入群私发](https://cloud.nextcli.com/bot/gmb/group/manage?link=joinPrivate)、[举报消息](https://cloud.nextcli.com/bot/gmb/group/manage?link=reportMsg) 等；

❌ **双向转发机器人是**<mark style="color:orange;">**普通机器人无法使用自定义表情**</mark>！

&#x20;   自己的机器人如需使用自定义表情，需在[fragment](https://fragment.com/)购买Usernames并分配给BOT（需要支付给官方一次性费用1000 Ton）。
{% endhint %}

如需个人Telegram发消息时使用，请添加到个人表情包中 👉<https://t.me/addemoji/nextcli>

[Demo1](https://t.me/nextcli/764) , [Demo2](https://t.me/cryptopush/38417)&#x20;

{% hint style="success" %}
**如何让@TGHelp 使用自定义emoji图标？**

1、如果需要在您的回复内容中使用自定义emoji图标，见上文、下文的示例，请在 **回复内容**->**文本编辑器** 填写以下示例代码：

```html
<tg-emoji emoji-id="6206368656302020568">💰</tg-emoji>
```

如果需要使用其他图标，请参考下文中的图标及对应的ID；
{% endhint %}

<details>

<summary>如何获取Telegram自定义Emoji图标ID？</summary>

1、与Telegram机器人 [@AdsMarkdownBot](https://t.me/AdsMarkdownBot) 对话，发送自定义表情，机器人会返回自定义Telegram ID和兜底emoji；

&#x20;    前提条件：

* 需要个人Telegram账号为会员，才能添加自定义表情；
* 兜底emoji必须要有，并且要与获取到的兜底默认emoji保持一致；
* 自定义表情测试：<https://t.me/addemoji/nextcli>&#x20;

2、更通过浏览器的检查元素获取Emoji ID：[<mark style="color:blue;">查看教程>></mark>](https://www.google.com/search?sourceid=chrome\&udm=50\&aep=48\&q=telegram+web+%E5%A6%82%E4%BD%95%E4%BD%BF%E7%94%A8%E6%B5%8F%E8%A7%88%E5%99%A8%E7%9A%84%E6%A3%80%E6%9F%A5%E5%85%83%E7%B4%A0%E6%9F%A5%E7%9C%8B%E8%87%AA%E5%AE%9A%E4%B9%89%E8%A1%A8%E6%83%85%E7%9A%84+data-doc-id%E5%92%8Cdata-sticker-emoji)

如果想使用更多其他自定义图标，您可以使用Telegram web，通过本地浏览器的检查元素查看聊天信息中图标的 data-doc-id  ，如果获取的代码为`data-doc-id="6206368656302020568" data-sticker-emoji="💰"`

则需要将 **data-doc-id的数字ID** 和 **data-sticker-emoji的emoji** 填入示例HTML代码，

⚠️注意 doc-id sticker-emoji 必须保持一致，如：

<pre class="language-html"><code class="lang-html"><strong>&#x3C;tg-emoji emoji-id="6206368656302020568">💰&#x3C;/tg-emoji>
</strong></code></pre>

将上述这类HTML代码添加到 [<mark style="color:blue;">**@TGHelp**</mark>](https://t.me/tghelp) 后台任意模版，即可使用该自定义表情作为内容进行回复！

</details>

{% hint style="danger" %}

#### <mark style="color:red;">**注意：**</mark>

<mark style="color:red;">**⚠️自定义表情\<tg-emoji...>不能放在任意产生文本实体的HTML标签内**</mark>，如 \<a>链接

```html
<a href="https://t.me/addemoji/nextcli">
Add Telegram Cryptocurrency icon <tg-emoji emoji-id="6206368656302020568">💰</tg-emoji>
</a>
```

**因为 Telegram 的“链接（text\_link）实体”和“自定义表情（custom\_emoji）实体不能重叠/嵌套**。`<a>...</a>` 会把整段内容变成一个链接实体，而 `<tg-emoji ...>` 需要再创建一个 custom\_emoji 实体；两者一旦发生“同一段字符范围内重叠”，<mark style="color:red;">Telegram 客户端就会</mark><mark style="color:red;">**降级处理**</mark>（通常表现为：自定义表情不渲染，<mark style="color:red;">只显示兜底的普通 emoji 字符，比如</mark> <mark style="color:red;"></mark><mark style="color:red;">`💰`</mark>）
{% endhint %}

<table><thead><tr><th width="169.3984375" align="center">Token-icon</th><th width="178.37890625">Token-Name </th><th width="227.375">Emoji-ID</th><th width="168.703125">Sticker-emoji</th></tr></thead><tbody><tr><td align="center"><div><figure><img src="/files/uVqZwFZrQwEC7eIdD97n" alt="" width="25"><figcaption></figcaption></figure></div></td><td>USDT</td><td>6195150966229048345</td><td>💰</td></tr><tr><td align="center"><div><figure><img src="/files/qs2Y9MhmIlwYsXBdmFtm" alt="" width="25"><figcaption></figcaption></figure></div></td><td>USDC</td><td>6195048827611780876</td><td>💰</td></tr><tr><td align="center"><div><figure><img src="/files/7Qv5Eg8wPTwBDujpGrhX" alt="" width="25"><figcaption></figcaption></figure></div></td><td>BUSD</td><td>6194999237919380919</td><td>💰</td></tr><tr><td align="center"><div><figure><img src="/files/ylHnJ7PwsHrXKuX9l6M8" alt="" width="25"><figcaption></figcaption></figure></div></td><td>BTC</td><td>6206368656302020568</td><td>💰</td></tr></tbody></table>

<table><thead><tr><th width="170.00390625" align="center">Network/Chain-icon</th><th width="180.140625">Network/Chain-Name</th><th width="227.5234375">Emoji-ID</th><th width="168.4921875">Sticker-emoji</th></tr></thead><tbody><tr><td align="center"><div><figure><img src="/files/TnUAsXB2jR5TkI7DZQpk" alt="Tron Logo" width="25"><figcaption></figcaption></figure></div></td><td>Tron</td><td>6195173467562711872</td><td>💰</td></tr><tr><td align="center"><div><figure><img src="/files/Huh32mMxPVRlRyAcW4d7" alt="ETH Ethereum logo" width="25"><figcaption></figcaption></figure></div></td><td>ETH Ethereum</td><td>6195258787088045848</td><td>💰</td></tr><tr><td align="center"><div><figure><img src="/files/K4tW3FRHB1e6q3j7FcnU" alt="Solana Logo" width="25"><figcaption></figcaption></figure></div></td><td>Solana</td><td>6195026502371777099</td><td>💰</td></tr><tr><td align="center"><div><figure><img src="/files/DJ1rqt8XVv2OXrIStREX" alt="Polygon Logo" width="25"><figcaption></figcaption></figure></div></td><td>Polygon</td><td>6194872467664672834</td><td>💰</td></tr><tr><td align="center"><div><figure><img src="/files/qZCtB6o0pZOHWL5Fq5Ll" alt="BSC Logo Binance Smart Chain Logo" width="25"><figcaption></figcaption></figure></div></td><td>BSC</td><td>6194879150633786415</td><td>💰</td></tr></tbody></table>

<table><thead><tr><th width="172.7109375" align="center">Token-Network-icon</th><th width="180.125">Token-Network-Name</th><th width="226.98046875">Emoji-ID</th><th width="118.828125">Sticker-emoji</th></tr></thead><tbody><tr><td align="center"><div><figure><img src="/files/vNi5TKMqisc5krIqHyJu" alt="USDT-Tron Logo" width="25"><figcaption></figcaption></figure></div></td><td>USDT-Tron</td><td>6194991412488969775</td><td>💰</td></tr><tr><td align="center"><div><figure><img src="/files/nrlAgjqqpLeiChHOwVKI" alt="USDC-Tron Logo" width="25"><figcaption></figcaption></figure></div></td><td><del>USDC-Tron</del></td><td><del>6194934014546025766</del></td><td><del>💰</del></td></tr><tr><td align="center"><div><figure><img src="/files/eX71ApoMQ3LlqVuKAocT" alt="USDT-ETH Logo" width="25"><figcaption></figcaption></figure></div></td><td>USDT-ETH</td><td>6195150188839968991</td><td>💰</td></tr><tr><td align="center"><div><figure><img src="/files/iXhvMwCnNr7RgaSpPli4" alt="USDC-ETH Logo" width="25"><figcaption></figcaption></figure></div></td><td>USDC-ETH</td><td>6194737429597918984</td><td>💰</td></tr><tr><td align="center"><div><figure><img src="/files/1n9ZrJQgNr2DY6hYGwB9" alt="USDC-Polygon Logo" width="25"><figcaption></figcaption></figure></div></td><td>USDC-Polygon</td><td>6194976100930558317</td><td>💰</td></tr><tr><td align="center"><div><figure><img src="/files/WF2ZTZMlliwa4jCPjBef" alt="USDT0-Pologon Logo" width="25"><figcaption></figcaption></figure></div></td><td>USDT0-Pologon</td><td>6136340090714070421</td><td>💰</td></tr><tr><td align="center"><div><figure><img src="/files/XKCD6iFjzxEJAmQe3ZAi" alt="USDT-Polgon Logo" width="25"><figcaption></figcaption></figure></div></td><td><del>USDT-Polgon</del></td><td><del>6194935745417844957</del></td><td><del>💰</del></td></tr><tr><td align="center"><div><figure><img src="/files/rJHwyz9fvIFBXLIaU0Od" alt="USDT-Solana Logo" width="25"><figcaption></figcaption></figure></div></td><td>USDT-Solana</td><td>6194862554880154143</td><td>💰</td></tr><tr><td align="center"><div><figure><img src="/files/xZrkCfdRGhmWzGrTKDU8" alt="USDC-Solana Logo" width="25"><figcaption></figcaption></figure></div></td><td>USDC-Solana</td><td>6195120888573073465</td><td>💰</td></tr><tr><td align="center"><div><figure><img src="/files/9DKLoJUqui5vhvi4yLHu" alt="USDT-BSC Logo" width="25"><figcaption></figcaption></figure></div></td><td>USDT-BSC</td><td>6194957495132232612</td><td>💰</td></tr><tr><td align="center"><div><figure><img src="/files/eB1WIks0AotYRzX76iD6" alt="USDC-BSC Logo" width="25"><figcaption></figcaption></figure></div></td><td>USDC-BSC</td><td>6194725386509621715</td><td>💰</td></tr><tr><td align="center"><div><figure><img src="/files/7qrpO1f6QvzMCyrHI6Q0" alt="BUSD-BSC Logo" width="25"><figcaption></figcaption></figure></div></td><td>BUSD-BSC</td><td>6194815971664862996</td><td>💰</td></tr></tbody></table>

{% hint style="info" %}
**Explanation**：

* On February 21, 2024, Circle announced the immediate cessation of USDC minting on the Tron blockchain.
* USDT on the Polygon network was officially upgraded and migrated to USDT0 on August 27, 2025.

**说明**：

* 2024年2月21日，Circle宣布立即停止在Tron区块链上铸造USDC。
* Polygon网络上的USDT已于2025年8月27日正式升级并迁移至USDT0。
  {% endhint %}

Emoji provided by @TGHelp Click to use cryptocurrency icon 👉<https://t.me/addemoji/nextcli>

## [`/html`](https://t.me/tghelp?start\&text=/html)  查看Telegram支持的HTML标签 <a href="#html" id="html"></a>

要使用此模式，请在 `parse_mode` 字段中传入 HTML。目前支持以下标签：

```
<b>bold</b>, <strong>bold</strong>
<i>italic</i>, <em>italic</em>
<u>underline</u>, <ins>underline</ins>
<s>strikethrough</s>, <strike>strikethrough</strike>, <del>strikethrough</del>
<span class="tg-spoiler">spoiler</span>, <tg-spoiler>spoiler</tg-spoiler>
<b>bold <i>italic bold <s>italic bold strikethrough <span class="tg-spoiler">italic bold strikethrough spoiler</span></s> <u>underline italic bold</u></i> bold</b>
<a href="http://www.example.com/">inline URL</a>
<a href="tg://user?id=123456789">inline mention of a user</a>
<tg-emoji emoji-id="6206368656302020568">💰</tg-emoji>
<code>inline fixed-width code</code>
<pre>pre-formatted fixed-width code block</pre>
<pre><code class="language-python">pre-formatted fixed-width code block written in the Python programming language</code></pre>
<blockquote>Block quotation started\nBlock quotation continued\nThe last line of the block quotation</blockquote>
<blockquote expandable>Expandable block quotation started\nExpandable block quotation continued\nExpandable block quotation continued\nHidden by default part of the block quotation started\nExpandable block quotation continued\nThe last line of the block quotation</blockquote>
```

[预览在Telegram中的实际样式>>](https://t.me/tghelp?start\&text=/html)

请注意：

* 目前仅支持上述提到的标签。
* 所有不属于标签或 HTML 实体的 `<`、`>` 和 `&` 符号必须替换为相应的 HTML 实体（`<` 替换为 `&lt;`，`>` 替换为 `&gt;`，`&` 替换为 `&amp;`）。
* 支持所有数字形式的 HTML 实体。
* 目前 API 仅支持以下命名 HTML 实体：`&lt;`、`&gt;`、`&amp;` 和 `&quot;`。
* 使用嵌套的 `pre` 和 `code` 标签，可以为 `pre` 实体定义编程语言。
* 无法为独立的 `code` 标签指定编程语言。
* `tg-emoji` 标签的内容必须为有效的 emoji。在无法显示自定义表情符号的地方（例如系统通知）或消息被非高级用户转发时，将显示该 emoji。建议使用自定义表情贴纸中 `emoji` 字段的 emoji。
* 只有在 Fragment 上购买了附加用户名的机器人才能使用自定义表情符号实体。

End.


# Telegram 教程

[如何注册Telegram账号？](/cloud/telegram-bot/telegram-help/how-to-register-telegram-account)\
如何创建Telegram群组？\
如何配置Telegram群组？\
如何配置Telegram群组？\
如何创建Telegram频道？\
如何配置Telegram频道？\
如何配置Telegram频道？\
如何使用Telegram bot机器人协助管理群组？\
如何创建Telegram bot机器人？

Telegram Numbers是什么？

如何购买Telegram Premium会员？\
如何购买Telegram Stars\
如何购买Telegram @Username？

Telegram Gifts是什么？

Telegram ADs是什么？\
怎么投放Telegram ADs?

Telegram 的 fragment.com 是什么？


# 如何注册Telegram账号？

打开 <https://web.telegram.org/>  或下载客户端  <https://telegram.org/>  注册账号

目前中国手机号 如果在中国境内接收验证码 可能无法收到验证码！


# 加密货币支付通道

{% hint style="success" %}

#### 加密货币支付

我们将提供现成的插件，您只需将插件上传到程序目录，填写自己的收币地址即可使用！

币直接收到您自己的钱包地址里！
{% endhint %}

目前平台自用，即将对外开放！如有需求请联系 客服 [@NextCLiCloudBOT ](https://t.me/NextCLiCloudBOT)

优先支持通用程序，如 ：

WHMCS、独角数卡、XrayR Panel、XBoard、V2Board、SSPanel-UIM、X-UI、Soga 等..

平台充值：<https://cloud.nextcli.com/billing>

加密货币收支通知：<https://cloud.nextcli.com/bot/cnb/address>

**现已支持币种**：

<img src="/files/8AgOlSucS2ltrfnEb1uN" alt="" data-size="line">**USDT**

<img src="https://docs.nextcli.com/~gitbook/image?url=https%3A%2F%2F759424590-files.gitbook.io%2F%7E%2Ffiles%2Fv0%2Fb%2Fgitbook-x-prod.appspot.com%2Fo%2Fspaces%252FjiR3t04ay90Ea9V3I6ju%252Fuploads%252F3QKrUtjjswlIis3mCOhg%252Fimage.png%3Falt%3Dmedia%26token%3Ddeb970e7-2df4-40d2-b037-15b353b83186&#x26;width=40&#x26;dpr=4&#x26;quality=100&#x26;sign=3a915e65&#x26;sv=2" alt="" data-size="line">**USDC**

**网络**：

<img src="/files/exBgDr42GiLt5YVzidb4" alt="" data-size="line">波场**Tron**

<img src="/files/nwEwKINcStSWifSd7LUd" alt="" data-size="line">以太坊**Ethereum**

<img src="/files/fQdnoG7FkIP0iPlGIuHJ" alt="" data-size="line">**Solana**

<img src="/files/1pcAZBE5k1fskN8J4mV4" alt="" data-size="line">**Polygon**

<img src="/files/w7myB2WIIXmjiRC9nd8c" alt="" data-size="line">币安链**BSC**

.


# 网站一键打包成多端App\_自带VPN/防屏蔽/防DNS污染

APP打包封装 https\://cloud.nextcli.com/app/myapp

{% hint style="success" %}
**App 应用打包使用说明**

本服务可将任何网站 URL 打包为 Android 与 Windows 应用（iOS、Mac 版本正在开发中），并在应用内部集成了防屏蔽功能，使海内外用户均可自由访问目标网站，不受防火墙限制。

同时，您也可以在此生成并下载专用的 Android 与 Windows 防屏蔽 SDK，将其整合至您的 App，以便突破网络访问限制。以下示例以 X(推特) 为例，展示如何使用本功能。
{% endhint %}

## 一、APP打包 <a href="#app-package" id="app-package"></a>

#### 1.1 创建APP  <https://cloud.nextcli.com/app/myapp> <a href="#create-app" id="create-app"></a>

<table><thead><tr><th width="173">字段</th><th>说明</th></tr></thead><tbody><tr><td>APP包名/APP ID</td><td><a data-footnote-ref href="#user-content-fn-1">包名</a>? 是APP的唯一ID，通常以 com.开头，如: <code>com.example.myapp</code> <br>不建议使用主流APP的名字，包名冲突，会覆盖已安装的同包名ID的APP；</td></tr><tr><td>APP适用系统</td><td>普通用户可选择打包Android APK、Windows EXE；<br>安卓AAR、Windows DLL 则是面向专业开发者的SDK。</td></tr><tr><td>APP主页链接</td><td>打开APP时，主页显示内容所在的链接网址；</td></tr><tr><td>APP图标</td><td>APP安装在桌面上显示的图标；<br>Android推荐使用 512×512px 的图标以获得最佳效果；<br>Windows同样512×512px 的图标，也可以直接使用网站的favicon.ico链接。</td></tr></tbody></table>

#### 1.2. 打包与下载 <a href="#package-and-download" id="package-and-download"></a>

* 点击“打包”后，预计 1～5 分钟完成。需手动刷新查看进度。
* 打包产物下载链接有效期为 1小时，过期后需重新打包。
* 如果打包失败，请检查错误提示；如无法解决可联系客服。

#### 1.3. 其他说明 <a href="#other-notes" id="other-notes"></a>

* 新用户在创建第一个应用后，可获得 1年 的每月 1G 流量套餐。

## 二、流量控制 <https://cloud.nextcli.com/app/whitelist>  <a href="#whitelist" id="whitelist"></a>

#### 2.1 流量加速 <a href="#traffic-speed-up" id="traffic-speed-up"></a>

* 开启流量加速后，白名单中的域名将启用防屏蔽功能。
* 如果当月流量用完，需要再次购买套餐或流量包才能继续使用流量加速。

#### **2.2 什么是加速白名单？** <a href="#what-is-whitelist" id="what-is-whitelist"></a>

* 流量加速开启后，白名单中的域名会通过加速通道，消耗套餐流量；其他域名则使用普通网络。
* 创建应用后，系统会自动将应用主页链接的域名加入到加速白名单。

  例如，若应用主页链接为 abc.x.com，则默认将 abc.x.com 添加到白名单。
* 您还可以手动添加更多域名到白名单，例如添加 123.x.com 、[www.google.com，则该域名流量将走加速通道。](http://www.google.com，则该域名流量将走加速通道。)

#### **2.3 白名单规则** <a href="#whitelist-rules" id="whitelist-rules"></a>

1. 仅可添加域名（不能包含 http 或 https）。
2. 若添加一级域名（如 x.com），其所有二级或子域名（如 m.x.com, [www.x.com）皆自动纳入白名单。](http://www.x.com）皆自动纳入白名单。)
3. 若只添加二级域名（如 m.x.com），则不包含 x.com。

## 三、流量套餐 <https://cloud.nextcli.com/app/plugin>  <a href="#data-packages" id="data-packages"></a>

* 新用户创建第一个应用后，系统会免费提供 1年 的每月 1G 流量套餐。
* 您可多次购买同一套餐，后购买的套餐将覆盖之前的套餐，同时重置 App 的流量用量和到期时间。
* ⚠️注意，必须先拥有一个套餐，才能购买流量包。流量包的有效期与当月套餐同步。
* 如需更多套餐选项，请联系客服。

## 四、开发者文档 <a href="#developer-docs" id="developer-docs"></a>

#### 4.1  生成AAR <a href="#generate-aar" id="generate-aar"></a>

1. 在创建应用时选择 AAR 作为目标产物，主页链接可先填后端 API 地址（后续可于白名单中修改）。
2. 打包产物解压后将获得 checksum 文件与 xxx.aar 文件。
3. sdk调用前需要把checksum复制到app的内部存储文件夹下，因为sdk需要校验这个文件，然后初始化sdk，参考以下demo

{% tabs %}
{% tab title="kotlin" %}

<pre class="language-kotlin"><code class="lang-kotlin"><strong>// kotlin 示例
</strong><strong>CoroutineScope(Dispatchers.IO).launch {
</strong>    try {
        moveAssetsFileToInternalStorage(context, "checksum")

        // code=1 正常启动
        // 这里sdk工作目录必须和checksum文件在同一个目录
        val errCode = Safetunnel.newInstance(context.filesDir.absolutePath)

        // code=1 正常启动
        val startCode = Safetunnel.start()

        // 获取代理端口，应用层流量转发到这个端口即可使用流量加速功能
        val port = Safetunnel.getPort()
    } catch (e: Exception) {
        // log
    }

// Android复制assets文件到内部存储
private suspend fun moveAssetsFileToInternalStorage(
    context: Context,
    fileName: String
): Boolean {
    return withContext(Dispatchers.IO) {
        var inputStream: InputStream? = null
        try {
            inputStream = context.assets.open(fileName)
            // ⚠️注意：sdk工作目录必须和checksum文件在同一个目录
            val outFile = File(context.filesDir, fileName).apply {
                parentFile?.mkdirs()
            }
            if (!outFile.exists()) {
                // 将文件内容从输入流复制到输出流
                inputStream.copyTo(outFile.outputStream())
                Log.d(
                    "TAG",
                    "File $fileName moved to internal storage: ${outFile.absolutePath}"
                )
            }
            true
        } catch (e: Exception) {
            Log.e("TAG", "Failed to move file $fileName to internal storage: ${e.message}")
            false
        } finally {
            // 关闭流
            inputStream?.close()
        }
    }
}
</code></pre>

{% endtab %}

{% tab title="java" %}

```java
  // java 示例
  new Thread(new Runnable() {
    @Override
    public void run() {
        try {
            // 将 assets 文件移动到内部存储
            boolean isMoved = moveAssetsFileToInternalStorage(context, "checksum");
            if (!isMoved) {
                Log.e(TAG, "Failed to move checksum file.");
                return;
            }

            // ⚠️注意：SDK 工作目录必须和 checksum 文件在同一个目录
            int errCode = Safetunnel.newInstance(context.getFilesDir().getAbsolutePath());
            if (errCode != 1) {
                Log.e(TAG, "Safetunnel.newInstance failed with code: " + errCode);
                return;
            }

            // 启动 Safetunnel
            int startCode = Safetunnel.start();
            if (startCode != 1) {
                Log.e(TAG, "Safetunnel.start failed with code: " + startCode);
                return;
            }

            // 获取代理端口，应用层流量转发到这个端口即可使用流量加速功能
            int port = Safetunnel.getPort();
            Log.d(TAG, "Proxy port: " + port);

        } catch (Exception e) {
            Log.e(TAG, "Exception occurred: " + e.getMessage());
        }
    }
}).start();

// Android复制assets文件到内部存储，java示例
public static boolean moveAssetsFileToInternalStorage(Context context, String fileName) {
    InputStream inputStream = null;
    try {
        inputStream = context.getAssets().open(fileName);
        // 注意：SDK工作目录必须和checksum文件在同一个目录
        File outFile = new File(context.getFilesDir(), fileName);
        File parentDir = outFile.getParentFile();
        if (parentDir != null && !parentDir.exists()) {
            parentDir.mkdirs();
        }
        if (!outFile.exists()) {
            // 将文件内容从输入流复制到输出流
            try (FileOutputStream outputStream = new FileOutputStream(outFile)) {
                byte[] buffer = new byte[1024];
                int length;
                while ((length = inputStream.read(buffer)) > 0) {
                    outputStream.write(buffer, 0, length);
                }
            }
            Log.d(TAG, "File " + fileName + " moved to internal storage: " + outFile.getAbsolutePath());
        }
        return true;
    } catch (Exception e) {
        Log.e(TAG, "Failed to move file " + fileName + " to internal storage: " + e.getMessage());
        return false;
    } finally {
        // 关闭输入流
        if (inputStream != null) {
            try {
                inputStream.close();
            } catch (Exception e) {
                Log.e(TAG, "Failed to close input stream: " + e.getMessage());
            }
        }
    }
}
```

{% endtab %}

{% tab title="C#" %}

```csharp
// C#复制assets文件到内部存储
private string cachePath = Path.Combine(Environment.GetFolderPath(Environment.SpecialFolder.LocalApplicationData), "com.safelink.test", "Cache");

// 导入dll
[DllImport("libcore.dll")]
private static extern int NewInstance(string dir);

[DllImport("libcore.dll")]
private static extern int Start();

[DllImport("libcore.dll")]
private static extern int GetPort();

 private async void initSdk()
  {
      String filePath = Path.Combine(cachePath, "file");
      if (!Directory.Exists(filePath))
      {
          Directory.CreateDirectory(filePath);
      }
      if (!File.Exists(Path.Combine(filePath, "checksum")))
      {
          ExtractResourceToFile("pack://application:,,,/tmp/checksum", Path.Combine(filePath, "checksum"));
      }
      try
      {
          var ErrCode = NewInstance(filePath);
          Debug.WriteLine("NewInstance ErrCode:"+ ErrCode);
          if (ErrCode == 1)
          {
              ErrCode=Start();
              Debug.WriteLine("Start ErrCode:" + ErrCode);
          }
      }
      catch (Exception ex)
      {
          Debug.WriteLine("initSdk error:" + ex.ToString());
      }
  }

// 复制文件到内部存储
public static void ExtractResourceToFile(string resourceName, string filepath)
{
    try
    {
        // 获取当前程序集

        StreamResourceInfo info = Application.GetContentStream(new Uri(resourceName));

        // 使用资源名称从程序集获取资源流
        using (Stream resourceStream = info.Stream)
        {
            if (resourceStream == null)
            {
                throw new InvalidOperationException("Could not find resource: " + resourceName);
            }

            // 创建目标文件路径的目录
            Directory.CreateDirectory(Path.GetDirectoryName(filepath));

            // 创建文件流并写入从程序集提取的数据
            using (FileStream fileStream = new FileStream(filepath, FileMode.Create, FileAccess.Write))
            {
                resourceStream.CopyTo(fileStream);
            }
        }
    }
    catch (Exception ex)
    {
        MessageBox.Show("Error extracting resource: " + ex.Message);
    }
}
```

{% endtab %}
{% endtabs %}

4. 应用层示例，这里以网络请求为例，更多使用示例请查看demo；

{% tabs %}
{% tab title="Android " %}

```kotlin
# Android kotlin 示例
val proxy =
    Proxy(Proxy.Type.SOCKS, InetSocketAddress("127.0.0.1", Safetunnel.getPort()))
okHttpClient.proxy(proxy)
```

{% endtab %}

{% tab title="Windows" %}

```csharp
# Windows C# 示例
// 创建一个 HttpClientHandler，并设置代理信息
var httpClientHandler = new HttpClientHandler
{
    Proxy = new WebProxy("127.0.0.1:"+GetPort()),
    UseProxy = true,
};

// 使用 HttpClientHandler 创建 HttpClient
using (var httpClient = new HttpClient(httpClientHandler))
{
    // 发送 HTTP GET 请求
    HttpResponseMessage response = await httpClient.GetAsync("http://example.com");

    if (response.IsSuccessStatusCode)
    {
        // 处理成功响应
        string content = await response.Content.ReadAsStringAsync();
        Console.WriteLine(content);
    }
    else
    {
        // 处理错误响应
        Console.WriteLine($"HTTP Error: {response.StatusCode}");
    }
}
```

{% endtab %}
{% endtabs %}

***

#### 参考链接

• [Android 开发者文档（英文）](https://developer.android.com/docs)

• [Windows 应用打包（Microsoft 官方文档）](https://learn.microsoft.com/en-us/windows/apps/)

[^1]: 1、什么是应用包名：

    <https://dev.mi.com/docs/appsmarket/operation_docs/package_name/>

    2、安卓官方对 Application ID的说明：

    <https://developer.android.com/build/configure-app-module?hl=zh-cn#set-application-id>


# APP VPN SDK\_让APP自带VPN/防域名屏蔽/防DNS污染

APP打包封装 https\://cloud.nextcli.com/app/myapp

{% hint style="success" %}
**App 应用打包使用说明**

本服务可将任何网站 URL 打包为 Android 与 Windows 应用（iOS、Mac 版本正在开发中），并在应用内部集成了加密隧道访问（防域名屏蔽、防DNS污染）功能，使海内外用户均可自由访问目标网站/接口API，不受防火墙/网络异常等特殊突发情况的限制。

同时，您也可以在此生成并下载专用的 Android 与 Windows 防屏蔽 SDK，将其整合至您的 App，以便突破网络访问限制。以下示例以 X(推特) 为例，展示如何使用本功能。
{% endhint %}

### 一、APP打包，SDK集成 <a href="#app-package" id="app-package"></a>

#### 1.1 创建APP <https://cloud.nextcli.com/app/myapp>  <a href="#create-app" id="create-app"></a>

<table><thead><tr><th width="173">字段</th><th>说明</th></tr></thead><tbody><tr><td>APP包名/APP ID</td><td><a data-footnote-ref href="#user-content-fn-1">包名</a>? 是APP的唯一ID，通常以 com.开头，如: <code>com.x.app</code> <br>不建议使用主流APP的名字，包名冲突，会覆盖已安装的同包名ID的APP；</td></tr><tr><td>APP适用系统</td><td>普通用户可选择打包Android APK、Windows EXE；<br>安卓AAR、Windows DLL 则是面向专业开发者的SDK。</td></tr><tr><td>APP主页链接</td><td>打开APP时，主页显示内容所在的链接网址；</td></tr><tr><td>APP图标</td><td>APP安装在桌面上显示的图标；<br>Android推荐使用 512×512px 的图标以获得最佳效果；<br>Windows同样512×512px 的图标，也可以直接使用网站的favicon.ico链接。</td></tr></tbody></table>

#### 1.2. 打包与下载 <a href="#package-and-download" id="package-and-download"></a>

* 点击“打包”后，预计 1～5 分钟完成。需手动刷新查看进度。
* 打包产物下载链接有效期为 1小时，过期后需重新打包。
* 如果打包失败，请检查错误提示；如无法解决可联系客服。

#### 1.3. 其他说明 <a href="#other-notes" id="other-notes"></a>

* 新用户在创建第一个应用后，可获得 1年 的每月 1G 流量套餐。

### 二、流量控制 <https://cloud.nextcli.com/app/whitelist>  <a href="#whitelist" id="whitelist"></a>

#### 2.1 流量加速 <a href="#traffic-speed-up" id="traffic-speed-up"></a>

* 开启流量加速后，白名单中的域名将启用防屏蔽功能。
* 如果当月流量用完，需要再次购买套餐或流量包才能继续使用流量加速。

#### **2.2 什么是加速白名单？** <a href="#what-is-whitelist" id="what-is-whitelist"></a>

* 流量加速开启后，白名单中的域名会通过加速通道，消耗套餐流量；其他域名则使用普通网络。
* 创建应用后，系统会自动将应用主页链接的域名加入到加速白名单。

  例如，若应用主页链接为 abc.x.com，则默认将 abc.x.com 添加到白名单。
* 您还可以手动添加更多域名到白名单，例如添加 123.x.com 、[www.google.com，则该域名流量将走加速通道。](http://www.google.com，则该域名流量将走加速通道。)

#### **2.3 白名单规则** <a href="#whitelist-rules" id="whitelist-rules"></a>

1. 仅可添加域名（不能包含 http 或 https）。
2. 若添加一级域名（如 x.com），其所有二级或子域名（如 m.x.com, [www.x.com）皆自动纳入白名单。](http://www.x.com）皆自动纳入白名单。)
3. 若只添加二级域名（如 m.x.com），则不包含 x.com。

### 三、流量套餐 <https://cloud.nextcli.com/app/plugin>  <a href="#data-packages" id="data-packages"></a>

* 新用户创建第一个应用后，系统会免费提供 1年 的每月 1G 流量套餐。
* 您可多次购买同一套餐，后购买的套餐将覆盖之前的套餐，同时重置 App 的流量用量和到期时间。
* ⚠️注意，必须先拥有一个套餐，才能购买流量包。流量包的有效期与当月套餐同步。
* 如需更多套餐选项，请联系客服。

### 四、开发者文档 <a href="#developer-docs" id="developer-docs"></a>

#### 4.1  生成AAR <a href="#generate-aar" id="generate-aar"></a>

1. 在创建应用时选择 AAR 作为目标产物，主页链接可先填后端 API 地址（后续可于白名单中修改）。
2. 打包产物解压后将获得 checksum 文件与 xxx.aar 文件。
3. sdk调用前需要把checksum复制到app的内部存储文件夹下，因为sdk需要校验这个文件，然后初始化sdk，参考以下demo

{% tabs %}
{% tab title="kotlin" %}

<pre class="language-kotlin"><code class="lang-kotlin"><strong>// kotlin 示例
</strong><strong>CoroutineScope(Dispatchers.IO).launch {
</strong>    try {
        moveAssetsFileToInternalStorage(context, "checksum")

        // code=1 正常启动
        // 这里sdk工作目录必须和checksum文件在同一个目录
        val errCode = Safetunnel.newInstance(context.filesDir.absolutePath)

        // code=1 正常启动
        val startCode = Safetunnel.start()

        // 获取代理端口，应用层流量转发到这个端口即可使用流量加速功能
        val port = Safetunnel.getPort()
    } catch (e: Exception) {
        // log
    }

// Android复制assets文件到内部存储
private suspend fun moveAssetsFileToInternalStorage(
    context: Context,
    fileName: String
): Boolean {
    return withContext(Dispatchers.IO) {
        var inputStream: InputStream? = null
        try {
            inputStream = context.assets.open(fileName)
            // ⚠️注意：sdk工作目录必须和checksum文件在同一个目录
            val outFile = File(context.filesDir, fileName).apply {
                parentFile?.mkdirs()
            }
            if (!outFile.exists()) {
                // 将文件内容从输入流复制到输出流
                inputStream.copyTo(outFile.outputStream())
                Log.d(
                    "TAG",
                    "File $fileName moved to internal storage: ${outFile.absolutePath}"
                )
            }
            true
        } catch (e: Exception) {
            Log.e("TAG", "Failed to move file $fileName to internal storage: ${e.message}")
            false
        } finally {
            // 关闭流
            inputStream?.close()
        }
    }
}
</code></pre>

{% endtab %}

{% tab title="java" %}

```java
  // java 示例
  new Thread(new Runnable() {
    @Override
    public void run() {
        try {
            // 将 assets 文件移动到内部存储
            boolean isMoved = moveAssetsFileToInternalStorage(context, "checksum");
            if (!isMoved) {
                Log.e(TAG, "Failed to move checksum file.");
                return;
            }

            // ⚠️注意：SDK 工作目录必须和 checksum 文件在同一个目录
            int errCode = Safetunnel.newInstance(context.getFilesDir().getAbsolutePath());
            if (errCode != 1) {
                Log.e(TAG, "Safetunnel.newInstance failed with code: " + errCode);
                return;
            }

            // 启动 Safetunnel
            int startCode = Safetunnel.start();
            if (startCode != 1) {
                Log.e(TAG, "Safetunnel.start failed with code: " + startCode);
                return;
            }

            // 获取代理端口，应用层流量转发到这个端口即可使用流量加速功能
            int port = Safetunnel.getPort();
            Log.d(TAG, "Proxy port: " + port);

        } catch (Exception e) {
            Log.e(TAG, "Exception occurred: " + e.getMessage());
        }
    }
}).start();

// Android复制assets文件到内部存储，java示例
public static boolean moveAssetsFileToInternalStorage(Context context, String fileName) {
    InputStream inputStream = null;
    try {
        inputStream = context.getAssets().open(fileName);
        // 注意：SDK工作目录必须和checksum文件在同一个目录
        File outFile = new File(context.getFilesDir(), fileName);
        File parentDir = outFile.getParentFile();
        if (parentDir != null && !parentDir.exists()) {
            parentDir.mkdirs();
        }
        if (!outFile.exists()) {
            // 将文件内容从输入流复制到输出流
            try (FileOutputStream outputStream = new FileOutputStream(outFile)) {
                byte[] buffer = new byte[1024];
                int length;
                while ((length = inputStream.read(buffer)) > 0) {
                    outputStream.write(buffer, 0, length);
                }
            }
            Log.d(TAG, "File " + fileName + " moved to internal storage: " + outFile.getAbsolutePath());
        }
        return true;
    } catch (Exception e) {
        Log.e(TAG, "Failed to move file " + fileName + " to internal storage: " + e.getMessage());
        return false;
    } finally {
        // 关闭输入流
        if (inputStream != null) {
            try {
                inputStream.close();
            } catch (Exception e) {
                Log.e(TAG, "Failed to close input stream: " + e.getMessage());
            }
        }
    }
}
```

{% endtab %}

{% tab title="C#" %}

```csharp
// C#复制assets文件到内部存储
private string cachePath = Path.Combine(Environment.GetFolderPath(Environment.SpecialFolder.LocalApplicationData), "com.safelink.test", "Cache");

// 导入dll
[DllImport("libcore.dll")]
private static extern int NewInstance(string dir);

[DllImport("libcore.dll")]
private static extern int Start();

[DllImport("libcore.dll")]
private static extern int GetPort();

 private async void initSdk()
  {
      String filePath = Path.Combine(cachePath, "file");
      if (!Directory.Exists(filePath))
      {
          Directory.CreateDirectory(filePath);
      }
      if (!File.Exists(Path.Combine(filePath, "checksum")))
      {
          ExtractResourceToFile("pack://application:,,,/tmp/checksum", Path.Combine(filePath, "checksum"));
      }
      try
      {
          var ErrCode = NewInstance(filePath);
          Debug.WriteLine("NewInstance ErrCode:"+ ErrCode);
          if (ErrCode == 1)
          {
              ErrCode=Start();
              Debug.WriteLine("Start ErrCode:" + ErrCode);
          }
      }
      catch (Exception ex)
      {
          Debug.WriteLine("initSdk error:" + ex.ToString());
      }
  }

// 复制文件到内部存储
public static void ExtractResourceToFile(string resourceName, string filepath)
{
    try
    {
        // 获取当前程序集

        StreamResourceInfo info = Application.GetContentStream(new Uri(resourceName));

        // 使用资源名称从程序集获取资源流
        using (Stream resourceStream = info.Stream)
        {
            if (resourceStream == null)
            {
                throw new InvalidOperationException("Could not find resource: " + resourceName);
            }

            // 创建目标文件路径的目录
            Directory.CreateDirectory(Path.GetDirectoryName(filepath));

            // 创建文件流并写入从程序集提取的数据
            using (FileStream fileStream = new FileStream(filepath, FileMode.Create, FileAccess.Write))
            {
                resourceStream.CopyTo(fileStream);
            }
        }
    }
    catch (Exception ex)
    {
        MessageBox.Show("Error extracting resource: " + ex.Message);
    }
}
```

{% endtab %}
{% endtabs %}

4. 应用层示例，这里以网络请求为例，更多使用示例请查看demo；

{% tabs %}
{% tab title="Android " %}

```kotlin
# Android kotlin 示例
val proxy =
    Proxy(Proxy.Type.SOCKS, InetSocketAddress("127.0.0.1", Safetunnel.getPort()))
okHttpClient.proxy(proxy)
```

{% endtab %}

{% tab title="Windows" %}

```csharp
# Windows C# 示例
// 创建一个 HttpClientHandler，并设置代理信息
var httpClientHandler = new HttpClientHandler
{
    Proxy = new WebProxy("127.0.0.1:"+GetPort()),
    UseProxy = true,
};

// 使用 HttpClientHandler 创建 HttpClient
using (var httpClient = new HttpClient(httpClientHandler))
{
    // 发送 HTTP GET 请求
    HttpResponseMessage response = await httpClient.GetAsync("http://example.com");

    if (response.IsSuccessStatusCode)
    {
        // 处理成功响应
        string content = await response.Content.ReadAsStringAsync();
        Console.WriteLine(content);
    }
    else
    {
        // 处理错误响应
        Console.WriteLine($"HTTP Error: {response.StatusCode}");
    }
}
```

{% endtab %}
{% endtabs %}

### 五、错误码 <a href="#code" id="code"></a>

<table><thead><tr><th width="143.6328125">code</th><th>备注</th></tr></thead><tbody><tr><td>1</td><td>成功</td></tr><tr><td>101</td><td>包名错误、不匹配</td></tr><tr><td>103</td><td>checksum文件不存在(默认的域名白名单文件)</td></tr><tr><td>104</td><td>checksum文件解密失败</td></tr><tr><td>105</td><td>下载配置文件失败</td></tr><tr><td>106、206</td><td>解密配置文件失败</td></tr><tr><td>107、207</td><td>json解析配置文件失败</td></tr><tr><td>108</td><td>未找到可用tag</td></tr><tr><td>109</td><td>已开启</td></tr><tr><td>111</td><td>已经close</td></tr><tr><td>110</td><td>start失败</td></tr><tr><td>112</td><td>端口开启错误</td></tr><tr><td>208</td><td>yaml解析失败</td></tr><tr><td>209</td><td>Options对象序列化为JSON 失败</td></tr><tr><td>210</td><td>加密JSON失败</td></tr><tr><td>211</td><td>创建box实例失败</td></tr></tbody></table>

比如：105 下载配置文件失败，可能是因为请求IP在国外，我们的配置文件在国内，国内不会异常！

更多问题请[联系客服 @NextCLiCloudBOT >>](https://t.me/NextCLiCloudBOT?start\&text=%23APP%E6%89%93%E5%8C%85%20%E9%94%99%E8%AF%AF%E7%A0%81%0A)

***

#### 参考链接

• [Android 开发者文档（英文）](https://developer.android.com/docs)

• [Windows 应用打包（Microsoft 官方文档）](https://learn.microsoft.com/en-us/windows/apps/)

[^1]: 1、什么是应用包名：

    <https://dev.mi.com/docs/appsmarket/operation_docs/package_name/>

    2、安卓官方对 Application ID的说明：

    <https://developer.android.com/build/configure-app-module?hl=zh-cn#set-application-id>


# 域名SSL证书

点击链接免费申请SSL证书 <https://cloud.nextcli.com/certificate/account>


# AI


# LLM-API

### 现已支持的大模型：

* [x] GPT-4o-2024-08-06
* [x] &#x20;GPT-4o o1-mini
* [x] o1-preview
* [x] GPT-4-turbo
* [x] Claude-3.5-Sonnet
* [x] GPT-4o-mini
* [x] GPT-3.5-turbo
* [x] GPT-3.5-turbo-instruct
* [x] LLama-3.1-405b
* [x] LLama-3.1-70b
* [x] LLama-3-70b
* [x] 更多模型实时添加中..

### Tokens价格

以网站内实时显示为准。

### API

见站内页面；


# 其他文档


# 服务条款 Terms Of Service

## Terms of Service

*Last updated: 2026-01-16*

These Terms of Service (“Terms”) govern your access to and use of the services provided by NextCLi  (“we”, “us”, or “the Platform”). By accessing or using our services, you agree to be bound by these Terms.

***

### 1. Agreement and Acceptance

By registering an account, accessing the Platform, using any service, API, application, or making any payment, you confirm that you have read, understood, and agreed to these Terms.

If you do not agree to these Terms, you must not access or use the Platform.

***

### 2. Description of Services

The Platform provides technical and infrastructure services, which may include but are not limited to:

* Cloud infrastructure and computing services
* Developer tools, APIs, and automation services
* Internet infrastructure services such as domain-related or networking services
* Messaging, bot, and application-related technical services
* Crypto-related technical services (non-custodial, non-financial)

The Platform provides **technology services only** and does not operate as a financial institution, payment processor, exchange, broker, custodian, or trustee.

Specific services may be subject to additional terms (“Product Terms”).

***

### 3. Eligibility

You must be legally capable of entering into binding agreements under applicable law to use the Platform.

By using the Platform, you represent that your use complies with all applicable laws and regulations in your jurisdiction.

***

### 4. Fees and Payments

Some services may require payment. Pricing, billing methods, and payment options are determined by the Platform and may change from time to time.

Payments made using digital assets or blockchain-based methods are **irreversible**. The Platform is not responsible for errors caused by incorrect payment information provided by the user.

***

### 5. User Responsibilities

You are solely responsible for:

* Your account activities and credentials
* All content, data, applications, bots, services, or transactions you create, deploy, or operate using the Platform
* Ensuring your use of the Platform complies with applicable laws and third-party terms

The Platform does not monitor or control user content or activities and assumes no responsibility for them.

***

### 6. Prohibited Use

You may not use the Platform for any unlawful, harmful, or abusive activities, including but not limited to activities that violate applicable laws, infringe third-party rights, or pose security or compliance risks.

Detailed usage restrictions are defined in the Acceptable Use Policy (“AUP”).

***

### 7. Suspension and Termination

We may suspend or terminate your access to the Platform, with or without notice, if:

* Your use poses legal, regulatory, or security risks
* You violate these Terms or applicable policies
* We are required to do so by law or governmental authority

Termination does not relieve you of obligations incurred prior to termination.

***

### 8. Data and Privacy

You retain ownership of your data. We may collect, use, and retain certain data and logs as necessary to provide services, ensure security, comply with legal obligations, and enforce these Terms.

Our data practices are described in the Privacy Policy.

***

### 9. Disclaimer of Warranties

The Platform and services are provided “as is” and “as available,” without warranties of any kind, whether express or implied.

We do not guarantee uninterrupted, secure, or error-free operation of the Platform.

***

### 10. Limitation of Liability

To the maximum extent permitted by law, the Platform shall not be liable for any indirect, incidental, consequential, or special damages.

Our total liability arising from or related to the use of the Platform shall not exceed the fees paid by you to the Platform during the twelve (12) months preceding the claim.

***

### 11. Indemnification

You agree to indemnify and hold harmless the Platform from any claims, damages, losses, or liabilities arising from your use of the services, content, or violation of these Terms.

***

### 12. Governing Law and Dispute Resolution

These Terms shall be governed by and construed in accordance with applicable laws, without regard to conflict of law principles.

Any disputes arising from these Terms shall be resolved through competent courts with proper jurisdiction.

***

### 13. Changes to Terms

We may update these Terms from time to time. Continued use of the Platform after changes become effective constitutes acceptance of the updated Terms.

***

### 14. Contact Information

For questions regarding these Terms, please contact us through the official channels provided on the Platform.

End.


# @TGhelp Privacy Policy

https\://t.me/tghelp

## Standard Bot Privacy Policy <a href="#dev_page_title" id="dev_page_title"></a>

The following serves as a standard Privacy Policy for bots and mini apps on the Telegram platform.

By design, this policy is written to be generally applicable to a wide range of services. While this document serves as a functional agreement between developers and users, Telegram still encourages all developers to create their own, separate privacy policies to better describe the ways in which their service receives, processes and stores data from its users.

#### Bot and Mini App Standard Privacy Policy

**1. Terms and Definitions**

1.1. Telegram – Telegram Messenger Inc (also “we”).\
1.2. Platform – The Telegram Bot Platform.\
1.3. Developer – The person or legal entity who operates and maintains Third-Party Service, as further defined in 3.1.\
1.4. Third-Party Service – The bot or mini app of Developer, made available to users on Platform.\
1.5. User – The person accessing Third-Party Service via their account on Platform (also “you”).\
1.6. Policy – This document, governing the relationship between Third-Party Service and User.

**2. General Provisions**

2.1. Policy is a standard document which applies to all third-party bots and mini apps on Platform by default, unless or until their respective developer has published a separate privacy policy.

2.2. Policy governs solely the relationship between Developer and User. It cannot and does not regulate the relationship between Telegram and its users, nor does it supersede the [Telegram Privacy Policy](https://telegram.org/privacy).

2.3 Developer follows all privacy guidelines set forth by platforms that distribute Telegram apps, including Apple's [App Review Guidelines](https://developer.apple.com/app-store/review/guidelines/#legal) and Google's [Developer Policies](https://support.google.com/googleplay/android-developer/topic/9877467).

2.4. Policy regulates the collection, storage, distribution, usage and protection of information of Users who access Third-Party Service.

2.5. Your continued access to and use of Third-Party Service shall constitute your acceptance of Policy, the Telegram [Bot Terms](https://telegram.org/tos/bots) and the Telegram [Mini App Terms](https://telegram.org/tos/mini-apps).

2.6. Note that this default Policy is meant to aid Developer in providing a functional privacy policy to their Users, with the understanding that the Policy is written to be generally applicable to a wide range of services. Accordingly, if Developer opts to use the Policy, it is solely their responsibility to ensure that the Policy fits the Developer’s use case and complies with all local laws.

2.7. If you do not accept all the aforementioned terms, you should immediately cease your use of Third-Party Service.

**3. Disclaimers**

3.1. Third-Party Service is an independent third-party application that is neither maintained, endorsed, nor affiliated with Telegram. Developer is the person or entity defined as such, for example within the Terms of Service of Third-Party Service, its interfaces or in its response to the `/developer_info` command.

3.2. You understand and agree that, without limiting section 8, this Policy may be amended at any time, and it is your responsibility to review and agree to all changes.

3.3. You acknowledge that you have read, understood and agreed to the Telegram [Bot Terms](https://telegram.org/tos/bots) and the Telegram [Mini App Terms](https://telegram.org/tos/mini-apps), as well as any other terms made available to you by Developer.

3.4. You acknowledge and warrant that you possess all the necessary rights and permissions to use Third-Party Service in compliance with applicable local laws and legal obligations, including without limitation age restrictions and third-party store terms.

3.5. Developer operates under the understanding that all information you provide is submitted in good-faith, and is not obligated to check or verify your statements for errors or inaccuracies. It is your responsibility to ensure that all information you provide is accurate and up-to-date.

3.6. You may decide to make some information available in the public domain, either directly on Platform, elsewhere on the internet, or via Third-Party Service. The information you choose to make public may be accessed by other users of Third-Party Service via Platform or on the internet, in which case it will not be covered or protected by Policy.

**4. Collection of Personal Data**

4.1. The ways in which Platform natively allows Third-Party Service to access certain limited information from and about User are described in the [Telegram Privacy Policy](https://telegram.org/privacy#6-bot-messages) and [Mini App Terms](https://telegram.org/tos/mini-apps#4-privacy).

4.2. Without limiting [section 4.1.](https://telegram.org/privacy-tpa#4-1-collection-of-personal-data), Third-Party Service has the ability to receive additional data from you if you send it messages, upload files to it, or choose to share personal information such as your contact or phone number.

4.3. If Third-Party Service is a mini app, it may also receive additional data as detailed in sections [4.1.](https://telegram.org/tos/mini-apps#4-1-data-we-share) and [4.2.](https://telegram.org/tos/mini-apps#4-2-data-you-share) of the [Mini App Terms](https://telegram.org/tos/mini-apps). In this case, Third-Party Service may also acquire additional information as a result of your interactions with it.

4.4. Third-Party Service may collect anonymous data that is not linked to you in any way, such as anonymized diagnostics or usage statistics.

**5. Processing of Personal Data**

5.1. Third-Party Service only requests, collects, processes and stores data that is necessary for its designated features to function properly. Third-Party Service processes your personal data on the legal ground that such processing is necessary to further its legitimate interests, including (i) providing services to its users; (ii) detecting and addressing security issues in respect of its provision of services; unless those interests are overridden by your interest or fundamental rights and freedoms that require protections of personal data.

5.2. Developer does not monetize or otherwise utilize user data for applications outside the scope of Third-Party Service, unless otherwise clearly stated by Developer and explicitly agreed to by User.

5.3. Without limiting section 6.2., private user information will not be transferred or made accessible to any third party, except as stipulated by Policy and agreed to by User.

5.4. In any event, Developer will only collect or otherwise aggregate user data in compliance with applicable laws, third-party store terms, and for no other purposes than those clearly stated in Policy and necessary to furnish and enhance the functionality of Third-Party Service.

**6. Data Protection**

6.1. Developer employs robust security measures to protect the integrity and confidentiality of all data it processes. User information is handled, transferred and stored in compliance with applicable laws, including all necessary precautions to prevent unauthorized access, modification, deletion, or distribution.

6.2. Developer will never share user data with third parties, including with Developer’s own additional services or bots (if any, as the case may be) unless explicitly authorized by User or required by law, such as in response to a lawful court order.

**7. Rights and Obligations**

7.1. Telegram may:\
(a) delete data sent from User to Third-Party Service from its servers in response to abuse of Platform by either User or Developer. This deletion may include sent messages, mini app cloud storage, the entire chat with Third-Party Service, or Third-Party Service itself as the case may be;

7.2. Developer may:\
(a) seek verification of the identity of the User submitting data requests if they suspect unauthorized access to or misuse of personal information;\
(b) impose reasonable limits on the number of data requests User can submit within a given timeframe, in order to prevent abuse of the request system. In any event, these limits cannot undermine User’s rights under applicable law;

7.3. Developer shall:\
(a) comply with the stipulations set forth in Policy, or those outlined in any additional or substitute Policy they choose to enact, provided that neither can supersede the Telegram Terms of Service, and, by extension, the Telegram Bot Developer Terms;\
(b) provide an easily accessible avenue for User to consult Policy, and for them to exercise all rights Policy entitles them to under applicable law;\
(c) promptly process and respond to lawful requests from users within the timeframes allowed by applicable law, and, in any event, no later than 30 days from the date the request was submitted.

7.3. User may:\
(a) submit a request to Developer for a copy of all personal data Third-Party Service collected and stored in connection with them;\
(b) submit a request to Developer for the timely deletion of all personal data Third-Party Service collected and stored in connection with them, with the exception of essential data that Developer may preserve if and as permitted by applicable law. Examples of essential data vary by jurisdiction and may include but are not limited to data required for performing legal obligations, defense of legal claims, public interest or transactional history for the purpose of fulfilling tax obligations;\
(c) amend, restrict, or object to the processing of their data, or exercise the option to revoke any previously given consent at any time and for any reason, including withdrawing from Policy entirely and discontinuing their use of Third-Party Service;\
(d) lodge a complaint with national data protection authorities having jurisdiction if they believe their rights are not being upheld by Developer.

7.4. User shall:\
(a) provide accurate and up-to-date information when submitting data requests to Developer, and cooperate with any reasonable measures necessary for Developer to fulfill these requests;\
(b) adhere to the terms set forth in Policy and any additional policy enacted by Developer or Telegram.

**8. Changes to this Privacy Policy**

While we do not anticipate frequent changes, we will review and may update this Privacy Policy from time to time. Any changes to this Privacy Policy will become effective when we post the revised Privacy Policy on this page <https://telegram.org/privacy-tpa>. Please check our website frequently to see any updates or changes to this Privacy Policy, a summary of which we will set out below.

End.


# Cloud Privacy Policy

*Last updated: 2026-01-16*

This Privacy Policy describes how NextCLi (“we”, “us”, “the Platform”) collects, uses, shares, and protects personal information of users (“you”, “your”) when you access or use our services.

This Privacy Policy is incorporated into and subject to the Terms of Service.

***

### 1. Information We Collect

We may collect the following categories of personal information:

**1.1 Account Information**

* Email address, username, password (encrypted)

**1.2 Usage Data**

* Login metadata (IP address, device information, timestamps)
* API call logs, service actions

**1.3 Payment and Billing Information**

* Blockchain transaction hashes, wallet addresses related to payment
* Billing records

**1.4 Cookies and Tracking Technologies**

* Cookies, local storage identifiers for session management and analytics

***

### 2. How We Use Your Information

We use your information to:

* Provide, maintain, and improve our services
* Authenticate your access and secure your account
* Process payments and billing
* Monitor, detect, and prevent abuse and security incidents
* Comply with legal and regulatory requirements

***

### 3. Sharing and Disclosure

We will not sell your personal information.

We may share information with:

* **Service providers** that assist with operations (hosting, logging, analytics)
* **Payment processors and blockchain services** where necessary for processing
* **Legal and regulatory authorities** when required by law

***

### 4. User Rights

You may exercise the following rights:

* **Access** your personal data
* **Update or correct** your personal data
* **Delete** your personal data (subject to legal retention requirements)
* **Withdraw consent** to processing (where applicable)

To exercise these rights, please contact us through the official support channels.

***

### 5. Data Retention

We retain personal information only as long as necessary to:

* Provide the services
* Comply with legal obligations
* Resolve disputes and enforce agreements

After that, we securely delete or anonymize data.

***

### 6. Security

We implement reasonable technical and organizational safeguards to protect personal information from unauthorized access, use, disclosure, or destruction.

***

### 7. International Data Transfers

Your data may be processed or stored outside your country where we or our service providers operate.

By using the Platform, you consent to such transfers.

***

### 8. Children’s Privacy

Our services are not directed to children under the age of 13. We do not knowingly collect personal information from children.

***

### 9. Changes to This Policy

We may update this Privacy Policy. Updates will be posted with a revised “Last updated” date.

Continued use of the Platform after changes constitutes acceptance of the updated policy.

***

### 10. Contact Us

If you have questions about this Privacy Policy or wish to exercise your data rights, contact us via official support channels provided on the Platform.

End.


# Acceptable Use Policy (AUP)

Last updated: 2026-01-16

This Acceptable Use Policy (“AUP”) governs the acceptable and prohibited uses of the services provided by NextCLi (“the Platform”). This AUP forms part of and is incorporated into the Terms of Service.

By using the Platform, you agree to comply with this AUP.

***

### 1. Purpose of This Policy

The Platform provides technical infrastructure and developer services.\
This AUP exists to protect the Platform, its users, and third parties from abuse, legal risk, and security threats.

***

### 2. General Use Requirements

You may use the Platform only for lawful purposes and in compliance with:

* Applicable laws and regulations
* The Terms of Service
* This Acceptable Use Policy
* Any applicable Product Terms

You are solely responsible for all activities conducted through your account, services, applications, servers, APIs, or bots.

***

### 3. Prohibited Activities

The following activities are strictly prohibited on or through the Platform.

#### 3.1 Illegal or Fraudulent Activities

* Money laundering, terrorist financing, or sanctions evasion
* Fraud, scams, impersonation, or deceptive practices
* Operating or supporting Ponzi schemes, pyramid schemes, or investment fraud
* Any activity that violates applicable laws or regulations

***

#### 3.2 Gambling and High-Risk Financial Activities

* Online gambling, betting, lotteries, or games of chance involving real-world value
* Unlicensed financial services or payment processing
* Custody, pooling, or management of user funds on behalf of others

***

#### 3.3 Spam, Abuse, and Harassment

* Bulk unsolicited messaging, spam, or phishing
* Malicious automation, bot abuse, or message flooding
* Harassment, threats, or abusive behavior toward individuals or groups

***

#### 3.4 Malware, Security, and Network Abuse

* Distribution of malware, ransomware, spyware, or trojans
* Unauthorized access, scanning, probing, or exploitation of systems
* DDoS attacks or traffic flooding
* Circumventing security measures or rate limits

***

#### 3.5 Platform and API Abuse

* Excessive or abusive API usage beyond permitted limits
* Attempts to bypass billing, metering, or usage controls
* Reverse engineering or interference with Platform services

***

#### 3.6 Content and Intellectual Property Violations

* Hosting or distributing content that infringes intellectual property rights
* Unauthorized use of trademarks, copyrighted material, or proprietary content
* Distribution of illegal, harmful, or restricted content

***

#### 3.7 Third-Party Policy Violations

* Activities that violate the terms or policies of third-party platforms or services\
  (including but not limited to messaging platforms, blockchain networks, or domain registries)

***

### 4. Enforcement and Platform Rights

The Platform reserves the right, at its sole discretion, to:

* Monitor usage for security, compliance, and risk management
* Suspend or terminate services or accounts
* Remove or restrict access to content, services, or resources
* Cooperate with law enforcement or regulatory authorities

Such actions may be taken **with or without prior notice**, where permitted by law.

***

### 5. No Circumvention

You may not attempt to evade, bypass, or circumvent any enforcement actions, restrictions, suspensions, or safeguards imposed by the Platform.

***

### 6. Reporting Abuse

If you become aware of any violation of this AUP, you should report it through the official channels provided by the Platform.

***

### 7. Updates to This Policy

We may update this AUP from time to time. Continued use of the Platform after changes become effective constitutes acceptance of the updated policy.

***

### 8. Relationship to Other Policies

This AUP supplements the Terms of Service and any applicable Product Terms.\
In the event of a conflict, the Terms of Service shall prevail unless otherwise specified.

End.


# 本站资源

本站Logo、图标等资源

下载地址：

{% file src="/files/HruC9yfNF6HgaJCoK2mx" %}

下载地址：

{% file src="/files/tEzHS2Y3yXeB4hPWVKlQ" %}

下载地址：

{% file src="/files/pItdjBuOA713NegB36ar" %}

[@TGHelp](https://t.me/tghelp) Logo

{% file src="/files/Wa40m8jS2EGeevicqRPd" %}

[@NextCLiCloudBOT](https://t.me/NextCLiCloudBOT) Customer Service Logo

{% file src="/files/8WFF7rj1E7SM7No3QcXl" %}

@NextCLiCloudBOT images

{% file src="/files/wYxn1zS1LbxDXcIMARyk" %}

{% file src="/files/mLV6lqCMFZ8NAXVwSZyl" %}

{% file src="/files/Uo2DjB7wquHwjjzriDiY" %}

{% file src="/files/J3TIvtl2oOqogna9atmv" %}

{% file src="/files/KTF8QVWbM4xN6CKCxgSL" %}

{% file src="/files/5gEcgFJCKyIzmsQzCH8o" %}

{% file src="/files/BeHAVoS70I3P9Sl2fAGW" %}

{% file src="/files/KFpGrTFlCUh7SL1kmp7y" %}

End.


# 升级日志 Changelog

云平台升级日志 Cloud Upgrade Log

{% hint style="success" %}

## 官方网址 Official Websites

云服务 Cloud/Telegram BOT  [https://Cloud.NextCLi.COM](https://cloud.nextcli.com/)

服务器/VPS/域名 Server/VPS/Domain [https://My.NextCLi.COM](https://my.nextcli.com/)

帮助文档 Help Center Docs [https://Docs.NextCLi.COM](https://docs.nextcli.com/)

升级日志 Changelog [https://Docs.NextCLi.COM/docs/changelog](https://docs.nextcli.com/docs/changelog)
{% endhint %}

### 关于我们/联系方式

{% content-ref url="/pages/T0y62kzazIcbihL0RxqZ" %}
[关于我们/About US](/about-us)
{% endcontent-ref %}

### 升级日志

{% tabs %}
{% tab title="Cloud Platform" %}

<table><thead><tr><th width="108.39453125">Time</th><th width="132.82421875">Module Service</th><th>Content</th><th data-hidden></th></tr></thead><tbody><tr><td>2026-01-16</td><td>bot-crypto</td><td><a href="https://cloud.nextcli.com/">Cloud</a>新增：<br> - 加密货币监控通知机器人：<br>     - 支持本位币 <img src="/files/mq5v3MfmmNFopgWmbDL8" alt="" data-size="line">ETH <img src="/files/exBgDr42GiLt5YVzidb4" alt="" data-size="line">TRX <img src="/files/fQdnoG7FkIP0iPlGIuHJ" alt="" data-size="line">SOL <img src="/files/fq8pW2TATEAyw5BpTiM6" alt="" data-size="line">POL <img src="/files/EcE1ArCRm8w6y41McKe9" alt="" data-size="line">BNB<br>     - 支持自定义合约币种Token的监控，需联系管理员开通<br><br><a href="https://t.me/tghelp">@TGHelp</a> 新增：<br> - 上线<a href="https://t.me/tghelp?startapp">小程序</a>，自动免密登录！<br>    频道抢沙发功能支持：视频、音频、附件、投票、联系人、位置定位<br>    群组订阅频道消息的复制消息支持：音乐、投票、联系人、位置定位<br><br><a href="https://t.me/tghelp">@TGHelp</a> 优化：<br>    内联查询，支持在任意群组/私聊/频道的输入框输入：<br>    <code>@tghelp post</code>  分享已提前配置好的post<br>    <code>@tghelp CryptoAddress</code>  查询加密货币余额</td><td></td></tr><tr><td>2026-01-12</td><td>bot-crypto</td><td>新增：<br> - 优化机器人 <a href="https://t.me/TGHelp">@TGHelp</a> 的多语言逻辑，用户第一次与机器人 <a href="https://t.me/TGHelp">@TGHelp</a> 对话时，使用客户端语言作为机器人的默认语言，如果匹配不到客户端语言则使用机器人默认语言-English。<br><br>优化：<br> - 平台编辑器输入更友好，不会被提示、代码补全给截断；<br> - 加密货币监控通知，填写的Chat ID为用户自己的Telegram ID时，显示用户自己的Telegram用户名（需要用户与机器人 <a href="https://t.me/TGHelp">@TGHelp</a> 对话过才能获取）。</td><td></td></tr><tr><td>2025-12-28</td><td>bot</td><td>新增：<br><a href="https://cloud.nextcli.com/bot/csb/bot">双向转发机器人</a> 自动识别/支持群组的话题模式<br><a href="https://cloud.nextcli.com/bot/csb/bot">双向转发机器人</a> 网站侧支持显示用户列表，同时支持导出</td><td></td></tr><tr><td>2025-12-19</td><td>bot</td><td><p>新增：<br> - 新人进群验证，支持要求用户与机器人 <a href="https://t.me/TGHelp">@TGHelp</a> 私聊验证<br><br>优化：<br> - <a href="https://cloud.nextcli.com/bot/csb/bot">双向转发机器人</a>  的 <code>/ban</code> <code>/unban</code> 命令支持独立消息发送用户Telegram ID或 @Username 用户名参数进行封禁，如：<br><code>/ban @username</code>  <code>/unban @username</code></p><p><code>/ban 7712345888</code> <code>/unban 7712345888</code> <br> - 机器人 <a href="https://t.me/TGHelp">@TGHelp</a> 的 <a href="https://t.me/tghelp?start&#x26;text=/post"><code>/post</code></a> 富媒体消息支持多语言<br> - <a href="https://cloud.nextcli.com/bot/csb/bot">双向转发机器人</a> 的多语言预览时至转发给自己(需要在平台个人中心绑定自己的Telegram)<br></p></td><td></td></tr><tr><td>2025-12-12</td><td>bot</td><td>与机器人 <a href="https://t.me/TGHelp">@TGHelp</a> 互动时的文案（平台消息模板）的多语言支持复制/粘贴<br>与机器人 <a href="https://t.me/TGHelp">@TGHelp</a> 互动时的文案（平台消息模板）的多语言预览功能<br>与机器人 <a href="https://t.me/TGHelp">@TGHelp</a> 互动时的文案（平台消息模板）的多语言支持机翻<br>与机器人 <a href="https://t.me/TGHelp">@TGHelp</a> 互动时的文案（平台消息模板）的多语言支持导出/导入json</td><td></td></tr><tr><td>2025-11-26</td><td>bot-crypto</td><td>新增：<br> - 机器人 <a href="https://t.me/TGHelp">@TGHelp</a> 命令支持多语言<br> - 用户与机器人 <a href="https://t.me/TGHelp">@TGHelp</a> 互动时的文案（平台的消息模版）支持多语言<br> - 用户与机器人 <a href="https://t.me/TGHelp">@TGHelp</a> 私聊/群组内群主 可以使用 <code>/setlang</code> 设置机器人对话时使用的语言<br><br>优化：<br> - <a href="https://cloud.nextcli.com/bot/csb/bot">双向转发机器人</a> <code>/ban</code> 时，永久封禁目标用户<br> - <a href="https://cloud.nextcli.com/bot/csb/bot">双向转发机器人</a>  <code>/ban</code> &#x26; <code>/unban</code> 提示消息模板的配置化，和成功文案修改<br> - <a href="https://cloud.nextcli.com/bot/cnb/address">机器人-到币通知</a>，PolyGon网络的USDT升级为USDT0</td><td></td></tr><tr><td>2025-11-26</td><td>app</td><td><a href="https://cloud.nextcli.com/app/myapp">App打包</a>，Splash-Screen支持自定义启动屏图片<br></td><td></td></tr><tr><td>2025-11-13</td><td>bot-group</td><td><a href="https://cloud.nextcli.com/bot/gmb/group">机器人-群组管理</a>，新人入群验证的验证码和加减法验证改成机器人私发验证</td><td></td></tr></tbody></table>

End.
{% endtab %}

{% tab title="Telegram BOT" %}

<table><thead><tr><th width="107.59765625">Time</th><th>Content</th></tr></thead><tbody><tr><td>2025-11-21</td><td>双向转发机器人 /ban &#x26; /unban 提示消息模板配置化、成功文案修改</td></tr><tr><td>2025-11-13</td><td><a href="https://cloud.nextcli.com/bot/gmb/group">群组管理</a>->新人入群验证的验证码和加减法验证改成机器人私发验证</td></tr></tbody></table>

End.
{% endtab %}

{% tab title="Patment" %}

### 升级日志

<table><thead><tr><th width="107.59765625">Time</th><th>Content</th></tr></thead><tbody><tr><td>2025</td><td></td></tr><tr><td>2025</td><td></td></tr></tbody></table>

End.
{% endtab %}
{% endtabs %}

<div align="left"><img src="https://visitor-badge.laobi.icu/badge?page_id=https://docs.nextcli.com/changelog" alt=""></div>

End.


# Blog


# blog-news-list

| 中文                                                                                                                                                | English                                                                                                                                                                                            | Time       |
| ------------------------------------------------------------------------------------------------------------------------------------------------- | -------------------------------------------------------------------------------------------------------------------------------------------------------------------------------------------------- | ---------- |
|                                                                                                                                                   |                                                                                                                                                                                                    |            |
| [Telegram 群发消息指南：向群组成员批量私信与广播](https://docs.nextcli.com/news/telegram-qun-fa-xiao-xi-zhi-nan-xiang-qun-zu-cheng-yuan-pi-liang-si-xin-yu-guang-bo) | [How to Send Bulk Messages to Telegram Group Members? -Broadcast Telegram Messages](https://docs.nextcli.com/news/how-to-send-bulk-messages-to-telegram-group-members-broadcast-telegram-messages) | 2026-01-14 |
|                                                                                                                                                   |                                                                                                                                                                                                    |            |


# 关于我们/About US

### 官方网址/Official Website <a href="#official-website" id="official-website"></a>

<table><thead><tr><th width="340.28125">Name</th><th>URL</th></tr></thead><tbody><tr><td>云服务 Cloud/Telegram BOT</td><td><a href="https://cloud.nextcli.com/">https://Cloud.NextCLi.COM</a></td></tr><tr><td>服务器/VPS/域名 Server/VPS/Domain</td><td><a href="https://my.nextcli.com/">https://My.NextCLi.COM</a></td></tr><tr><td>帮助文档 Help Center Docs</td><td><a href="https://docs.nextcli.com/">https://Docs.NextCLi.COM</a></td></tr><tr><td>升级日志 Changelog</td><td><a href="https://docs.nextcli.com/docs/changelog">https://Docs.NextCLi.COM/docs/changelog</a></td></tr></tbody></table>

### 联系我们/Contact Us <a href="#contact-us" id="contact-us"></a>

<table><thead><tr><th width="339.71875">Name</th><th>URL</th></tr></thead><tbody><tr><td>频道 Channel</td><td><a href="https://t.me/nextcli">https://t.me/nextcli</a></td></tr><tr><td>群组 Group</td><td><a href="https://t.me/NextCLiGroup">https://t.me/NextCLiGroup</a></td></tr><tr><td>联系客服 Contact Us</td><td><a href="https://t.me/NextCLiCloudBOT">https://t.me/NextCLiCloudBOT</a></td></tr><tr><td></td><td></td></tr><tr><td>Twitter X</td><td><a href="https://x.com/NextCLi">https://x.com/NextCLi</a></td></tr><tr><td>GitHub</td><td><a href="https://github.com/NextCLi">https://github.com/NextCLi</a></td></tr><tr><td>GitLab</td><td><a href="https://gitlab.com/NextCLi">https://gitlab.com/NextCLi</a></td></tr></tbody></table>

End.


# News


# 新加坡 CSP 新政来了：视频核验变强制，跨境注册合规升级！

> **结论先行**：\
> 2025 年 6 月起，新加坡全面升级 **CSP（Corporate Service Provider）监管政策**，\
> **视频身份核验成为强制要求**，跨境公司注册正式进入“强合规时代”。

***

### 一、什么是 CSP？

**CSP（Corporate Service Provider，企业服务提供商）**\
是指为企业或个人提供以下服务的机构：

* 公司注册与注销
* 董事 / 股东 / 实控人备案
* 年审、秘书服务
* 股权与公司结构变更

在跨境电商、海外架构、国际结算中，新加坡 CSP 一直是重要入口。

***

### 二、新政策核心变化（重点）

自 **2025 年 6 月 9 日起**，新加坡监管机构正式实施新版 CSP 管理规则，核心变化包括：

#### ✅ 视频身份核验（Video KYC）强制化

* 所有 **董事、股东、实际控制人**
* 必须通过 **实时视频方式完成身份确认**
* 不再接受“仅文件提交”的远程注册模式

#### ✅ 实控人透明化要求升级

* 明确披露 Ultimate Beneficial Owner（UBO）
* 严打代持、挂名董事、隐性股权结构

#### ✅ CSP 责任加重

* CSP 需对客户身份真实性负责
* 合规留档、核验记录需可追溯

***

### 三、政策背后的真实目的

#### 1️⃣ 打击“壳公司 + 隐性股东”

过去依赖：

* 名义董事
* 模糊股权结构
* 低成本快速注册

的新加坡“壳公司模式”，将大幅受限。

#### 2️⃣ 对齐全球反洗钱趋势

* 与 **FATF（反洗钱金融行动特别工作组）** 标准接轨
* 配合 **CRS（共同申报准则）**、国际税务信息交换体系

#### 3️⃣ 提升新加坡金融体系信誉

* 减少被滥用于洗钱、逃税、灰色资金通道
* 强化“可信司法辖区”形象

***

### 四、对企业和客户的实际影响

#### ❗ 注册成本上升

* 时间更长
* 审核更严格
* 材料准备更复杂

#### ❗ 低质量中介将被淘汰

* 无资质 CSP
* “包过”“免到场”服务 将基本消失。

#### ✅ 合规企业反而受益

* 合规架构更稳定
* 银行开户、支付通道成功率提升
* 长期经营风险更低

***

### 五、应对建议（实操向）

#### ✅ 1. 提前准备视频 KYC

* 护照 / 身份证原件
* 稳定网络环境
* 清晰说明公司业务逻辑

#### ✅ 2. 明确股权与控制结构

* 避免复杂嵌套
* 实控人信息保持一致、可解释

#### ✅ 3. 选择正规持牌 CSP

* 确认 CSP 是否 **ACRA 持牌**
* 是否具备跨境合规经验
* 是否能提供完整留档记录

#### ✅ 4. 重新评估“壳公司”价值

* 若无真实业务
* 建议谨慎布局，避免未来合规成本失控

***

### 六、总结

新加坡 CSP 新政释放了一个非常明确的信号：

> **低透明度的跨境架构时代正在结束，**\
> **合规、真实、可审计将成为默认门槛。**

短期看是成本上升，\
长期看是对真正做全球业务者的 **制度红利**。

***

**End.**


# Singapore CSP Regulation Update: Mandatory Video Verification and Enhanced Cross-Border Compliance

> **Executive Summary**\
> Starting from **June 2025**, Singapore has significantly upgraded its **Corporate Service Provider (CSP)** regulatory framework.\
> **Mandatory video identity verification (Video KYC)** is now required, marking a clear shift toward stricter transparency and global compliance standards.

***

### 1. What Is a CSP?

A **Corporate Service Provider (CSP)** is an entity authorized to provide corporate and administrative services, including:

* Company incorporation and dissolution
* Director, shareholder, and beneficial owner registration
* Corporate secretarial and annual filing services
* Shareholding and structural changes

Singapore CSPs have long played a key role in cross-border business structures, e-commerce, and international holding arrangements.

***

### 2. Key Regulatory Changes (Critical)

Effective **9 June 2025**, Singapore has enforced a new CSP regulatory regime with the following core changes:

#### ✅ Mandatory Video Identity Verification (Video KYC)

* All **directors, shareholders, and ultimate beneficial owners (UBOs)**
* Must complete **real-time video identity verification**
* Document-only or fully remote registrations are no longer sufficient

#### ✅ Enhanced Beneficial Ownership Transparency

* Clear identification and disclosure of UBOs
* Strict scrutiny of nominee arrangements and indirect control structures

#### ✅ Increased CSP Accountability

* CSPs are now directly responsible for identity verification accuracy
* Verification records must be complete, auditable, and traceable

***

### 3. Regulatory Intent Behind the Policy

#### 1️⃣ Crackdown on Shell Companies and Hidden Ownership

The traditional model relying on:

* Nominee directors
* Opaque ownership layers
* Low-cost, fast incorporations

is being systematically dismantled.

#### 2️⃣ Alignment with Global AML Standards

* Convergence with **FATF (Financial Action Task Force)** requirements
* Reinforcement of **CRS (Common Reporting Standard)** and international tax transparency

#### 3️⃣ Protection of Singapore’s Financial Reputation

* Reduced risk of money laundering and regulatory arbitrage
* Strengthening Singapore’s position as a trusted global financial hub

***

### 4. Practical Impact on Businesses and Clients

#### ❗ Higher Incorporation and Maintenance Costs

* Longer onboarding timelines
* More rigorous due diligence
* Increased compliance documentation

#### ❗ Elimination of Non-Compliant Intermediaries

* Unlicensed CSPs
* “No-show” or “guaranteed approval” incorporation services

will largely disappear.

#### ✅ Long-Term Benefits for Compliant Businesses

* Higher success rates in bank account opening
* Improved payment and settlement access
* Lower long-term regulatory risk

***

### 5. Practical Recommendations

#### ✅ 1. Prepare for Video KYC in Advance

* Valid passport or government-issued ID
* Stable internet and proper video environment
* Clear explanation of business activities

#### ✅ 2. Simplify and Clarify Ownership Structures

* Avoid unnecessary complexity
* Ensure UBO information is consistent and defensible

#### ✅ 3. Work Only with Licensed CSPs

* Verify **ACRA licensing status**
* Assess cross-border compliance experience
* Ensure proper record-keeping and audit readiness

#### ✅ 4. Reassess the Value of Shell Structures

* Companies without genuine operations should carefully reconsider
* Future compliance costs may outweigh short-term convenience

***

### 6. Conclusion

Singapore’s CSP regulatory upgrade sends a clear signal:

> **The era of low-transparency cross-border structures is ending.**\
> **Compliance, substance, and auditability are now the baseline.**

While short-term costs may increase,\
this shift ultimately benefits businesses committed to long-term, compliant global operations.

End.


# Telegram 群发消息指南：向群组成员批量私信与广播

想做 **Telegram 群发消息**，你通常有两种需求。 一种是给 **Telegram 群组成员批量私信**。 另一种是对 **频道/群组广播消息**。

Telegram 本身并不提供“选中所有成员后一键私信”的官方能力。 所以市面上出现了 Telegram 群发工具、群发机器人、脚本与扩展。 这些工具常见能力是抓取成员信息、筛选受众、批量发送私信或自动转发。

下面整理了 **6 种向 Telegram 群组成员群发消息** 的方法。 它们覆盖 Windows、Android、Python 脚本和 Chrome 扩展。 你也会看到一种“广播式”的自动转发方案。

{% hint style="warning" %}
请合理使用 Telegram 群发与批量私信。 频繁骚扰、诱导或垃圾信息，会带来举报、封禁与品牌损失。
{% endhint %}

#### 企业为何应该使用 Telegram 发送批量消息？

Telegram 营销通常成本更低。 它适合做私域触达、活动通知、线索转化与客户运营。 做 Telegram 批量消息发送的常见收益如下。

* **定位小众受众（群组/频道人群）**\
  Telegram 群组和频道天然按兴趣聚类。 加入相关群组，能更快接触垂直人群。
* **更高的触达与打开率（即时通讯）**\
  Telegram 是 IM。 消息直达用户，反馈周期更短。
* **自动化运营（机器人/脚本）**\
  你可以用机器人做回复、分流、打标签与流程自动化。 也能用脚本批量执行重复动作。

![Telegram 群发消息工具示意图：批量私信与广播](/files/4f66efb1bc898d405618d55cc0ee60f1ad756c37)

{% stepper %}
{% step %}

### vUser Telegram 批量发送机器人

Virtual-User（vUser）是一类典型的 **Windows Telegram 群发软件**。 它主打批量发送与自动化操作。 你可以把它当成“群发私信工具 + 成员采集工具”的组合。

它通常支持从群组提取 ID。 也支持向用户名、ID 或手机号发送私信。 部分版本会提供限速与防封建议。

相关链接：\
<https://help.nextcli.com/blog/telegram-qun-fa-xiao-xi-zhi-nan-xiang-qun-zu-cheng-yuan-pi-liang-si-xin-yu-guang-bo#id-1.-vuser-telegram-pi-liang-fa-song-ji-qi-ren>
{% endstep %}

{% step %}

### 适用于 PC 的 Telegram 群发消息工具（批量私信）

Telegram Sender — 一款适用于 Windows PC 的软件，用于向 Telegram 群组或频道成员批量发送消息。只需单击一下，即可向所有 Telegram 用户发送消息。您可以手动添加用户，也可以从文件中导入。

无论你是否是管理员，它都能帮你提取群组中所有用户的用户ID。

相关链接：\
<https://telegramsender.com/\\>
<https://help.nextcli.com/blog/telegram-qun-fa-xiao-xi-zhi-nan-xiang-qun-zu-cheng-yuan-pi-liang-si-xin-yu-guang-bo#id-2.-shi-yong-yu-pc-de-telegram-qun-fa-xiao-xi-gong-ju-pi-liang-si-xin>
{% endstep %}

{% step %}

### 适用于 Android 的 Telegram 群发消息器（逐个发送）

PackGramar 是一款适用于安卓手机的免费应用，用于批量发送 Telegram 消息。您可以搜索感兴趣的 Telegram 群组，輸入个性化消息，然后逐个发送给每位成员。

它还能获取收到您信息的用户的详细信息。

相关链接：\
<https://play.google.com/store/apps/details?id=com.telegraph.telegram\\>
<https://help.nextcli.com/blog/telegram-qun-fa-xiao-xi-zhi-nan-xiang-qun-zu-cheng-yuan-pi-liang-si-xin-yu-guang-bo#id-3.-shi-yong-yu-android-de-telegram-qun-fa-xiao-xi-qi-zhu-ge-fa-song>
{% endstep %}

{% step %}

### Telegram 批量消息 Python 脚本（自动化私信）

使用自定义 Python 脚本也是一种常见方法。 例如本文提到的 GitHub 脚本使用 Telegram 桌面应用程序发送消息。要使此脚本正常工作，您需要一个包含所有要发送消息的 Telegram 用户名的 Excel 表格。

设置完成后，登录 Telegram 桌面版并运行脚本，脚本会读取 Excel 表格并逐一发送配置好的消息。

相关链接：\
<https://github.com/inforkgodara/telegram-automated-bulk-messages\\>
<https://help.nextcli.com/blog/telegram-qun-fa-xiao-xi-zhi-nan-xiang-qun-zu-cheng-yuan-pi-liang-si-xin-yu-guang-bo#id-4.-telegram-pi-liang-xiao-xi-python-jiao-ben-zi-dong-hua-si-xin>
{% endstep %}

{% step %}

### Chrome 扩展程序：抓取成员并群发 Telegram 消息

BulkTele Chrome 扩展程序可以从 Telegram 群组中抓取成员用户名，并向他们发送批量消息。 它也支持提取竞争对手群组的用户名，并批量邀请他们加入你自己的群组。

相关链接：\
<https://chrome.google.com/webstore/detail/bulktele-mass-invite-%20-me/lkabifackfijfdhlemldnjmipmgcacno\\>
<https://help.nextcli.com/blog/telegram-qun-fa-xiao-xi-zhi-nan-xiang-qun-zu-cheng-yuan-pi-liang-si-xin-yu-guang-bo#id-5.-chrome-kuo-zhan-cheng-xu-zhua-qu-cheng-yuan-bing-qun-fa-telegram-xiao-xi>
{% endstep %}

{% step %}

### Telegram 自动转发器（广播式群发）

自动转发 Telegram 机器人是一种替代批量私信的方案。它可以接收来自群组、频道或个人用户的消息，並将其转发给选定的 Telegram 用户，且可在转发前翻译和自定义消息。

适合需要开展交易或自动化 Telegram 营销的用户。

相关链接：\
<https://sktechhub.com/auto-forward\\>
<https://help.nextcli.com/blog/telegram-qun-fa-xiao-xi-zhi-nan-xiang-qun-zu-cheng-yuan-pi-liang-si-xin-yu-guang-bo#id-6.-telegram-zi-dong-zhuan-fa-qi-guang-bo-shi-qun-fa>
{% endstep %}
{% endstepper %}

#### 如何选择 Telegram 群发工具（减少封禁与举报风险）

优先看这几个点。

* 发送方式：批量私信、群组广播、还是自动转发。
* 人群来源：是否支持从群组/频道导入成员用户名与 ID。
* 限速与间隔：能否设置随机间隔、每日上限、分批发送。
* 内容能力：变量模板、个性化字段、A/B 文案。
* 账号安全：多账号轮换、代理支持、错误重试与日志。

{% hint style="info" %}
你发的越“像真人”，越不容易触发风控。 优先做分组、分批、低频触达。
{% endhint %}

#### 总结

Telegram 群发消息适合做低成本触达。 你可以用群发工具批量私信群组成员，也可以用自动转发做“广播式”分发。

#### 常见问题（FAQ）

<details>

<summary>Telegram 可以直接群发私信给群组所有成员吗？</summary>

Telegram 没有官方“一键群发私信”能力。 通常需要第三方工具或脚本逐个发送。

</details>

<details>

<summary>Telegram 群发会被封号吗？</summary>

高频、重复文案、被多人举报时，风险会上升。 用限速、分批、人群筛选和个性化文案能降风险。

</details>

<details>

<summary>给非联系人发消息可以吗？</summary>

能否成功取决于对方隐私设置与账号状态。 先做价值交换式触达，避免硬广开场。

</details>

原文与更多信息：\
<https://help.nextcli.com/blog/telegram-qun-fa-xiao-xi-zhi-nan-xiang-qun-zu-cheng-yuan-pi-liang-si-xin-yu-guang-bo>

Last updated 3 hours ago


# How to Send Bulk Messages to Telegram Group Members? -Broadcast Telegram Messages

Although Telegram is feature-rich, sending bulk messages to Telegram group members can be frustrating. There’s no easy way to select all users at once and broadcast your message.

Custom-made Telegram tools (apps, bots, and scripts) can scrape target audience details from different groups, segment users, and send automated direct messages.

In this article, we provide five (plus one additional) ways to send bulk messages to Telegram group members. Using these tools, you can find niche target audiences and get high open rates for your messages.

Let’s dive in.

#### Why should businesses use Telegram to send bulk messages?

Telegram marketing is cost-effective to reach your target audience. In a time when people are averse to promotional messages, Telegram still allows direct outreach. Some benefits:

* Find niche audience\
  Telegram is ideal for finding and targeting niche audiences. By joining the right groups and channels, you can grow a relevant user base for your business marketing.
* Get high open rates\
  Telegram is a messenger app, so messages reach users directly. That speeds organic growth and brings leads faster.
* Automate tasks\
  Telegram supports bots for many tasks. You can create custom bots to automate processes and engage your audience.

#### Five ways to send bulk messages to Telegram group members

Following are the ways to use Telegram bulk message sender tools.

![](/files/d8617e6cbb704c9b6086bc6be8db375326cb0ee5)

{% stepper %}
{% step %}

### vUser Telegram Bulk Sender Bot

The first and best software for sending bulk messages in Telegram is the Virtual-User software, which has more features than many competitors. This software is installed on your Windows system and sends as many messages as you want. It is not free but is reasonably priced.

Features:

* Extract IDs from groups and send direct messages to IDs or mobile numbers.
* Add IDs or send messages to groups automatically.
* Includes a tutorial with tips and tricks to avoid being blocked or reported.
  {% endstep %}

{% step %}

### Telegram bulk message sender for PC

[Telegram Sender ↗](https://telegramsender.com/) is a Windows PC software to send bulk messages to Telegram group or channel members. You can add users manually or import them from a file.

It helps you extract the user ID of all users from groups, whether you’re the admin or not—useful to reach competitor group members too.
{% endstep %}

{% step %}

### Telegram bulk message sender for Android

[PackGram ↗](https://play.google.com/store/apps/details?id=com.telegraph.telegram) is a free Android app to send bulk Telegram messages. You can search for Telegram groups, type a personalized message, and send it to each member individually.

With one tap, all Telegram group members receive your promotional message. You can also get details of the users who received your message.
{% endstep %}

{% step %}

### Python script to send bulk messages on Telegram

A custom Python script is another option. [Here’s one from GitHub ↗](https://github.com/inforkgodara/telegram-automated-bulk-messages) that uses the Telegram Desktop app to send messages. For this script, you’ll need an Excel sheet with all Telegram usernames.

Once set up, log into Telegram Desktop and run the script. The script reads the Excel data and sends the configured message to each user one by one.
{% endstep %}

{% step %}

### Chrome extension to send bulk Telegram messages

[BulkTele ↗](https://chrome.google.com/webstore/detail/bulktele-mass-invite-%20-me/lkabifackfijfdhlemldnjmipmgcacno) Chrome extension is an easy way to send bulk messages to Telegram group members. It can scrape member usernames from a Telegram group and send marketing messages.

It can also extract usernames from competitor groups and mass-invite them to your own group—useful for growth via Telegram marketing.
{% endstep %}

{% step %}

### Telegram bulk message auto forwarder

[Auto forwarder Telegram bot ↗](https://sktechhub.com/auto-forward) forwards messages from groups, channels, or individual users to selected Telegram users. It can translate and customize messages before forwarding—helpful for deals or automated marketing.
{% endstep %}
{% endstepper %}

{% hint style="warning" %}
Use Telegram bulk messaging sensibly to build respectful relationships with your customers. Communicate about launches or offers, but avoid sending spam. Spam can harm your reputation and business.
{% endhint %}

#### Wrapping it up

Telegram bulk messaging is an affordable and efficient way to reach your target market. It’s one of the easiest ways to promote products and services. Using custom tools, you can extract user details and send bulk messages to Telegram group members quickly.

Previous: Telegram 群发消息指南：向群组成员批量私信与广播 ↩︎

Last updated 3 hours ago